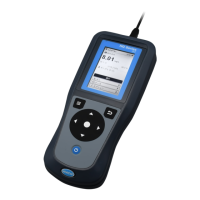
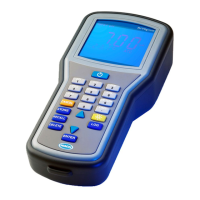
Figure 7 Display
1 Data log indicator 10 Data storage memory location
2 Temperature and data values 11 Automatic temperature compensation (ATC) value
(pH, conductivity, TDS or salinity)
3 Measured value 12 Calibration mode indicator
4 Stabilization lock 13 Temperature unit
5 Hold indicator 14 Low battery indicator
6 ISFET probe indicator 15 Bluetooth
™
connection indicator
7 Measurement mode 16 PC data transfer icon
8 Measurement units 17 Setup mode
9 Storage options
Startup
Set the power to on
Push the power button to set the power to on or off. Make sure that the power supply (AC power or
battery power) is correctly installed.
Configure the meter
Do the operations in order:
1. Set the power to on.
2. Push SETUP to put the meter in setup mode.
3. Use the arrow keys to select an option, then push ENTER:
Option Function Description
CLr ALL
CAL
Clear calibration
points
Erases all the calibration points. Make sure to calibrate the meter.
1
int Data log interval Keeps up to 999 data points in intervals from 1 to 1999 seconds (default =
10) in the data log.
year Year Use the number keys to enter the correct year.
14 English
 Loading...