1
2
Attaching and removing the viewnder 1
While holding the viewnder at a slight angle and resting it on the top of the camera,
slide the viewnder forward until the front locating pin is in position in the recess in the
front edge of the viewnder screen aperture on camera body. Press the rear part of the
viewnder rmly downwards until it clicks into place.
Ensure that both sides of the viewnder are seated correctly and that it has been rmly
attached and locked into position. Failure to do so could cause an intermittent malfunc-
tion if the databus interface connections between the viewnder and camera body are
not positively secured.
To remove, grasp the viewnder in the right hand and while depressing the viewnder
release button, li the rear of the viewnder up and away from the camera body.
Eyepiece adjustment 2
No corrective lenses are needed to adjust the eyepiece to suit most requirements. e
diopter range is from -5 to +3.5. Eyeglass wearers can rapidly and accurately change the
settings according to whether they wish to wear eyeglasses for viewing or not.
Personal eyepiece adjustments can be carried out by pointing the camera at the sky or
similar smoothly toned area. While holding the camera in your le hand, you can with
your right thumb turn the adjustment wheel until the markings on the viewnder screen
reach the optimum sharpness for your eyesight.
If you normally wear eyeglasses for distance viewing and intend to wear them for camera
use then do not remove them for the above procedure. If, on the other hand, you prefer
to remove your eyeglasses for camera work, then repeat the above procedure without
wearing your eyeglasses.
Rubber eye cup
Two rubber eye cups are available for the H3D. e one supplied is suitable for users who
do not intend to use eyeglasses when photographing. e second shorter eye cup is for
those who either prefer to position their eye further from the viewnder and those who
wish to wear eyeglasses.
e eye cups can be rapidly changed by a Hasselblad Authorized Service Center.
Integral ash unit
See section on ‘Flash’ for full details.
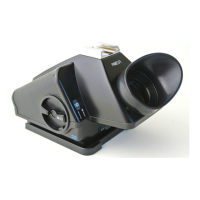
The HVD 90X viewnder (supplied) is most suitable for digital capture as it corresponds
to the actual digital sensor area. If you work with a lm back and want to see the
whole of the capture area (slightly larger than the sensor area) then you might prefer
to use an HD 90X viewnder instead (as well as the Focusing screen HS-standard that
has lm area markings).
23
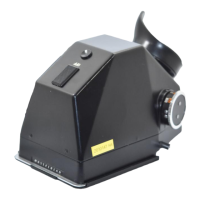
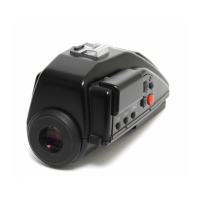
A B C D E F G H
1
2
A. Rubber eye cup D. Exposure compensation button G. Flash unit button
B. Hot shoe E. Exposure method / mode button H. Viewnder release button
C. Eyesight adjustment wheel F. Integral ash unit
 Loading...