5 / 148
EN CS SK PL HU
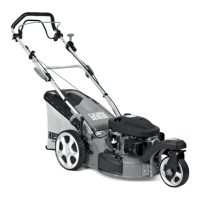
h
Grip Madlo Madlo Uchwyt Markolat
i
Clutch lever for
cutter
Páka ovládaní sečení
Páka ovládania
kosenia
Dźwignia włączania
ruchu listwy
Kaszálást irányító
kar
j
Safety lock Bezpečnostní páčka Bezpečnostná páčka
Dźwignia
bezpieczeństwa
Biztonsági kar
k
Starter handle Madlo startéru Madlo štartéra Uchwyt rozrusznika Indítózsinór
l
Fuel tank cap
Víčko palivové
nádrže
Viečko palivovej
nádrže
Zakrętka zbiornika
paliwa
Tanksapka
m
Engine cover Kryt motoru Kryt motora Osłona silnika Motor burkolat
n
Air filter Vzduchový filtr Vzduchový filter Filtr powietrza Levegőszűrő
o
Wheel Kolo Koliesko Koło Kerék
ILLUSTRATED GUIDE / OBRAZOVÁ PŘÍLOHA / OBRAZOVÁ
PRÍLOHA / ZAŁĄCZNIK ZDJĘCIE / ÁBRÁS ÚTMUTATÓ
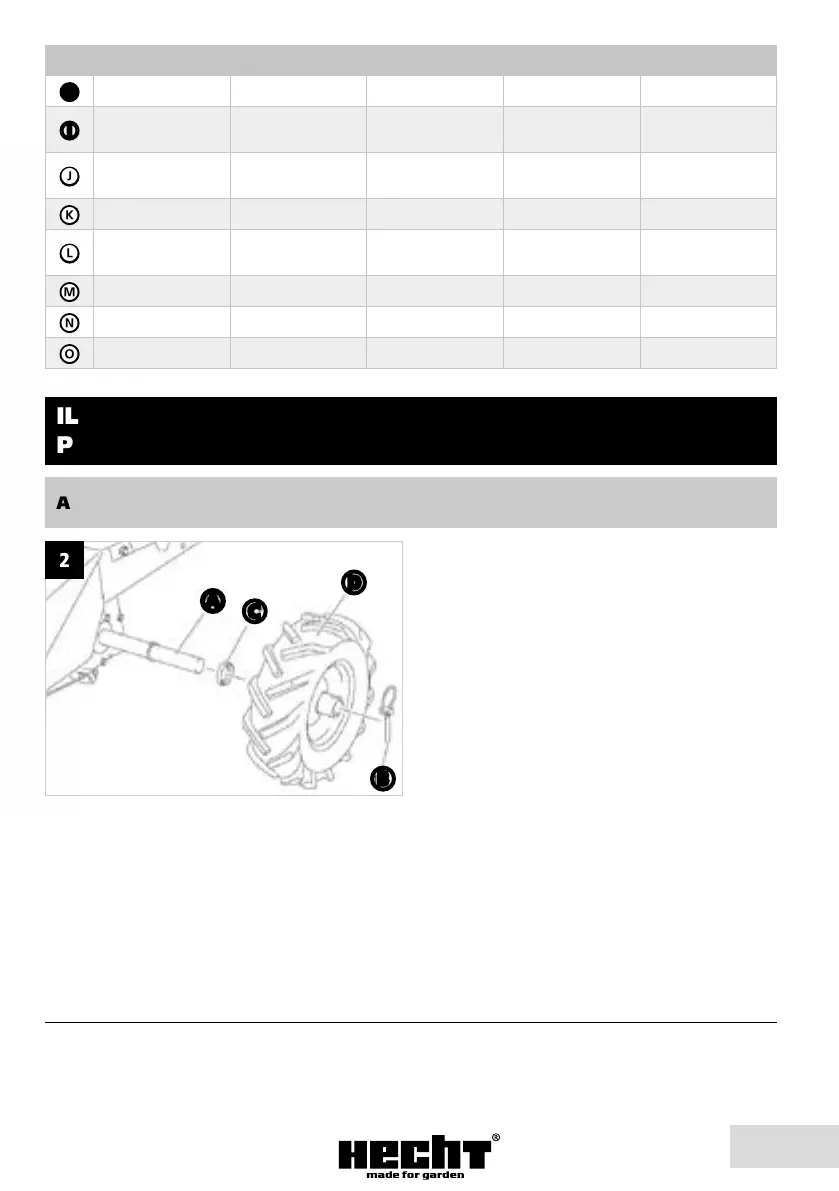
Wheels: If necessary, first remove the linchpin (B) from
the drive shaft (A). Push the protective cap (C) onto
the drive shaft. Slide the wheel (D) on the shaft - with
the valve facing outward. Push the linchpin through
the holes in the rim of the wheel and the drive shaft. Close
the linchpin. Follow the same procedure on the other side.
Kola: V případě, že je na poloose (A) nasazena závlačka
(B), nejprve ji vyjměte. Na poloosu nasaďte ochrannou
podložku (C). Nasuňte na poloosu kolo (D) - ventilkem
ven. Zarovnejte otvor v ráfku a v poloose a provlékněte
otvorem závlačku. Následně závlačku zajistěte. Na druhé
straně postupujte stejným způsobem.
ASSEMBLY / MONTÁŽ / MONTÁŽ / MONTAŻ / ÖSSZEÁLLÍTÁS
Assembly
Mounting the wheels
WARNING
Risk of injury!
Make sure that the linch pin closes fully.
CAUTION
Product damage!
Pay attention to the running direction of the wheel.
The profile of the wheels must point forward in travel direction.
CAUTION
Product damage!
Always make sure that the tyres have the correct air pressure.
– Push the protectve cap (17) onto the drve
shaft (16).
– Push the wheel (7) with the valve facng
outwards onto the drive shaft (16). If
necessary, first remove the linch pin (18) from
the drive shaft (16).
– Push the linch pin (18) through the hoes in
the rim of the wheel (7) and the drive shaft
(16).
– Close the linch pin (18).
– Repeat the procedure on the other side.
Mounting the arm housing
– Unscrew the screws (19) with the circlip
and the washer on both sides of the product.
– Place the arm housing (4) onto the
product and screw down to the product again
with the screws (19).
2
a
c
d
b
Kolesá: V prípade, že je na poloosi (A) nasadená závlačka (B), dajte ju dole. Na poloos nasaďte ochrannú podložku (C).
Nasuňte na poloos koleso (D) ventilkou smerom von. Zarovnajte otvor v ráfiku a v poloosi a prevlečte otvorom závlačku.
Potom ju zaistite. Na druhej strane postupujte rovnakým spôsobom.
Koła: Jeśli na półosi (A) jest zamontowana zawleczka (B), najpierw ją zdejmij. Zainstaluj na półosi podkładkę ochronną
(C). Wsuń na półoś koło (D) - wentylem na zewnątrz. Dopasuj otwory w obręczy i w półosi i przejdź zawleczką przez otwór.
Następnie zablokuj zawleczkę. Z drugiej strony zrób to samo.
Kerekek:
Abban az esetben, ha a féltengelyen (A), telepítve van a sasszeg (B), először húzza ki azt. A féltengelyre telepítse
a védőalátétet (C). Tolja rá a féltengelyre a kereket (D) – szeleppel kifelé. Hozza egyvonalba a felnin és a féltengelyen
található nyílást és húzza át rajta a sasszeget. A továbbiakban rögzítse a sasszeget. A másik oldalon azonos módon járjon el.