26
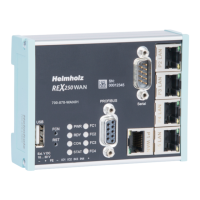
11. LED displays
SF Solid light: Indicates a fault in the router
(checkthelogatthewebinterfaceunder"Status"-"System")
Con
VPN
Off:ThereisnoactiveInternetorVPNconnection
Solid light:Internetconnectionactive,butVPNconnectioninactive
Rapid ashing (3Hz):TherouterisattemptingtoestablishanInternet
or VPN connection
Flashing (1.5Hz):VPNconnectionisactive
RxD Solid light: MPI/PROFIBUS communication is OK.
Flashing together with Rdy:Acongurationisbeingloadedfromthe
USB port
TxD Flashing:DataisbeingtransferredontheMPI/PROFIBUSinterface
Rdy Readiness indicator
(this LED must show a solid light after a max. of 110 s)
ON Indicator light for the power supply
12. Restoring the REX 300 router to its default settings
In order to reset the REX 300 to the factory settings, the following steps are neces-
sary:
- Switch on REX 300.
- Wait until the SF LED lights up.
- Press the Dial Out button and hold it down for about 10 to 15 seconds until the
TxD LED shows a green light
- BrieypresstheDialOutbuttonagain;theRxDLEDwilllightup.
- BrieypresstheDialOutbuttononceagain;theTxDLEDwillshowanorange
light.
- Finally, press the Dial Out button one last time.
Youhavenowdeletedtheentireconguration.YourREX300unithasbeenrestored
toitsdefaultsettingsandcanbereconguredatthispoint.
Important: The IP address of the REX 300 LAN interface is reset to 192.168.0.100/24.
13. FirmwareupdateusingaUSBashdrive
Note: The rmware le must be stored in the root directory of your USB ash drive. In
addition, no valid conguration le may be found in the root directory when carrying
out this action. A disruption of the supply voltage during the transfer can switch the
router to an undened status.
- LoadthermwareleontoastandardFAT-formattedUSBashdrive.
- Switch the REX 300 on and wait until the boot process is completed (Rdy & ON
LEDs are lit up continuously).
- Plug the USB stick into the appropriate USB terminal on the REX 300.
- WaituntiltheRxDLEDbeginstoash.
- PresstheDialOutbuttonandholditdownuntiltheTxDLEDashes.TheREX300
hasrecognizedthermwarele.
- Release the Dial Out button.
- IfaUSBashdrivewithvalidrmwareisfound,thecongurationwillbetrans-
ferredfromtheashdrivetotherouter.Duringtransmission,theTxDLEDashes.
- The RDY LED and the ON LED will show a solid light as soon as the process is com-
plete.ArestartoftheREX300isnotrequired.
14. AlternativecongurationwithoutmyREX24-V2
portal
IfyouwouldliketousetheREX300withoutour"myREX24"cloudserver,youcan
also use other OpenVPN software or, for example, set up the IPsec encryption em-
bedded in your hardware.
Ifyouhaveactivatedtheselectionfortheclassicrouterinthe"FirstStart"screen,you
reachthecorrespondingstep-by-stepconguratorofthewebinterfacethroughthe
"Assistants"menupointinthetoprightcorner.
Note: Manual conguration is also possible. We provide detailed installation examples
for the versions named above in the download area of our homepage.