Coaxial Video Cable shell
Notes:
RS-485: For control device connection (keyboard, DVR,
matrix, etc.).
Alarm Input/Output: the ALARM IN and ALARM GND work
in pairs for alarm input. The ALARM OUT1 and ALARM
OUT2 work in pairs for alarm output.
RS-232: For implement debugging, upgrade and control.
Coaxial Video Cable: For locally analog video signal output.
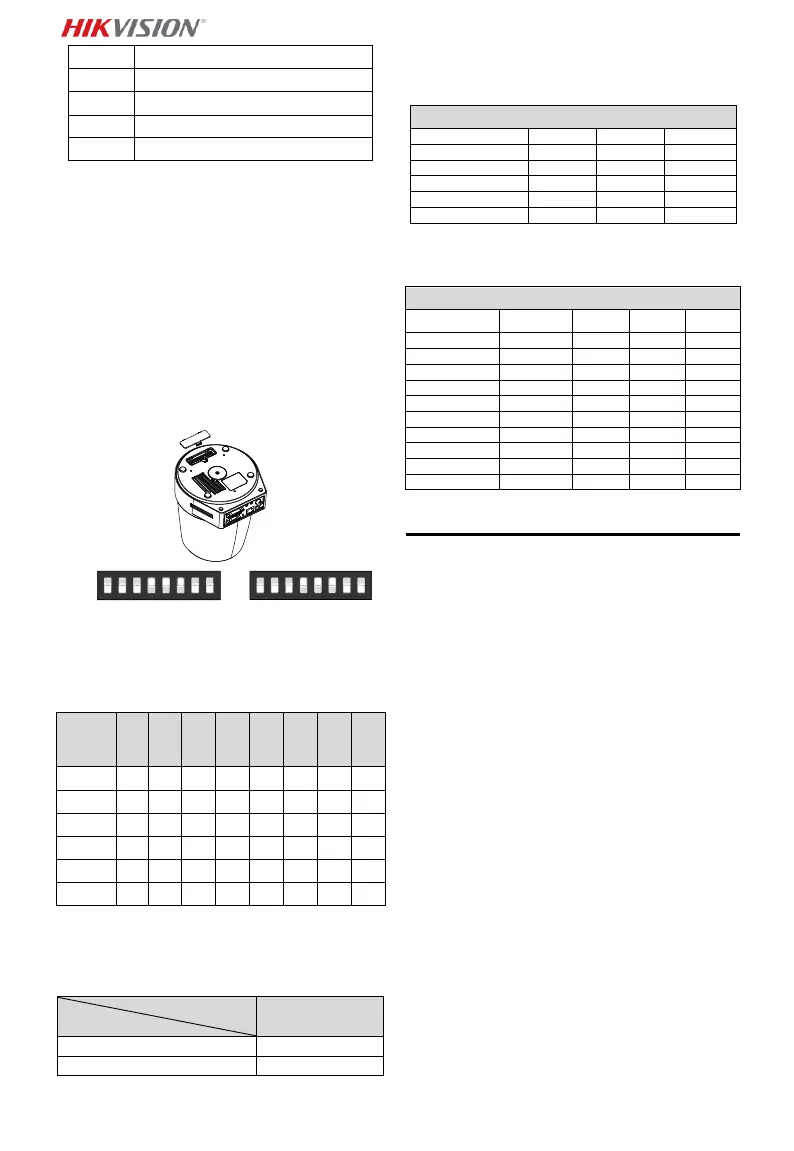
1.2.7 DIP Switch Settings
Two DIP switches SW1 and SW2 are for setting the speed
dome address, baudrate, protocol, etc., with value ON=1 and
OFF=0. The switch label is on the back of the SWITCH cover as
shown below.
Each number of the switch represents a DIP value, ranging
from 1 to 8 for the lowest to highest.
Note:
The default dome address is 0; the default baudrate is 2400;
the default value of the 120Ω terminator is OFF.
Address Settings
The SW1 switch is used for setting the address of speed
dome.
Terminal Resistor Settings
The No. 1 of SW2 switch is used for turning on/off the
terminal resistor.
Note:
The o-ring in the groove of the switch cover is for waterproof.
Switch Number
Description
Baudrate Settings
The No. 2, 3 and 4 of SW2 switch are for setting the baudrate
of the speed dome, standing for 2400bps, 4800bps and
9600bps respectively. The baudrate will be set as 2400bps by
default if it is out of this range. Refer to the following table:
DIP Switch SW2-Baudrate Settings
Resolution Settings
The position 5, 6, 7 and 8 of DIP Switch SW2 are for setting
the video resolution.
DIP Switch SW2-Resolution Settings
2 Installation
Before you start:
Check the package contents and make sure that the device in
the package is in good condition and all the assembly parts
are included.
We highly recommend that before installation, you apply
power to the speed dome to test it and make sure it can work
normally.
Make sure the speed dome is power off before you perform
wiring and installation.
2.1 Wiring
The survey of the actual installation environment and
planning the wiring is highly recommended before the
accurate deployment of the wire is implemented in order to
provide a safe and steady power supply and a reasonable
wiring route.
Get familiar with the installation environment before
deploying the wire, including the wiring distance,
surrounding, and electromagnetic interference and so
on.
Choose the cable with nominal voltage higher than the
actual voltage to ensure a normal running in case of
unsteady voltage.
To protect the power cable and the signal transmitting
cable from human tampering, you should pay attention
to the protection and reinforcement of the cables.
When deploying the wire, do not tighten the wire or
make the wire loose.
The wiring of the speed dome should be performed by
professionals.
2.2 Wall Mounting for Type A
Steps:
1. (Optional) Install a memory card.
 Loading...