7 Gateways for building management systems
HARC-BX E
TCGB0106 rev.0 - 12/2014
669669
7
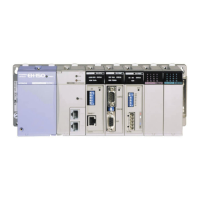
7.4.2.3 Description of the parts
HARC-BX E unit components
1
2
3
4
Power supply terminal to connect a AC220~240V power supply
Earthing terminal.
Terminal board for the transmission of the unit to connect the H-Link
Terminal board for the upper system, to connect the transmission cable for
the upper monitoring system
Control panel components
MCLR
LON- SERV.
AC AC E
LON / H-LINK
LON/H-LINK
LON H-LINKLON H-LINK
PSW (Push Switch) No. 1 (M.CLR): Press the button to check the quantity
of connected units.
7-segment display (1*): This indicates the current HARC-BX E status.
PSW No. 2 (LON-SERV): Press the button (PSW) to transmit the Neuron
ID. (Service pin)
8P DSW (DIP Switch) No. 1 (S201) (2*): Setting the system of HARC-BX E
DIP switches.
8P DSW No. 2 (S202) (3*): DIP switch (DSW) for setting the functions of
the HARC-BX E.
Power supply LED (PWR): The light is ON when electricity is supplied.
Transmission LED (H-L): Transmission status with H-LINK
¨
Upper monitoring system transmission LED (LON): Transmission status
with the upper monitoring equipment
(1*) 7-segment display: Read the “Check mode” and “Indication of abnormal conditions” sections for details on the 7-segment display.
(2*) 8P DSW No. 1 S201: Read the “DIP switch adjustment” section for further information and for HARC-BX E functions.
(3*) 8P DSW No. 2.S202: Read the “DIP switch adjustment” section. 8P DSW No. 1 and No. 2 are used for the self-check. For further
details, refer to the “HARC-BX E self-check” section.

 Loading...