16 Installation Instructions MB-Secure 1000/2000/3000/4000/5000/6000
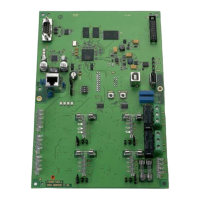
10 = * Wire bridges for connecting/disconnecting +U_B within I-BUS
11 = * Plug for connection cable (I-BUS) to the next module
12 = Power supply unit connection points
13 = * BUS-2 connection points
14 = Grounding bridges (see chapter Grounding/shielding)
15 = Contact area for shield connection to the mounting bottom
16 = Analog telephone connection
17 = Connection points armed/disarmed
Input “armed/disarmed" has to be permanent connected with 0 V” (solder in bridge)!
18 = * Input channels e1 - e8
19 = * Semiconductor-outputs parallel indicators
20 = * Connection for indicator PCB
21 = Jumper J5
22 = Headphone connector socket
23 = Microphone connector socket
24 = LEDs Ethernet status
25 = Jumper J6
26 = Jumper J1 to J4
27 = LEDs Device status
* = Not relevant for MB-Secure applications.
When connecting via the serial interface, at most 1 module can be used for each control panel.
You can find detailed information about connection and configuration in the installation instructions for
DS 6700 / DS 6750.
2.6.2.1 Connection of transmission device DS 6700/DS 6750 to MB-Secure computer/connection PCB
The 9-pole connection cable (computer PCB <-> transmission device) must be screwed with the PCBs
on both ends.
 Loading...