18 Installation Instructions MB-Secure 1000/2000/3000/4000/5000/6000
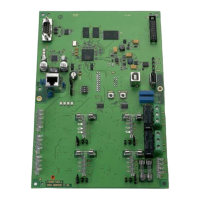
9 = * Serial S1 (TTL level)
10 = * Output “resuscitation” for RFW 2000
11 = * Wire bridge for connecting/disconnecting +U_B within I-BUS
12 = * Plug for connection cable (I-BUS) to the next module
13 = Power supply unit connection points
14 = Connection points armed/disarmed
Input “armed/disarmed" has to be permanent connected with 0 V” (solder in bridge)!
15 = Grounding bridge (See Chapter Grounding/shielding)
16 = Contact area for shield connection to the mounting bottom
17 = * BUS-2 connection points
18 = ISDN connection (connection to NT)
19 = ISDN connection (S
0
BUS for further end units)
20 = * Input channels e1 - e8
21 = * Semiconductor outputs for parallel indicators
22 = * Connection for indicator PCB
23 = Jumper J5
24 = LEDs ISDN status
25 = Jumper J7
26 = Jumper J8
27 = Jumper J9
28 = LEDs Ethernet status
29 = Jumper J10
30 = Jumper J1 to J4
31 = LEDs Device status
* = Not relevant for MB-Secure applications.
When connecting via the serial interface, at most 1 module can be used for each control panel.
You can find detailed information about connection and configuration in the installation instructions for
DS 7700.
2.6.3.1 Connection of transmission device DS 7700 to computer PCB
The 9-pole connection cable (computer PCB <-> transmission device) must be screwed with the PCBs
on both ends.
 Loading...