XNX Universal Transmitter Quick Start Guide
39
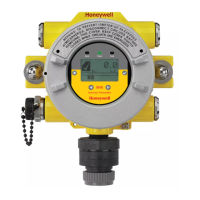
6 Powering the XNX for the First Time
6.1 XNX Units Configured for EC, mV, and IR (except Searchline
Excel)
After mounting and wiring the XNX, the plug in sensor should be fitted (if
equipped) and the installation visually and electrically tested as below.
WARNING
Prior to carrying out any work, ensure local and site procedures are followed. Ensure that the
associated control panel is inhibited so as to prevent false alarms. Minimum and maximum
controller alarm levels should not be set at less than 10% or greater than 90% of the full scale range
of the detector. CSA and FM agency limits are 60% LEL or 0.6mg/m
3
.
CAUTION
The following procedure should be followed carefully and only performed by suitably trained
personnel.
1. Checkthatthetransmitteriswiredcorrectlyaccordingtothis
manualandtheassociatedcontrolequipmentmanual.
2. Ifequipped,unscrewtheweatherproofcover,loosenthesensor
retainerlockingscrewandunscrewtheretainer.
3. Pluginthesensorcartridgetakingcaretoalignthesensorpinswith
theconnectorholesinthePCB.
CAUTION
For toxic sensors, remove the shorting clip from the bottom of the sensor prior to installation. For O
2
sensors, there is no shorting clip provided.
4. Retthesensorretainer,tightenthelockingscrewandretthe
weatherproofcover.
NOTE:
Before replacing the cover on the transmitter housing, coat the threads with
anti-seize compound to prevent corrosion buildup.
Also inspect the cover o-ring for cracking or any other defect that might
compromise the integrity of the seal. If it is damaged, replace with the o-ring
supplied in the accessory kit.
5. ApplypowertotheXNXwhichwillinturnprovidepowertothe
detector.
6. Thedetectoroutputwillbeforcedto3mA(defaultfault/inhibit).
7. TheXNXdisplaywillenterastartuproutinedisplayingthe
initializationscreen,thenthetransmitterloadsitsoperatingsystem,
datafromthesensorandchecksifitisthesametypetransmitter
andsensorsoftwareversionnumbers,gastype,thedetection
rangeandspancalibrationgaslevel,estimatedtimetonext
calibrationdue,andselftestresult.Theboot-upproceduretakes
approximately45seconds.TheLCDandLEDtestisperformedin
theinitializationafterpoweringon.AllLCDpixelsandLEDs(red,
 Loading...


