5. Hold the screw nut (5) vertically, with the open threads facing up, and drop the body (6) into
it, with the RJ-45 connector opening facing up.
6. Hold the clamp ring (3) vertically below the screw nut/body items and screw the body (6)
into the threads on the clamp ring (3). Tighten it only enough to stay attached. Note that the
screw nut (5) remains loose on the body (6).
7. Remove the white backing paper from one of the RJ-45 gaskets (8) and press the glued side
onto the body (6) being very careful to align the gasket (8) with the RJ-45 connector shape
on the body (6).
8. Remove the backing paper from the second RJ-45 gasket (8) and press it over the first one,
being sure to maintain alignment.
9. Hand tighten the threads between body (6) and clamp ring (3). DO NOT tighten between
clamp ring (3) and sealing nut (1). Do not over tighten. Do not tighten with tools.
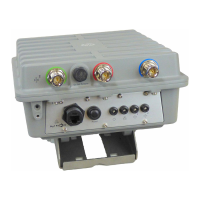
The connector assembly should now look like this when held horizontally, with the sealing nut
(1) at the left end, and the screw nut (5) over the body (6) on the right.
Figure 3 Weatherproof connector assembly
10. Carefully thread the cleanly-cut end of the Ethernet cable through the sealing nut (1) end of
the connector assembly, and push through approximately 30 cm (1 foot) of cable.
NOTE: The next two steps should be performed by someone with experience building Ethernet
cables.
11. Prepare the cable and attach it to the RJ-45 plug (7) according to the directions included with
your crimping tool.
12. Before continuing, test the cable with a portable Ethernet cable tester to ensure that the RJ-45
plug (7) is correctly connected.
13. Carefully pull the cable slack back through the connector assembly until the RJ-45 plug (7) is
almost touching the body (6). Adjust the cable position so that the RJ-45 plug (7) fits precisely
into the RJ-45 cutout in the body (6), and press down the plastic tab so the plug fits correctly.
14. Hand tighten the threads between sealing nut (1) and clamp ring (3), until the cable is firmly
anchored. Do not over tighten. Do not tighten with tools.
Installing cabling
According to your needs and local electrical codes and regulations, run Ethernet cabling, body
ground wire, and any separate grounding wires as needed for antenna lightning arresters as
described in the respective antenna guide to where the AP will be installed. For the Ethernet cable,
allow for an extra 0.6 meters (two feet) for connector attachment and drip loops. Install an Ethernet
surge suppressor (not supplied) according to its instructions at the location where the Ethernet cable
enters the building. This may not be necessary if the outdoor cable run is very short, for example,
when the AP is mounted on an outdoor wall. The AP includes a built-in Ethernet surge suppressor
for its end of the Ethernet cable.
8 Installing
 Loading...