16 17icklebubba.com icklebubba.com
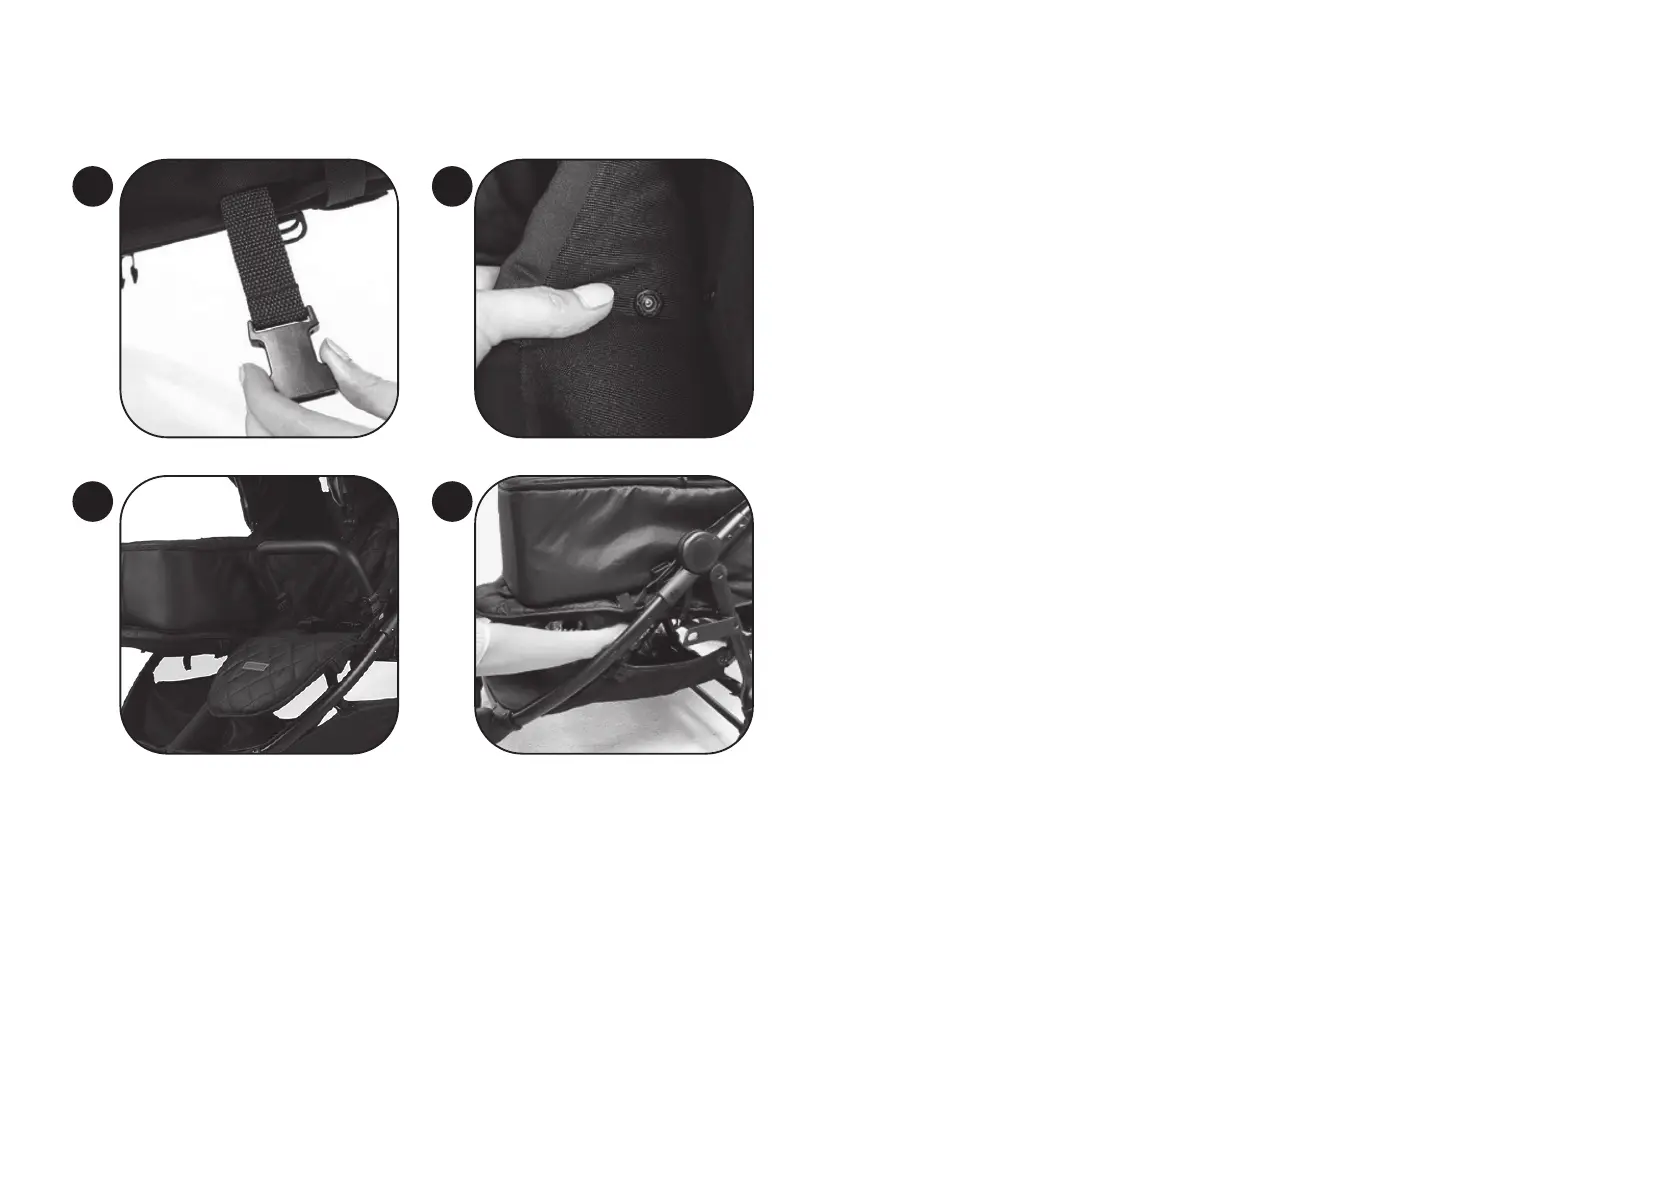
1
3
2
4
Using the Newborn Cocoon / Utiliser le cocon du nouveau-né
Verwendung des Neugeborenenkokons / Uso del capullo recién nacido
Using the Newborn Cocoon
PLEASE MAKE SURE ALL HARNESS PADS AND CROTCH PADS
ARE REMOVED BEFORE FITTING THE COCOON.
1. The bumper bar will need removing to fit
the cocoon. When raising the calf rest
make sure it is raised to the lie flat
position not too high or low. Thread
the attachment belt on the bottom of
the cocoon through the sides of the
seat and buckle underneath. There
are slots in the seat fabric at both
ends to guide the belt through.
2. Attach the studs on the cocoon to
the seat fabric to keep it in place.
3. Do the same at the both ends, fastening
the attachment belt around the calf rest.
Make sure both are fastened tightly.
4. Fasten the toggles in the position of your
choice depending on the weather.
5. Tuck handles in to side of the seat
unit so they arent hanging loose.
Utiliser le cocon du nouveau-né
ASSUREZ-VOUS QUE TOUS LES
COUSSINETS DU HARNAIS ET DE
L’ENTREJAMBE SONT ENLEVÉS AVANT
DE METTRE LE COCOON EN PLACE.
. La barre de pare-chocs devra être
enlevée pour le cocon. Lorsque vous
relevez le repose-mollet, veillez à ce qu’il
soit en position allongée, ni trop haut ni
trop bas. Faites passer la ceinture de
fixation située au bas du cocon par les
côtés du siège et bouclez-la en dessous.
Il y a des fentes dans le tissu du siège aux
deux extrémités pour guider la ceinture.
2. Fixez les goujons du cocoon au tissu
du siège pour le maintenir en place.
3. Faire de même aux deux extrémités,
en attachant la ceinture de fixation
autour du repose-mollet. Veillez à ce
que les deux soient bien attachés.
4. Attachez les grenouillères dans la
position de votre choix en fonction
des conditions météorologiques.
5. Rentrez les poignées sur le côté du
siège pour qu’elles ne pendent pas.
Verwendung des Neugeborenenkokons
BITTE VERGEWISSERN SIE SICH,
DASS ALLE GURTPOLSTER UND
SCHRITTPOLSTER ENTFERNT SIND,
BEVOR SIE DEN COCOON ANBRINGEN.
1. Die Stoßstange muss entfernt werden,
um den Kokon anzubringen. Wenn
Sie die Wadenstütze hochklappen,
achten Sie darauf, dass sie nicht zu
hoch oder zu niedrig ist, sondern flach
liegt. Führen Sie den Befestigungsgurt
an der Unterseite der Kabine durch die
Seiten des Sitzes und schließen Sie die
Schnalle darunter. An beiden Enden
des Sitzes befinden sich Schlitze im
Stoff, durch die der Gurt geführt wird.
2. Befestigen Sie die Nieten am Kokon
am Sitzstoff, um ihn zu fixieren.
3. Machen Sie dasselbe an beiden Enden und
befestigen Sie den Befestigungsgurt um
die Wadenstütze. Vergewissern Sie sich,
dass beide Gurte fest geschlossen sind.
4. Befestigen Sie die Knebelverschlüsse je nach
Wetterlage in der gewünschten Position.
5. Befestigen Sie die Griffe an der Seite der
Sitzeinheit, damit sie nicht lose herunterhängen.
Uso del capullo recién nacido
ASEGÚRESE DE RETIRAR TODAS
LAS ALMOHADILLAS DEL ARNÉS
Y DE LA ENTREPIERNA ANTES
DE COLOCAR EL COCOON.
1. Será necesario retirar la barra
parachoques para colocar el capullo.
Cuando levante el reposapantorrillas,
asegúrese de que está en posición
horizontal, ni demasiado alto ni
demasiado bajo. Pase el cinturón
de sujeción de la parte inferior del
capullo por los laterales del asiento y
abróchelo por debajo. Hay ranuras
en la tela del asiento en ambos
extremos para pasar el cinturón.
2. Fije las tachuelas del capullo a la tela
del asiento para mantenerlo en su sitio.
3. Haga lo mismo en ambos extremos,
fijando la correa de sujeción alrededor
del reposapantorrillas. Asegúrese de
que ambos estén bien abrochados.
4. Fije los toggles en la posición que prefiera
en función del tiempo que haga.
5. Introduzca las asas en el lateral
de la unidad de asiento para
que no queden sueltas.