V
QUICK REFERENCE GUIDE
2001 NEW 2001 NEW
DD
Just listening
3. Verify proper antenna has been selected.
1. Select the desired band
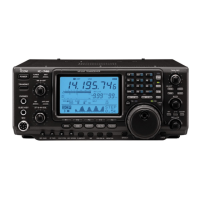
On your IC-746PRO, an easy way of changing bands
is by using the keypad located just above the tuning
knob on the right hand side of the display. You will no-
tice each switch has two sets of numbers; one set of
numbers represents the band selection.
•Say you want to go to 20 meters or 14 MHz; you
would push the [14
5
]. This will immediately change
the displayed operating frequency to the 20-meter
band. By pushing [14
5
] again, frequency pre-sets
in the triple band stacking registers frequency can be
displayed. For more details on this system refer to
p. 19.
GENE
50
0
21
7
24
8
28
9
14
5
10
4
18
6
3.5
2
1. 8
1
7
3
144
ENT
Directly below the keypad is the tuning knob. This will
allow you to dial in the frequency you want to oper-
ate. You will notice the tuning speed [TS] is 10 Hz res-
olution. Page 22 will instruct you on how to set the
tuning speed [TS] for 1 Hz resolution.
NOTE: Although you can directly enter the fre-
quency with the keypad, using the Band Stacking
Register and the tuning knob is the most popular
method of hoping around the bands. For more in-
formation regarding the direct frequency entry
method, refer to p. 22.
You IC-746PRO has three antenna connectors. Two
for HF and 6 m and a one for 2 m. The selection for
2 m is automatic, where the HF and 6 m is user se-
lectable for either one of the antenna jacks. For first
time use, the antenna selector should show “” on
the display of your radio. Verify the antenna selected
on the display is the antenna port your antenna is
connected to.
Either “1” or “2” appears.
*No indicator appears during
144 MHz operation.
Adjust this control to a comfortable audio level.
AF RF/SQL
No audio output
Max. audio output
Decreases Increases
2. Tune to the desired frequency
4. Adjust audio output
IC-746PRO.qxd 02.4.2 11:31 Page V