50
5
MENU SCREEN
2001 NEW
■ Manager Menu
D Setup (Continued)
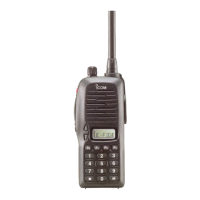
• Network
A new network can be created.
NOTE: The present Network list is cleared.
q Push [r] or [s] to select “Network,” and then hold
down [4] for 1 second to enter the input mode.
w Push [r] or [s] to select the memory channels,
and then push [4] to select or deselect.
• “4” appears to the left of the selected channel.
• If desired, several channels can be selected.
e Hold down [4] for 1 second to go to the next
screen.
r Push [s] to select “OK,” and then push [4].
• If desired, select “Cancel” and then push [4].
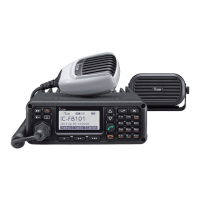
• ALE Self ID
A new Self ID can be created.
NOTE: The present Self ID is cleared.
q Push [r] or [s] to select “ALE Self ID,” and then
hold down [4] for 1 second to enter the input
mode.
w Push the keypad keys to enter the desired ID, and
then push [4].
• Usable characters are A to Z, 0 to 9, ? and @.
• Push [A/a](#) to toggle between the Alphabet (Upper
case letter) input mode and the Number input mode.
• Push [8] to delete the character, symbol or number to
the left of the cursor.
• Push [t](§) or [u](§§§) to move the cursor.
e Push [s] to select “OK,” and then push [4].
• If desired, select “Cancel” and then push [4].
2001 NEW
 Loading...