EasyManua.ls Logo

IDS X16 User Manual

IDS X16
87 pages
To Next Page IconTo Next Page
To Previous Page IconTo Previous Page
Page #13 background imageLoading...
Page #13 background image
IDS X Series Training V2.3 | Programming
13
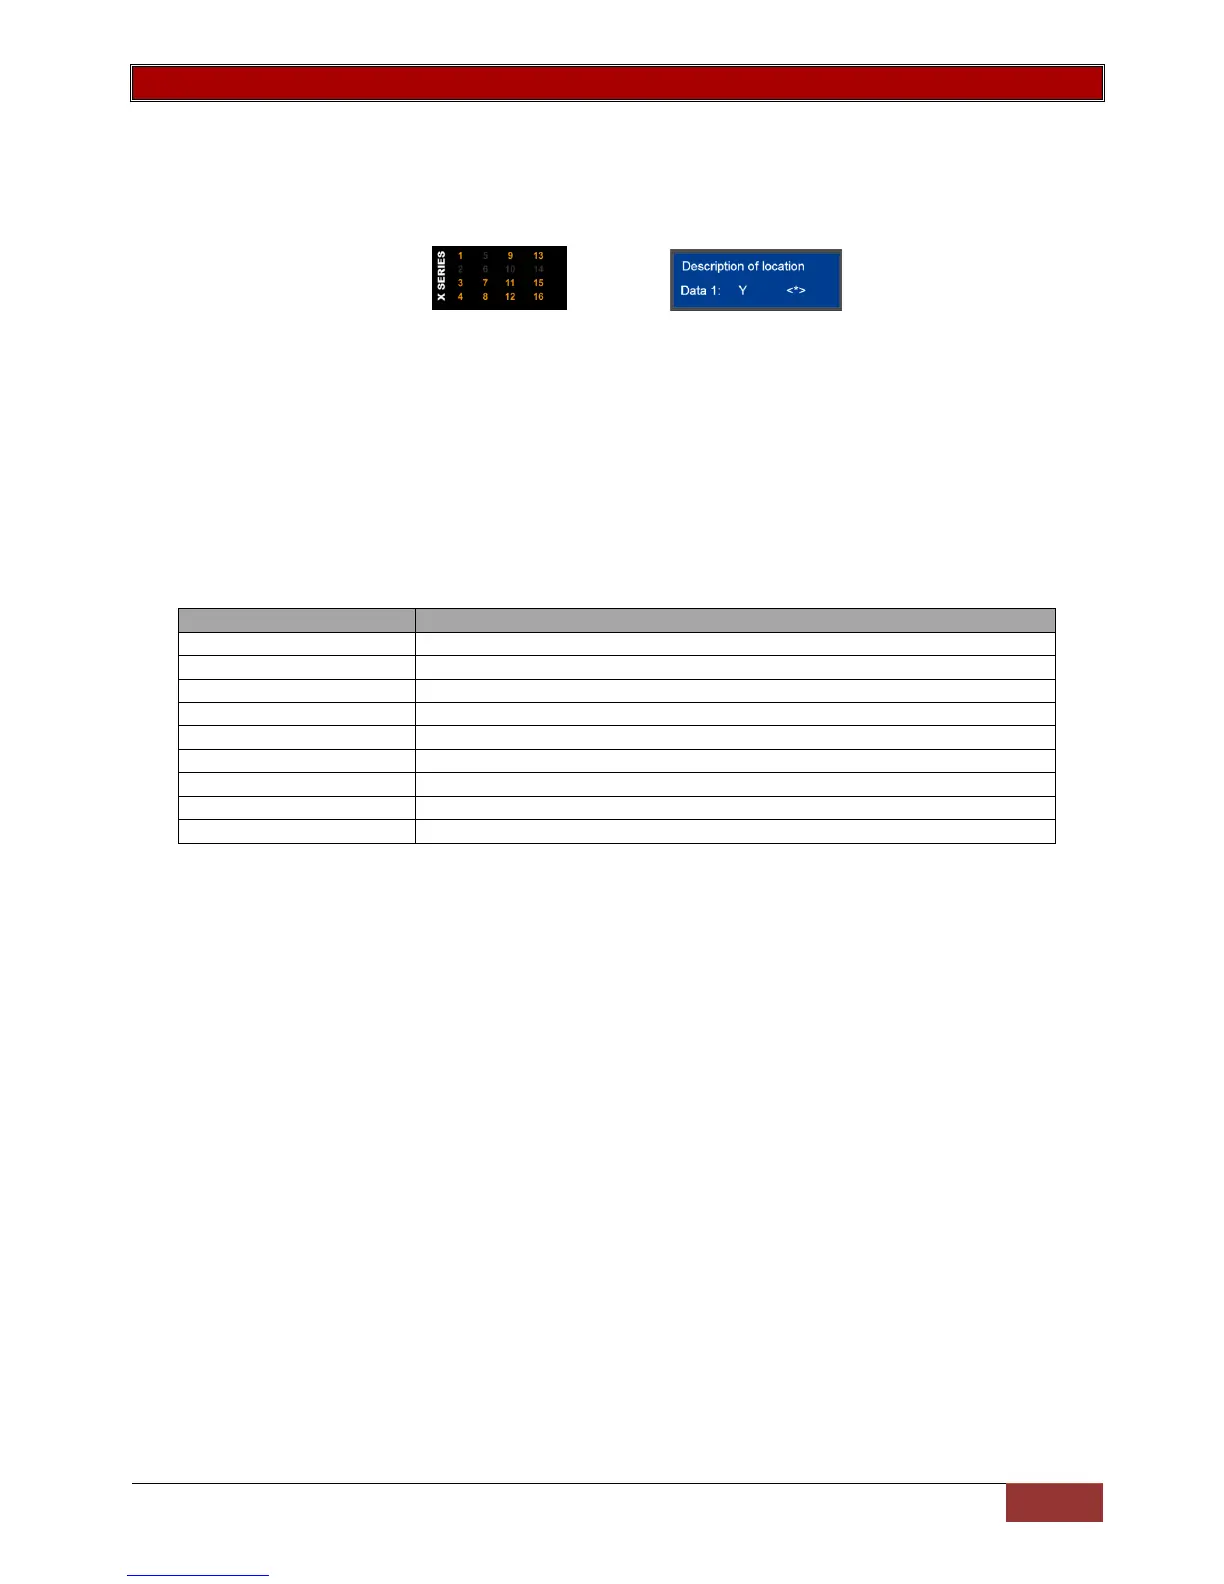
Programming Bitmap Locations
A bitmapped location holds many options within a single location that have to be selected or deselected.
Bitmapped locations can also be sub-locations.
1. Enter Installer mode [#] [9][9][9][9] [*] (This step is only required if you are not already in installer mode)
2. Then press the keys that represent the location number followed by the [*] key
3. Below is a diagram of what you may see when entering a bitmapped location or sub-location
4. To enable or disable an option, press the number corresponding to the option, then press the [*]
key, the number will come on if it was off or go off if it was on.
5. On the LCD keypad when the [*] key is pressed you will be taken to the option you have chosen.
This will show you the current value and if you want to then change the value, press the [*] key
(You can also scroll through the options using the scroll keys [>>] [<<])
6. Continue with any other options you wish to change
7. When complete, press the [#] key to exit the location or sub-location.
Review:
Location Type
Keys Presses
Entering the Installer Code
[#] [9] [9] [9] [9] [*]
Standard Location
[Location Number] [*] [Value] [*]
Bitmap Location
[Location Number] [*] [Option] [*] [Option] [*]....[#]
Sub-location method
[Location Number] [*] [Sub-location Number] [*] [Value] [*]
String method
[Location number] [*] [all values to be entered] [*]
LED Keypad
LCD Keypad
Enabled option number is on
Disabled option number is off
Y Option Enabled
N Option Disabled
Question and Answer IconNeed help?

Do you have a question about the IDS X16 and is the answer not in the manual?

IDS X16 Specifications

General IconGeneral
BrandIDS
ModelX16
CategorySecurity System
LanguageEnglish

Summary

Features

Hardware

Kick Start Jumper

Explains the function of the kick start jumper for powering up the X-Series panel.

Default Button & Panel Status LED

Describes how to default the panel and the function of the status LED.

Serial Output

Details the serial output port for connecting voice modules and download devices.

Outputs

Mentions the five positively triggered outputs and their current capacity.

Onboard Expander Connection

Explains how to connect expanders to the main PCB for additional zones.

X-Series Connectors

Provides an overview of the X-Series connector layout and their general purpose.

Wireless Device Hardware setup

Duevi Outdoor Wireless Dual Head PIR

Details the DIP switch settings for the Duevi Outdoor Dual Head PIR detector.

Duevi Wireless Door Contact

Explains DIP switch and jumper settings for the Duevi Wireless Door Contact.

Duevi Wireless Indoor PIR

Covers DIP switch settings for the Duevi Wireless Indoor Pet Tolerant PIR.

Duevi Outdoor E-Wall PIR/Microwave

Describes DIP switch settings for the Duevi Outdoor E-Wall PIR/Microwave detector.

Entering Data

Reading Numerical Values via LED Keypad

Explains how to interpret numerical values displayed in binary format on an LED keypad.

Programming

Installer Mode

Introduces installer mode for system configuration and the default installer code.

Location Definitions

Programming Standard Locations

Details the process for programming standard memory locations holding a single value.

Programming Extended Locations

Explains programming methods for locations with multiple sub-locations or complex data.

Locations

Location 0: Defaults

Describes how to reset the system to factory default settings using Location 0.

Location 1 to 8: Zone Type

Explains how to program zone types for the first eight zones using string or sub-location methods.

Zone Types and Their Values

Global Settings

Location 10: Zone Shutdown Count

Configures automatic zone bypassing after multiple violations when the system is armed.

Location 11: Programmable Zone Loop Response Time

Sets the time a zone must be violated before registering a detection.

Location 12: Cross-zone Delay Time

Defines the time window for multiple zone triggers in cross-zone detection.

Location 13: Cross-zone Delay Count

Specifies the number of zone violations required within the delay time for cross-zone detection.

Location 14: Global Options

Sets various global system behaviors and features affecting all partitions.

Location 15: AC Fail / Restore Reporting

Configures the delay before reporting AC power loss or restoration.

Location 16: Trouble Display

Manages which trouble conditions are displayed on the keypad and system.

Location 17: Siren Time Out

Sets the duration the siren will sound after an alarm event.

Location 18: Siren Delay

Allows delaying the siren activation after an alarm event.

Location 19: Extra Global Options

Provides additional global settings, including wireless supervision options.

Location 20: Keypad Lockout Count

Sets the number of incorrect code entries before keypad lockout.

Location 21: Keypad Lockout Time

Defines the duration of keypad lockout after too many incorrect entries.

Location 22: Keypad Sleep Delay

Sets the inactivity time before keypad LEDs turn off.

Location 23: User, Installer, Maintenance Code Number of Digits

Allows changing user, installer, and maintenance codes from 4 to 6 digits.

Location 24: Account Code Number of Digits

Adjusts reporting account codes to be 4 or 6 digits.

Daylight Savings

Location 25: Month to Start Daylight Savings

Selects the month when daylight saving time begins.

Location 26: Day of the Week to Start Daylight Savings

Selects the day of the week when daylight saving time begins.

Location 27: Week of the Month to Start Daylight Savings

Specifies the week of the month for daylight saving time to begin.

Location 28: Month to End Daylight Savings

Selects the month when daylight saving time ends.

Location 29: Day of the Week to End Daylight Savings

Selects the day of the week when daylight saving time ends.

Location 30: Week of the Month to End Daylight Savings

Specifies the week of the month for daylight saving time to end.

Location 31: Daylight Savings Time Offset

Sets the time offset value when daylight saving is active.

Advanced Miscellaneous Settings

Location 32: Auto Test Interval

Configures the frequency of automatic test signals sent to the monitoring company.

Location 33: Auto Test Time

Sets the specific time of day for automatic test signals.

Location 34: Download Code Default Disable

Controls whether the download code is affected by system defaulting.

Location 35: Hardware Default Switch Disable

Determines if the hardware default switch is active or disabled.

Location 36: Zone Status Verify Time

Sets the time to monitor a zone for restore before sending another event.

Location 37: Zone Status Verify Count

Defines how many times a zone must be violated before being ignored.

Communication Settings

Location 40: Serial Communication Format

Configures the communication format for serial devices connected to the alarm panel.

Location 41 to 44: Communication format

Sets the language format for alarm panel transmissions to the control room.

Location 45: Communication Delay

Sets a delay before communication of events, except panic or duress signals.

Location 46: Reporting Options

Configures how the alarm system communicates and dials phone numbers for reporting.

Location 47: Number of Dial Attempts

Sets how many times the system attempts to report an event.

Location 48: Download Options

Configures system behavior for remote downloads and incoming calls.

Location 49: Number of rings to answer

Sets the number of rings before the panel answers an incoming call.

Location 51 to 54: Entering a telephone number

Provides instructions and examples for entering telephone numbers into the system.

Location 55: Serial Reporting Telephone Number

Specifies the telephone number for serially connected devices to dial.

Location 61 to 68: Primary Account Codes per Partition

Assigns account codes to identify the system to security companies per partition.

Location 71 to 78: Secondary Account Codes

Sets secondary account codes for specific reporting scenarios.

Zone Properties

Location 101 to 164: Setting Zone Properties

Configures individual zone properties like tamper, cross-zone, silent, chime, and bypass options.

Auto Arm and Auto Alarm

Arm on no Movement

Configures automatic arming if no movement is detected within a set time frame.

Medical Alarm on No Movement

Triggers an alarm if no movement is detected within a specified period for medical alerts.

Location 171 to 178: Days to no movement auto arm / Medical Alarm

Enables or disables no movement auto arm/alarm features based on the day of the week.

Auto Arm and Disarm

Location 180: Auto Arm

Sets the specific time for automatic arming of a partition.

Location 181 to 188: Days to auto arm / disarm

Assigns days of the week for automatic arming and disarming of partitions.

Location 189: To auto disarm

Sets the time for automatic disarming of a partition.

Location 190: Auto Delay

Sets the delay period for keypad buzzer warning before automatic arming.

Security Options

Location 197: Installer code

Sets or changes the primary installer access code for system configuration.

Location 198: Download code

Protects the system from unauthorized connections and data changes via software.

Location 199: Maintenance code

Provides a secondary access level for specific system adjustments.

Partition Options

Location 201 to 208: Placing Zones into a Partition

Allocates configured zones to specific partitions for management.

Location 211 to 218: Partition Configuration

Sets how the system behaves when arming a partition, e.g., instant arm, key-switch arm.

Locations 221 to 228: Extra partition options

Provides additional options for partition behavior, like common zone bypassing and reporting.

Location 230: Exit delay

Sets the time the alarm waits before fully arming after exit delay.

Location 231: Primary Entry delay

Configures the time allowed for disarming after triggering the primary entry/exit zone.

Location 232: Secondary Entry delay

Sets a different entry delay time for secondary entry/exit zones.

Keypad Configuration

Location 240: Keypad and partitions

Assigns keypads to specific partitions and manages their default assignment.

Location 241: Keypad Display Start Zone

Sets the starting zone displayed on LED keypads, allowing customization of zone visibility.

Location 242: Keypad zone

Maps a physical keypad zone to a specific alarm zone, potentially disabling the original panel zone.

Location 243: Keypad ID

Identifies the unique ID of a specific keypad connected to the system.

Location 251 to 258: Keypad Options

Configures various keypad behaviors like global status, sleep mode, and menu access.

Wireless

DIP switch operation

Explains setting device addresses and configuring outputs using DIP switches on wireless expanders.

Default

Describes the factory default procedure for wireless units via DIP switches.

LED operation

Details the functions of the MODE, RF RX, and STATUS LEDs on the wireless integration PCB.

Location 260: Wireless Configuration

Manages the addition, deletion, signal strength, and supervision settings for wireless devices.

Reporting Codes

Location 261 to 264 Stay Zone Reporting Codes

Sets reporting codes for stay zones, excluding Contact ID and SIA formats.

Location 300 Global Reporting

Defines reporting codes for global events like AC fail, communication issues, and siren tamper.

Location 301 Global reporting

Sets reporting codes for battery, fuse, and tamper events, as well as installer resets.

Location 302 Global reporting

Configures reporting codes for bus-wired peripheral issues and wireless detector status.

Location 303 Global reporting

Defines reporting codes for wireless supervision, RF jam, RSSI, panic, and test reports.

Location 304 to 335: Zone reporting

Allows extending Contact ID reporting codes for specific zones and events.

Extending Contact ID Zone Reporting

Details how to assign specific Contact ID codes to zones for extended event reporting.

Location 336 to 340: Partition reporting codes

Sets reporting codes for partition-level events like duress, panic, fire, medical, and lockout.

Triggering Outputs

Zone Triggered Outputs

Configures outputs to trigger based on specific zone violations, with conditions for arming state.

Globally Triggered Outputs

Sets outputs to trigger based on system-wide events like AC failure, battery status, or downloads.

Pulse Length Configuration

Allows adjusting the duration of output pulses for onboard, expander, and keypad outputs.

Scheduled Output Triggers

Enables scheduling outputs to turn on or off based on time and day.

Location 458 to 498: Output On / Off Days

Manually triggered

Allows manual triggering of the five onboard outputs via keypad.

Event Reporting Codes

Enables or disables event codes for Contact ID and SIA formats, and selects phone number groups.

Event Reporting Codes

Location 571 Global Split Reporting

Sets global split reporting options for events like AC fail, comms fail, and tamper.

Location 572 Global Split Reporting

Configures global split reporting for bus-wired peripheral and wireless detector events.

Location 573 Global Split Reporting

Sets global split reporting for communication restores, battery, and tamper events.

Location 574 Global Split Reporting

Configures global split reporting for bus device and wireless detector status restores.

Location 575 Global Split Reporting

Sets global split reporting for IDSwift download access.

Location 581 - 588 Partition Split Reporting

Configures partition-specific split reporting for events like duress and panic.

Location 600 - 616 Voice Module Phone Numbers

Specifies telephone numbers for the voice module to report programmed events.

Default 5

Location 14 Global Options

Shows default settings for Global Options, including siren cancel and keypad beep.

Location 41 - 44 Communication Format

Displays the default communication format, Contact ID, for reporting.

Location 46 Reporting Option

Outlines the default reporting options, including tone dialing and dual reporting.

Locations 51 – 54 Primary Telephone Numbers

Indicates that primary telephone numbers are cleared by default.

Default 6

Location 14 Global Options

Shows default settings for Global Options under Default 6, disabling many features.

Location 46 Reporting Options

Displays default reporting options under Default 6, disabling dual and alternate reporting.

Locations 51 – 54 Primary Telephone Numbers

Indicates that primary telephone numbers are cleared by default under Default 6.

Features Grouped by Locations

Entry/Exit

Lists locations related to Entry/Exit zone configurations and behavior.

Zones

Groups locations pertaining to zone types, properties, and settings.

Partitions

Organizes locations related to partition management, configuration, and reporting.

Keypads

Gathers locations associated with keypad configuration, display, and options.

Communication

Lists locations relevant to system communication settings, formats, and reporting.

Wireless

Groups locations related to wireless device configuration and management.

User Menu

Types of Keypads

Illustrates and describes the two types of keypads: Liquid Crystal Display (LCD) and Light Emitting Diode (LED).

Keypad Key Descriptions

Explains the function of each key on both LCD and LED keypads for user interaction.

Standard User Functions

Away Arm

Details how users can arm the system in Away mode, activating all zones.

Stay Arm

Explains how users can arm the system in Stay mode, bypassing specific zones.

Buzz Zone

Describes how to set up zones that provide keypad buzzers during stay arming.

Chime Zone

Explains how to configure zones that trigger a keypad beep when violated in an unarmed state.

Bypassing Zones

Guides users on how to bypass faulty zones to allow system arming.

Alarm Memory

User Codes

Explains the system's user code structure, including master code privileges.

User Management Functions

Covers adding, editing, deleting users, and managing partition allocations for user codes.

Standard Master User Functions

User Code Management

Covers adding, changing, deleting, and viewing user codes and their properties.

Remote Transmitter Management

Details adding, deleting, configuring buttons, relays, and defaulting remote transmitters.

Zone Naming and Language Settings

Explains how to name zones via LCD keypad and select the system language.

Setting the Time and Date

Option 40 – Setting the Time

Guides on setting the system time in 24-hour HHMM format.

Option 41 – Setting the Date

Provides instructions for setting the system date in DD/MM/YY format.

Option 97 - Manual Auto Test

Explains how to manually trigger an auto test signal transmission.

Master Mode menu

Partition and Stay Profile Management

Allows changing partitions and toggling between stay profiles for customized arming.

Output Control and Alarm Memory

Enables manual control of outputs and access to alarm memory for event logging.

Changing between Alphanumeric Mode and LED Simulation Mode

New Partition Menu on LCD keypads

Trouble conditions

Quick Guide

Related product manuals