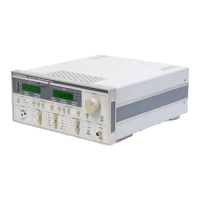
OPERATIONS
Operating from the Front Panel
7/01 LDC-3700 Series 17
CHAPTER 2
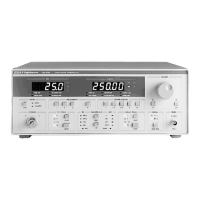
Set the Range
Next, in the RANGE section set the laser controller’s current source range by selecting the 200 mA
range indicated by the accompanying LED. You will need to press the SELECT push button twice to
change the range. It must be pressed twice quickly (within less than 1 second) to switch between
modes, and the LASER output must be off (LASER MODE ON indicator unlit) in order to change
ranges.
Select the Laser Display
Configure the display so that it reads in mA by selecting I in the LASER DISPLAY section of the
front panel (directly underneath the LASER display. The enunciators next to the display will indicate
the display mode (mA illuminates when "I" is pressed). The LASER DISPLAY switch section is also
used to select the I
PD
(photodiode current, µA), P
PD
(laser power, mW), or V (forward voltage, V)
measurement or set point values. The SET switch can be used to view the set point of any of the
LASER DISPLAY parameters. When the (LASER DISPLAY) SET switch is pressed, a display set
point value is indicated by the corresponding display mode enunciator flashing.
At this point the Controller is in Constant Current Mode, (I), in the 200 mA range, and the display is
reading in mA. Next, we need to adjust the set point of the laser current source. The controller can
be changed to set point mode a couple of ways.
Adjusting the Set Point
To adjust the set point of the Controller current source to 150 mA, set the instrument to LAS mode
by pressing the appropriate push button in the ADJUST section of the front panel. The LAS indicator
will be illuminated. Turn the adjust knob clockwise to increase the set point (as indicated on the
LASER display), or counterclockwise to decrease the set point. When the ADJUST knob is turned,
the controller automatically changes to set point mode indicated by the display mode enunciator
flashing. Before adjusting the set point check the LASER display for proper display mode; the
display mode determines which set point is being adjusted. Adjust the set point to 150 mA. Pressing
the SET switch in the LASER DISPLAY section will also change the controller to set point mode.
Make sure that the mA enunciator next to the display is illuminated before adjusting the set point.
After an adjustment has been made, and the (LASER DISPLAY) SET switch and ADJUST knob are
released, the SET mode will time out in three seconds. The new set point will be stored in non−
volatile memory. If the original display mode differed from the newly adjusted set point, the LASER
display will revert to the original display mode (I, I
PD
, or P
PD
).
Note: When adjusting any LASER parameter, display mode or operating mode, the LAS
indicator in the ADJUST section must be lit.
We are not quite ready to turn on the laser. One of the laser protection features our controllers offer
is a fully independent hardware current limit. The current limit protects your laser by never allowing
200 mA
500 mA
RANGE
LASER DISPLAY
II
PD
P
PD
V
SET
Artisan Technology Group - Quality Instrumentation ... Guaranteed | (888) 88-SOURCE | www.artisantg.com
 Loading...