Intel
®
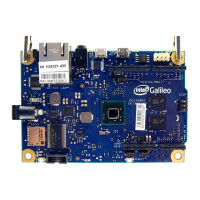
Galileo Board Getting Started Guide
4 Order Number: 329685-002US
Note: When unzipping the packages:
Extract the package into the C:\ directory due to a known issue unzipping
packages with long file paths.
Use an unzip tool that supports an extended file path (for example, 7-zip from
http://www.7-zip.org/).
Windows*:
1. Unzip the IDE file to the C:\ directory.
2. Make sure to preserve the folder structure. Double-click the folder to open it.
If you are updating your IDE, be sure to uninstall the previous IDE version first.
Linux*:
1. In your home directory, extract the package with the appropriate command:
tar -zxvf arduino-1.5.3-linux32.tar.gz
or
tar -zxvf arduino-1.5.3-linux64.tar.gz
2. To avoid interference with the IDE, you must disable modem manager. The exact
command will depend on your Linux distribution.
For example, the command sudo apt-get remove modemmanager may work.
3. In the same directory where the package was downloaded, launch the Arduino IDE
by executing ./arduino
Note: The first time you compile and install a sketch, the Galileo software will be
installed automatically. This requires appropriate file and directory access
permissions. You may be required to run the IDE as root or using
sudo arduino depending on your Linux distribution.
Mac OS*:
Caution: You must unzip the IDE on your Mac’s normal hard disk. Once the IDE is
unzipped, you cannot run it from or transfer it to USB drives or any other
media formatted for use in Windows computers or it will be corrupted.
1. Download the zip file on the Mac hard drive and unzip it.
2. Drag and drop the Arduino application onto the Applications folder on your Mac.
3. Connect the board
WARNING: You must use the power supply or you will damage the board.
Connect the 5V power cable to the Galileo board and to a power outlet.
Note: Always connect the 5V power before any other connection.
The green power LED (labelled PWR) will turn on.
4. Install the drivers and other software
Windows:
1. If not done already, connect the 5V power cable to the Galileo board and to a
power outlet.