EasyManuals Logo

iOptron CEM40 User Manual

iOptron CEM40
60 pages
To Next Page IconTo Next Page
To Previous Page IconTo Previous Page
Page #22 background imageLoading...
Page #22 background image
22
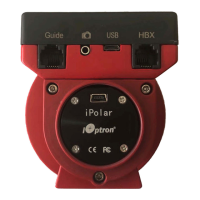
Download and install iPolar Software (first time use)
Connect a USB cable between the mount and a computer USB port
Start polar alignment by following on screen instructions
Polar Alignment Software
There are quite a few alignment software available for polar alignment, such as PHD2 guiding,
TheSky software, PemPro, or Alignmaster.
BrightStar Polar Alignment
BrightStar Polar Alignment allows you to perform coarse polar align the mount even if you cannot
view the Celestial Pole.
(1) Level the mount and set it to the Zero Position. Align the telescope to the R.A. axis of the mount.
If a finder scope is used, adjust it to be parallel to the telescope optical axis.
(2) Use the HC (MENU => “Alignment” => “Polar Iterate Align”) to display the azimuth and altitude
position of several bright stars near the meridian. Select one that is visible at a high altitude as
Alignment Star A. Follow the HC instruction to move Alignment Star A to the center of the
eyepiece using a combination of the Latitude Adjustment Knob and the “◄” or “►” buttons.
Press ENTER to confirm when the star is centered. Next, select a bright star that is close to the
horizon as Alignment Star B. Center it using the Azimuth Adjustment Knob and the ◄” or “►”
button (the “▲” and “▼” buttons are not used here). Press ENTER to confirm the settings.
(3) The telescope will now slew back to Alignment Star A. Repeat the steps above. The iteration can
be stopped when it is determined that the alignment error has been minimized. Press the BACK
button to exit the alignment procedure.
NOTE: It is highly recommended to use an eyepiece with an illuminated crosshair for accurate centering.
NOTE: The movement of the alignment star in your eyepiece may not be perpendicular depending on its
location in the sky.
STEP 12. Returning the Mount to Zero Position
After polar alignment and balancing OTA, return the mount to the Zero Position. Please check the
zero position after set up the mount or firmware update.

Table of Contents

Other manuals for iOptron CEM40

Questions and Answers:

Question and Answer IconNeed help?

Do you have a question about the iOptron CEM40 and is the answer not in the manual?

iOptron CEM40 Specifications

General IconGeneral
MountCenter-balanced Equatorial Mount (CEM)
Structure MaterialAll metal, CNC machined
Exterior finishAnodized red/black
Level indicatorLevel bubble
Dovetail saddle8" Losmandy D & Vixen
Hand ControllerGo2Nova® HC, 212, 000 objects database, star recognition
Cable managementYes
TripodLiteRoc 1.75" Stainless Steel(7kg), optional tri-pier
Max payload*40 lb (18kg), exclude counterweight
Payload/Mount weight ratio2.28:1
PECPPEC/Real time PEC
Tracking accuracy (PE)**<±7.5 arcsec p-p (CEM40, CEM40G), or <0.3 arcsec RMS (CEM40EC)
Motor resolution0.08 arc seconds
Slew speed1×, 2×, 8×, 16×, 64×, 128×, 256×, 512×, MAX(~4.5°/sec)
Latitude adjustment range0°~ 60° (special CW shaft mounting if <10° )
Azimuth adjustment range± 6°
Operation temperature-10°C ~ +40°C
Right Ascension worm wheelΦ110mm, 216 teeth aluminum
Declination worm wheelΦ110mm, 216 teeth aluminum
Counterweight shaftΦ28X280 mm, Stainless Steel (1.2 kg)
Counterweight11 lb (5 kg) X1
Motor drivePrecision stepper motor, 1.8º/128X micro-step
Meridian treatmentStop (0-14° pass), auto flip
Power consumption0.6A(Tracking), 0.9A(GOTO)
Power requirement12V DC 5A
AC adapter100V ~ 240V (included, indoor use only)
Polar ScopeInternal iPolarTM electronic polar scope
GPSYes
WIFIExternal (optional)
Guiding scope/cameraBuilt in guiding scope and camera, iGuiderTM (CEM40G)
Autoguide portST-4
Communication portUSB Port (on mount)
PC computer controlYes (ASCOM)
WarrantyTwo year limited
Weight and Dimensions IconWeight and Dimensions
Mount weight17.4 lb (7.9kg)
Mount base sizeΦ120 mm

Related product manuals