page 19 / 27
5.11.3. Adjustpneumaticpotdispenser(LPO)(optional)
Adjust the pot dispenser before starting work with the machine.
Procedure:
1. Turn the machine on and turn it off again when the drill is at the bottom
position.
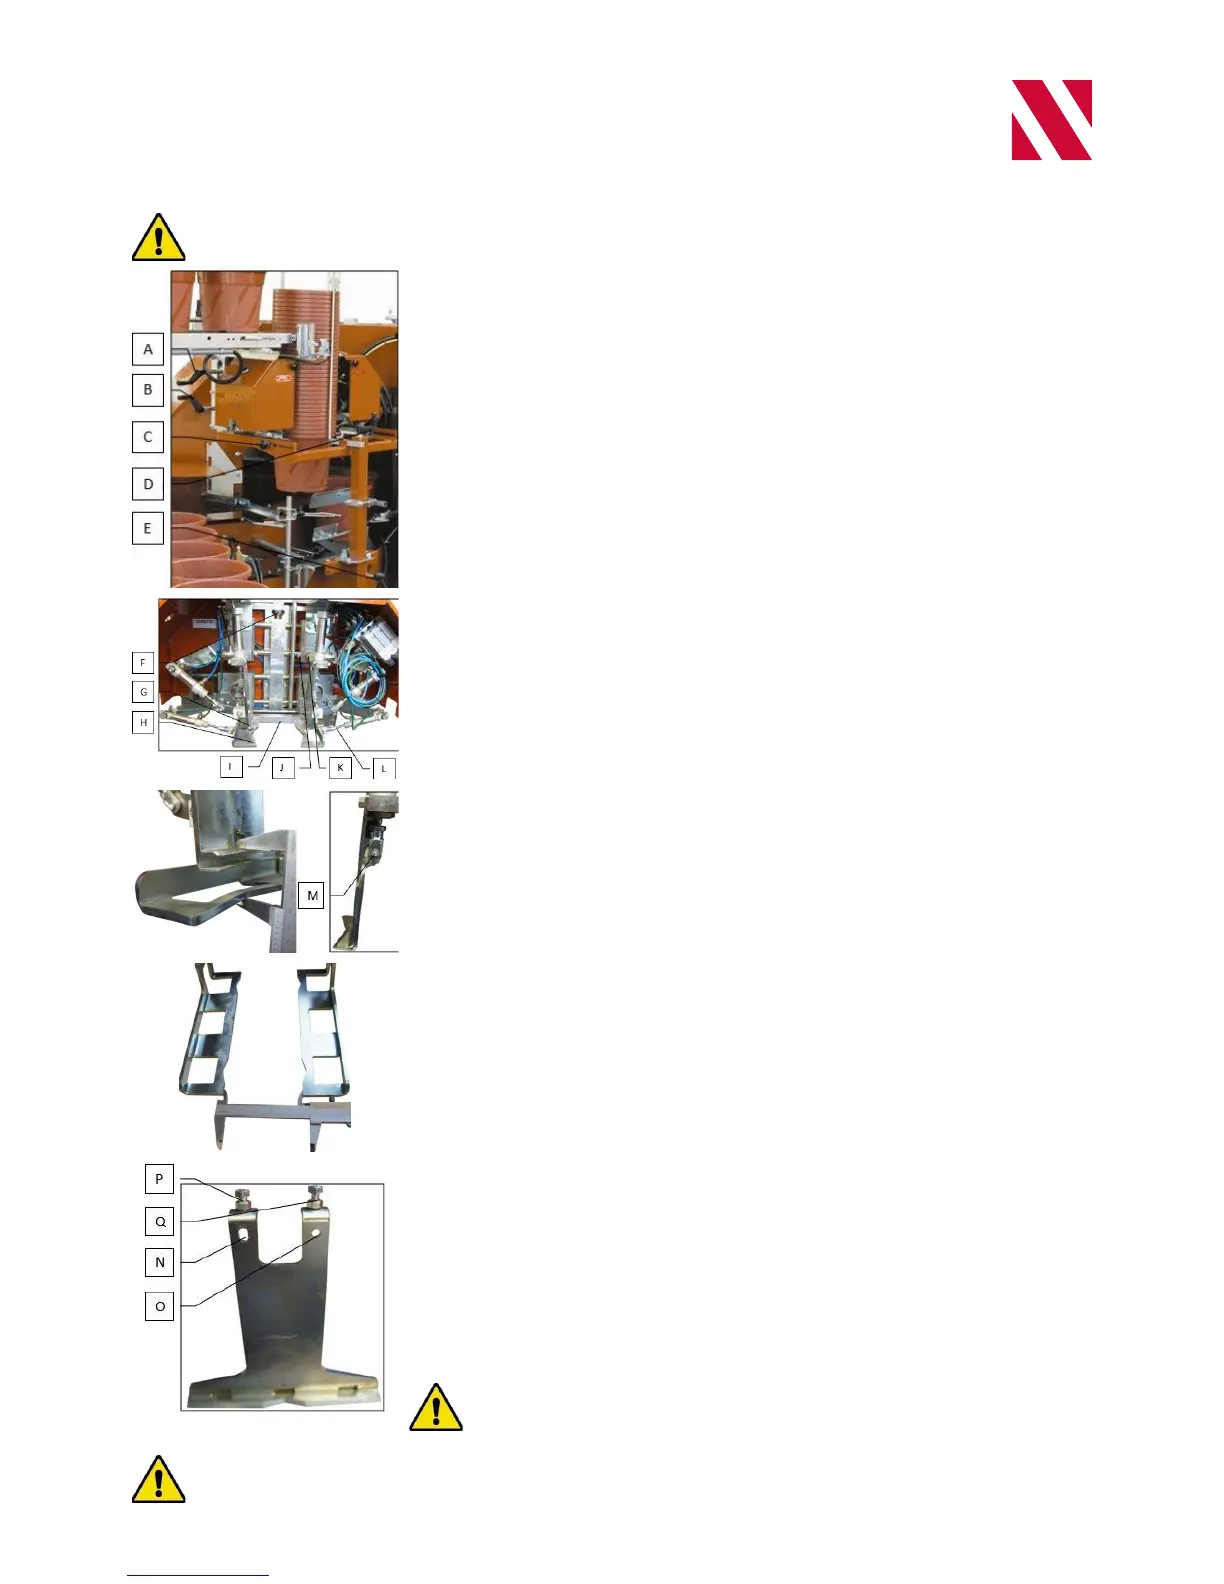
2. Adjust the diameter of pot clamp (G) with crank handle (A). Turn crank handle
(C) to lower pot clamper (G) until it contacts the pot row then turn 1 extra full
turnsothattherowisrmlyclamped.
3. Adjust the diameter of pot holder (H) with crank handle (B).
4. Adjust the length of the pot dispenser by loosening the 2 star knobs (C) (left
and right) and shifting the unit as required.
5. Tighten star knobs (C).
6. Adjust the height of pot holder (H) by turning the star knob on screw (E) so that
the pot row is at the correct height.
7. Loosen clamp lever (E) and adjust the height with crank handle (D) so that the
bottom of the pot row is about 20 mm above the pot in the holder.
8. Tighten clamp lever (E).
When you are unable to adjust the pot dispenser to the correct setting then the
advanced settings can be adjusted to set the pot dispenser correctly (preferably by a
Javoengineer):
9. Check that the pot dispenser is perpendicular to the frame. If the pot dispenser
isnotperpendiculartotheframe:
a. Loosen cylinder nut (L).
b. Turn the cylinder shaft until the pot dispenser is perpendicular to the frame.
c. Tighten cylinder nut (L).
10. Measure the distance between pot clamp (G) and pot holder (H). The distance
mustbethesameonleftandright.Whenthedistanceisnotthesame:
a. Loosen M10 bolt (J).
b. Turn tapered shaft (K) until the pot dispenser is perpendicular to the frame.
c. Tighten M10 bolt (J).
d. Check that the right and left jaws are vertically above the lower jaws.
Ifnecessary,adjustaforkofthecylindersoftheupperjawssothatthe
distance is equal.
11. Check that the pot clamp closes properly when the cylinder is actuated. When
thepotclampdoesnotcloseproperly:
a. Release the air pressure from the cylinder by disconnecting the compressed
air line from the machine.
b. Close the pot clamp by hand.
c. Loosen nut (M).
d. Turn the cylinder shaft out of the cylinder until it extends about 1 mm from
the cylinder.
e. Tighten nut (M).
f. Reconnect the compressed air line.
The following need to be checked for pot dispensers that dispense two pot rows after
eachother:
12. Measure the distance between the pot holder at front and back. The distance
mustbethesameatbackandfront.Whenthedistanceisnotthesame:
a. Bend the pot holder horizontally so that the distance at front and back is the
same.
13. Measure the distance between pot clamp (G) and pot holder (H). The distance
mustbethesame.Whenthedistanceisnotthesame:
a. Loosen bolt (N) and bolt (O).
b. Adjust pot clamp (G) with adjustment bolts (P) and (Q).
c. Tighten bolt (N) and bolt (O).
A special square pot clamp is available for square pots.
The pot dispenser is only suitable for new pots. The extent to which the pots unstack properly depends on how rmly
the pots are pressed into each other and the degree of fouling of their surfaces. The pressure of the compressed air
supplied to the cylinder may be increased slightly if so required, although never to more than 6 bar.