20
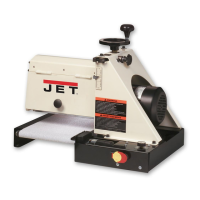
1. Repeat “Tension Roller Alignment” except
raise the sanding drum only 1/4 turn of the
height adjustment handle.
2. If both tension rollers are causing snipe then
tighten all four hex nuts (A, Figure 29) at this
position.
3. If only outfeed tension roller causes snipe,
only tighten rear (outfeed) hex nuts on each
end of drum at this position, then raise
sanding drum another 3/4 turn of the handle.
4. Press infeed tension roller down to rest on
conveyor bed and tighten front (infeed) hex
nuts at this position.
This process sets the tension roller assembly at
an angle providing less tension pressure on the
outfeed roller.
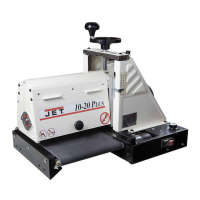
Operation
Before using your drum sander, review the
previous pages in this manual on initial set-up
and adjustment. In this section, you will learn
how to operate the machine.
Basic Operating Procedure
1. Set depth of cut.
2. Start drum.
3. Start conveyor and select feed rate.
4. Start dust collection system.
5. Feed stock through machine.
Setting Depth of Cut
Adjusting the drum sander for the proper contact
between the abrasive and the stock determines
the mechanical depth of cut.
It may take some experimentation to determine
the proper depth of cut, given the variables of
abrasive grit, type of wood, and feed rate. For
best results, use scrap wood to practice sanding
and to develop skill and familiarity with the
machine before doing finish work.
A good rule of thumb when sanding with grits
finer than 80 is to lower the drum so it contacts
the workpiece but drum can still be rotated by
hand. When using grits coarser than 80, you can
lower the drum slightly more. However, a
combination of several variables will determine
the proper depth of cut to use, including the
following:
1. Abrasive type and grit size.
2. Width of the piece being processed.
3. Hardness of the piece.
4. Feed rate of the conveyor belt.
NOTE: The use of a carrier or backer board (not
provided), is recommended for cuts 1/16” or
less. This is a flat board, usually of wood or
MDF, slightly larger than the workpiece and of
even thickness, placed beneath the workpiece
as it is fed through the sander. The workpiece
may be attached to the carrier with rubber
cement, carpenter’s tape or some other easily
removable adhesive. However, some operators
use a rubber or textured surface on the carrier to
help stabilize the workpiece by simple friction.
Establishing Proper Drum Height
1. To establish drum height, position the stock
to be sanded under the drum. Do NOT start
drum.
2. Lower the drum to the stock thickness,
making sure drum can be rotated by hand
while contacting stock.
Do not start drum while in
contact with stock!
3. Without changing drum height, turn on
conveyor and run the stock out from under
the drum. Start sanding drum and sand
stock at that same position.
4. With the drum operating, feed stock under
the drum from the infeed side and against
the rotation of the drum. Always maintain
control of the stock to avoid kick-back and/or
slippage.
NOTE: If motor heats up during operation, depth
of cut may be too great for size of grit and/or
feed rate may be too fast.
Selecting SandSmart™ Feed Rates
A faster feed rate allows faster sanding but
fewer revolutions of the drum per inch of
sanding. A slower feed rate provides more
revolutions of the drum per inch of sanding to
allow a greater depth of cut and smooth
sanding.
Begin experimenting with the feed rate set at
about 40% to 50% of maximum. The best feed
rate will depend on a number of factors,
including type of stock, grit and depth of cut
used, and whether the stock is fed directly in line
with the conveyor bed or at an angle. If the drum
motor is lugging down, if the conveyor belt is
slipping, or if you observe a ripple effect on the
stock, slow down the feed rate. If the finish is
smooth and the machine is not overworking, you
can experiment using a faster feed rate.

 Loading...