– 29 –
Adjustment procedures
Results of Improper adjustment
o
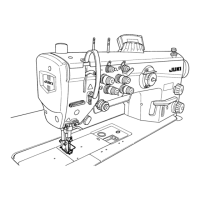
Lubrication procedure
1. Add oil from section
D
.
2. If the pointer of oil gauge
6
drops below Min line, lubricate
again.
(Caution) Adjust the oil quantity so that the pointer of oil gauge
6
stays between Max and Min.
o
Adjusting the amount of oil in the hook
1. Remove rubber cap
7
.
2. Loosen nut
8
and turn oil amount adjustment screw
9
to ad-
just the amount of oil in the hook.
Turning the screw clockwise
A
will decrease the amount of oil
in the hook or counterclockwise
B
will increase it.
3. The appropriate amount of oil, when a sheet of paper is placed
near the periphery of the hook, is to such an extent that splash-
es of oil from the hook appear in approximately ve seconds as
shown in a sheet of paper.
o
Cleaning the oil pan and lter
1. Remove clips
5
to remove lter clamp
4
.
2. Remove lter
3
and oil pipe
1
.
3. Clean up lter
3
and oil reservoir
C
of the oil pan
2
.
4. Insert the oil pipe
1
and lter
3
into oil reservoir
C
of the oil
pan
2
.
5. Set the lter clamp
4
to oil pan
2
, and x it with the clip
5
.
6. Pour the JUKI New Defrix Oil No. 1 into the oil tank.
(Caution) Adjust the oil quantity so that the pointer of oil gauge
6
stays between Max and Min.
o
Cleaning the oil lter
1. Remove metal xture
!0
.
2. Remove lter holder
!1
.
3. Clean up lter
!2
.
(Caution) 1. Be sure to clean up the oil pan
2
approximately
once a month.
2. If lters
3
and
!2
is clogged with soil, lubrica-
tion fails resulting in trouble.
When the amount of oil is short :
o
Loose stitches will result.
o
Hook is heated resulting in sei-
zure.
When the amount of oil is too much :
o
Thread is stained with oil. In ad-
dition, the cloth may be stained.
o
Trouble of sewing will be
caused.
海外講習会用121122LU-2810(-7)EM
 Loading...