–
17
–
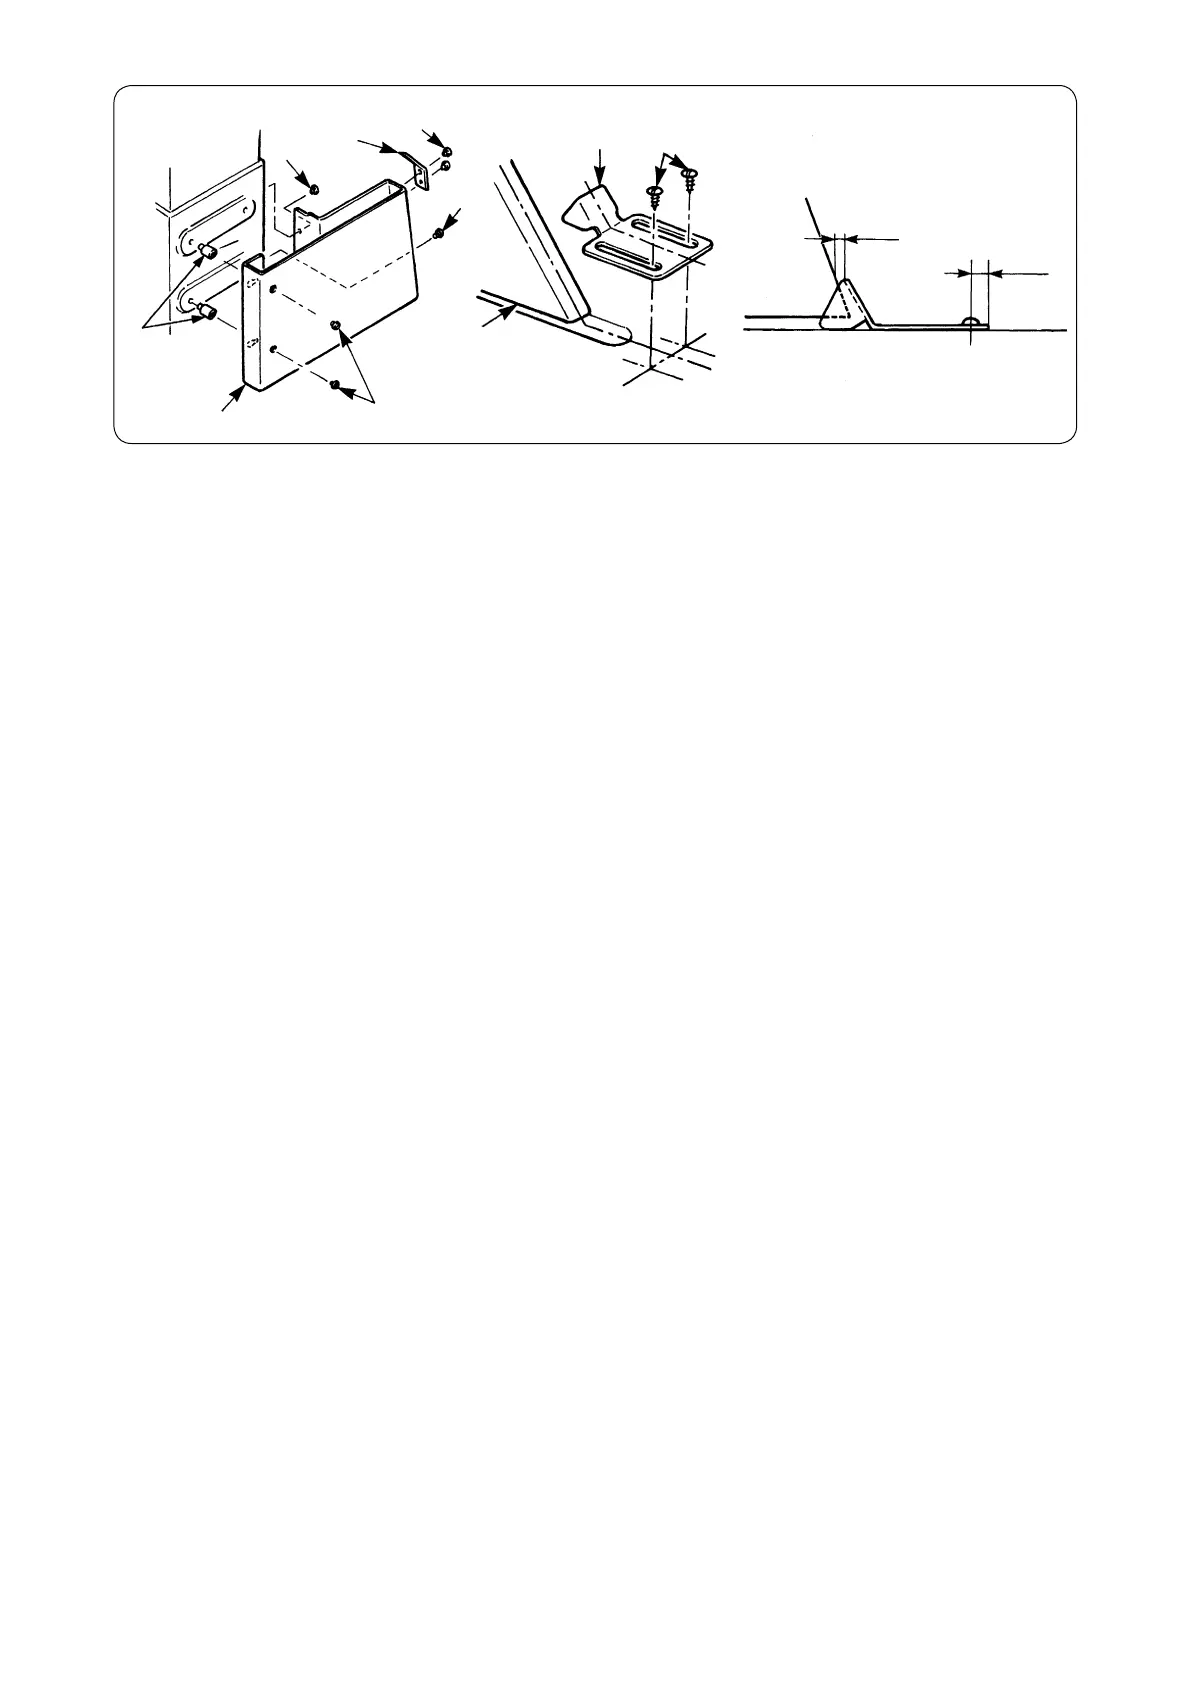
5) ベルトカバー(下)支柱 !2 をポスト部のねじ穴に取り付けます。
6) ベルトカバー(下)!1 を止めねじ !3 にて、ベルトカバー(下)支柱 !2 及びポスト部に固定します。
7) ベルトカバー(蓋)
9
を止めねじ !0 にて、ベルトカバー(下)!1 に取り付けます。
8) この時、ベルトカバー(蓋)
9
が、ベルトカバー(右)
1
の外側になります。
9) ベルトカバー補助板 !4 がベルトカバー(下)!1 と 2.5mm すき間をあけた時、ベルトカバー補助板 !4
後端から 10mm の位置に木ねじ !5 で固定します。
10)ミシンを倒す時は、木ねじ !5 をゆるめ、ベルトカバー補助板 !4 を取り外してください。
(注意) ベルトカバー取り付け後、各コードがベルト及びはずみ車に接触していないか確認してください。
接触している場合、コードの断線の原因となります。
5) Attach belt cover (lower) stud
!2
to the screw hole in the post section.
6) Fix belt cover (lower)
!1
to belt cover (lower) stud
!2
and the post section with screws
!3
.
7) Attach belt cover (lid)
9
to belt cover (lower)
!1
with screws
!0
.
8) At this time, belt cover (lid)
9
has to be placed to the outside of belt cover (right)
1
.
9) Fix belt cover auxiliary plate
!4
at the position of 10 mm from the rear end of the belt cover auxiliary plate with wood
screws
!5
when there is a clearance of 2.5 mm between belt cover auxiliary plate
!4
and belt cover (lower)
!1
.
10) When tilting the machine head, loosen wood screws
!5
, and remove belt cover auxiliary plate
!4
.
(Caution) After attaching the belt cover, confi rm whether or not the respective cords do not come in contact
with the belt and the handwheel. Disconnection of the cords will result when they come in contact
with one another.
!4
!5
9
!0
!3
!3
!1
!3
!1
!2
2.5 mm
10 mm
5) Den Stehbolzen
!2
der unteren Riemenabdeckung in die Gewindebohrung des Säulenteils eindrehen.
6) Die untere Riemenabdeckung
!1
mit den Schrauben
!3
am Stehbolzen
!2
befestigen.
7) Die Riemenabdeckung (Deckel)
9
mit den Schrauben
!0
an der unteren Riemenabdeckung
!1
befestigen.
8) Dabei muss die Riemenabdeckung (Deckel)
9
auf der Außenseite der Riemenabdeckung (rechts)
1
angebracht
werden.
9) Die Riemenabdeckungs-Hilfsplatte
!4
mit den Holzschrauben
!5
an der Position 10 mm vom hinteren Ende der Rie-
menabdeckungs-Hilfsplatte befestigen, wenn ein Abstand von 2,5 mm zwischen der Riemenabdeckungs-Hilfsplatte
!4
und der unteren Riemenabdeckung
!1
vorhanden ist.
10) Wenn der Maschinenkopf geneigt wird, die Holzschrauben
!5
lösen, und die Riemenabdeckungs-Hilfsplatte
!4
ab-
nehmen.
(Vorsicht) Vergewissern Sie sich nach dem Anbringen der Riemenabdeckung, daß die jeweiligen Kabel nicht
mit Riemen und Handrad in Berührung kommen. Gegenseitige Berührung dieser Teile kann zum
Abtrennen der Kabel führen.