SmartVision & SmartVision LITE – User Guide (Rev. 2.7) – Version 1943.4105 85
Camera
Select the "Camera" application, then press “OK” on the keypad to take the
picture. You will hear the shutter sound when the picture is captured.
Press the "Menu"
button to access the settings:
- "Gallery" to open the Gallery application directly to view photos and videos.
- "Capture Mode" allows you to switch to photo mode, video or panning.
- "Flash mode" allows you to enable, disable, or set the flash to automatic
mode.
- "Display mode" will display more settings on the main screen of the camera.
- "White Balance" is used to calibrate the camera sensor and adjust color cast
to the ambient lighting.
- "Color Effect" to add color filters before taking the photo.
- "Scene Mode" allows you to adjust the sensor according to the type of shot
you want to take.
- "Advanced" provides access to advanced configuration options.
- "Restore defaults" to restore the default settings.
Pictures taken are saved into the phone memory in the "DCIM" folder. They are also
viewable from the "Gallery" application.
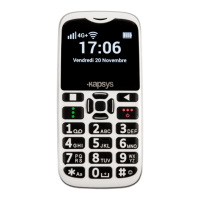
Clock
Select the "Clock" application for managing your alarms and reminders.
The main page of the application displays all the alarms saved on your SmartVision.
Create an alarm
From the main screen of the application, press "Menu" then select "Add alarm"