3
Assemble units as described herein only. To do otherwise
may result in instability. All screws, nuts and bolts must be
tightened securely and must be checked periodically after
assembly. Failure to assemble properly, or to secure parts
may result in assembly failure and personal injury.
Concerto
®
Seating with Power & Data
Assembly Instructions
Preliminary Mounting and Hole
Layout - with Power
1. Follow the space-planning layout
provided and stage the uprights in
position with the specified right,
left or no-tablet option (Figure 1),
as well as by indicated electrical
circuit number and/or aisle light
option. Each powered upright
comes with a simplex receptacle
box labeled “1”, “2”, or “3”
(Figure 1). All upright locations
designated “FL” (full-length
side-cover upright) will require a
bottom side cover bracket
(Figure 1). A side cover bracket
is also required at power infeed
locations “P” (Figure 1). A data
bracket is required at data infeed
locations “D” (Figure 1). The data
infeed side cover is full length with
a protrusion at the bottom where
the data wires enter the cover
(Figure 6). Half-height side covers
may be used on uprights where
no power or data is run up from
the floor (Figure 6). Half-height
side cover locations require no
2. Carefully locate the upright
mounting holes and the appropriate
floor anchors as specified in
the space-planning layout
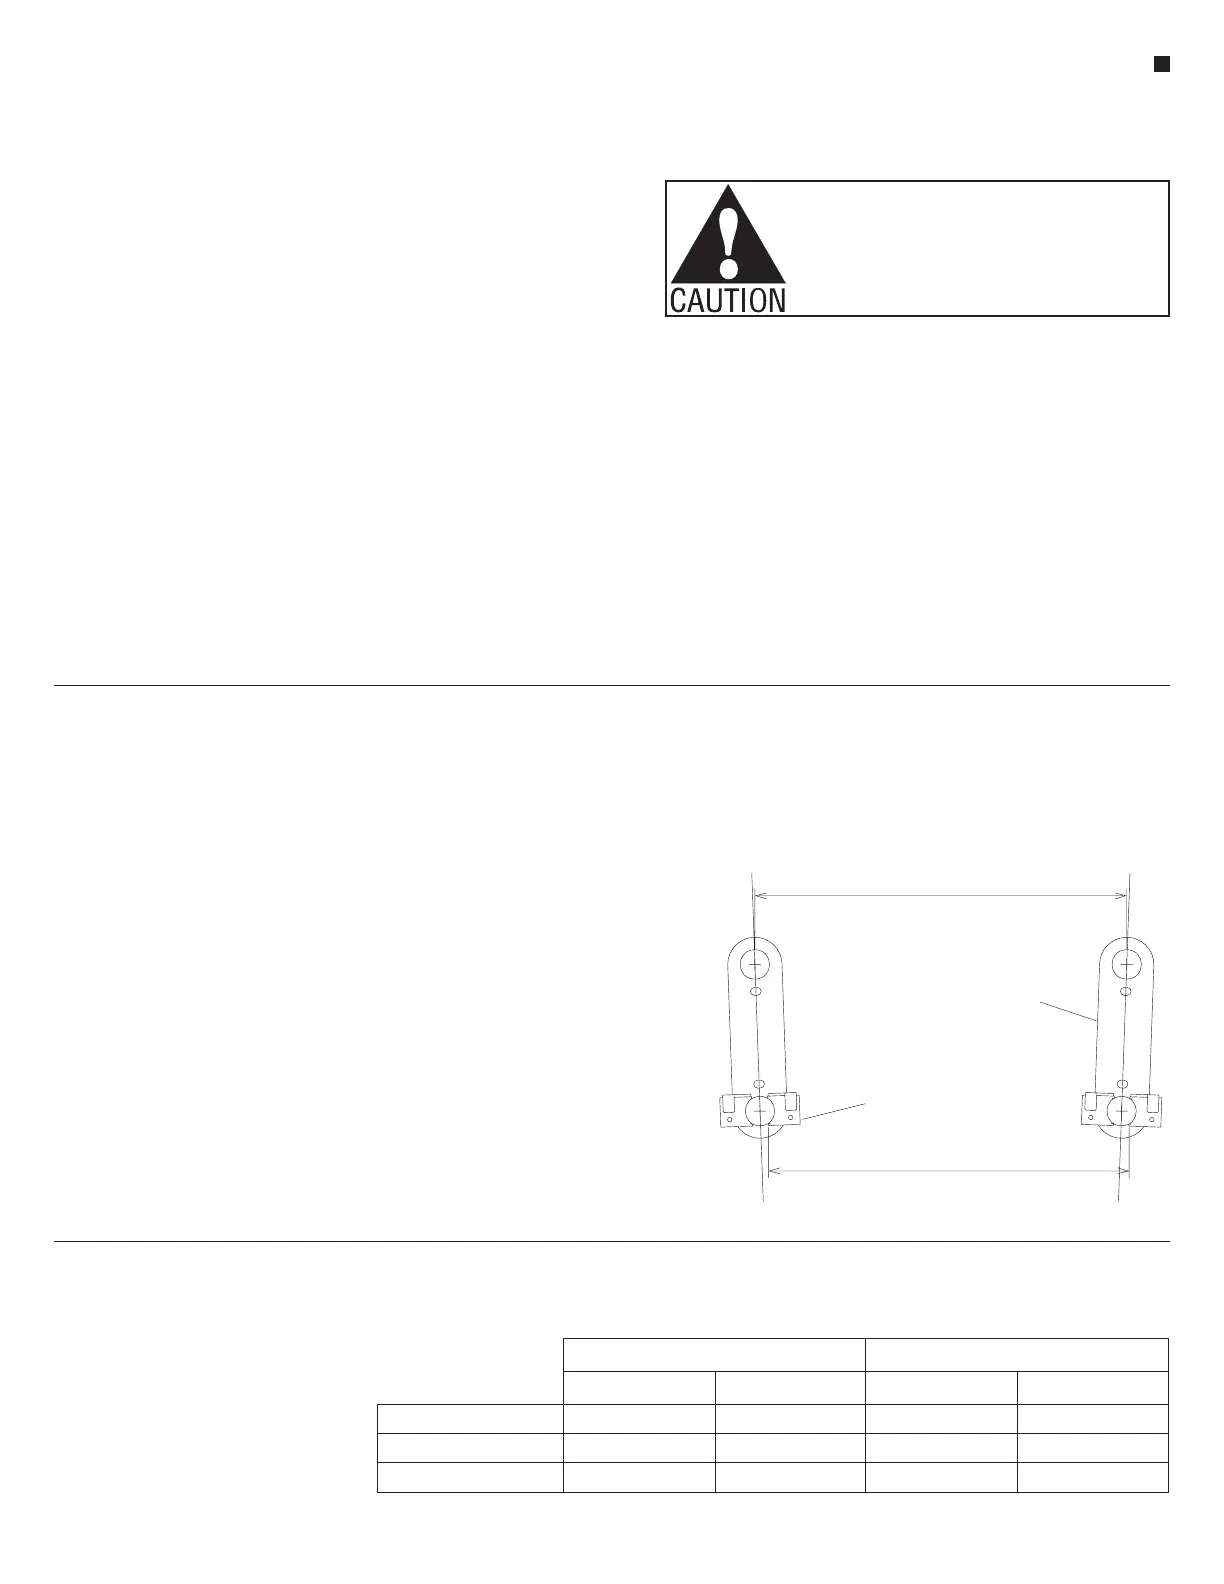
provided. Study “Detail A” and the
guidelines in the “Radius Chart”
and “Tolerances for Mounting
Uprights”.
3. Route the power infeed and data
infeed to the correct location
according to the space-planning
layout provided. The power infeed
wires must not be connected to
the power source at this time.
mounting bracket to be positioned
on the foot, between the uprights
(Figure 6).
Note: On radiused installations,
the front tubes of the upright are
shifted closer together. Rear tubes
always remain at the appropriate
dimension matching the seat
size: 19", 20", 21", 22", 23" or
24" (Detail A, “Radius Chart” and
“Tolerances for Mounting
Uprights”).
Radius Chart: See space-planning
layout for specific anchor bolt
locations per seat, per row. The
following dimensions are a reference
to aid in upright alignment.
The following chart is a guide to front
tube, center-to-center dimensions
for specific radius installations. This
dimension can be measured from front
bracket to front bracket. Rear tube
center-to-center dimension must remain
For a radius of 40' or less,
1
/
8
"
is
added to nominal
center-to-center spacing of rear
tubes.
at 19", 20", 21", 22", 23" or 24" for
straight runs and radius installations.
Front
front tube spacing - see chart
front tube bracket
upright foot
rear tube spacing - 19”, 20”, 21”, 22” 23” or 24”
Radius (ft) 19" Seat 20" Seat 21" Seat 22" Seat 23" Seat 24" Seat
20' 18
1
/
2
" 19
1
/
2
" 20
7
/
16
" 21
7
/
16
" 22
3
/
8
" 23
3
/
8
"
25' 18
5
/
8
" 19
5
/
8
" 20
9
/
16
" 21
9
/
16
" 22
1
/
2
" 23
1
/
2
"
30' 18
3
/
4
" 19
11
/
16
" 20
11
/
16
" 21
11
/
16
" 22
5
/
8
" 23
5
/
8
"
40' 18
13
/
16
" 19
13
/
16
" 20
13
/
16
" 21
3
/
4
" 22
3
/
4
" 23
3
/
4
"
60' 18
13
/
16
" 19
13
/
16
" 20
13
/
16
" 21
3
/
4
" 22
13
/
16
" 23
13
/
16
"
100' 18
7
/
8
" 19
7
/
8
" 20
7
/
8
" 21
7
/
8
" 22
7
/
8
" 23
7
/
8
"
200' 18
15
/
16
" 19
15
/
16
" 20
15
/
16
" 21
15
/
16
" 22
15
/
16
" 23
15
/
16
"
300' 18
31
/
32
" 19
31
/
32
" 20
31
/
32
" 21
31
/
32
" 22
31
/
32
" 23
31
/
32
"
400' - straight 19" 20" 21" 22" 23" 24"
TUBE CENTERLINE FLOOR BOLT CENTERLINE
FRONT REAR
5
/
16
" Diameter
3
/
8
" Diameter
Minimum Radius (20') +
7
/
16
" / -
1
/
16
" ±
3
/
16
" +
9
/
16
" / -
3
/
16
" +
1
/
2
" / -
1
/
8
"
Median Radius ±
1
/
4
" ±
3
/
16
" ±
7
/
16
" ±
3
/
8
"
Straight Installation
+
1
/
16
" / -
7
/
16
" ±
3
/
16
" +
3
/
16
" / -
9
/
16
" +
1
/
8
" / -
1
/
2
"
Tolerances for Mounting Uprights
The following tolerances apply to
standard, floor-mounted Concerto.
They are applied to the
center-to-center dimensions of the
uprights, e.g. a 22" seat must maintain
an upright spacing of 21
13
/
16
" to
22
3
/
16
" between the centerlines of the
rear upright tubes. See above “Radius
chart” text in reference to a radius
which is 40' or less. Note that these
dimensions must be maintained at each
seat. Attempting to rob from an adjacent
seat may only move the problem down
the row.
 Loading...


