TAKING
PICTURES
1. Set the
focus
slide
for
the
correct
cam-
era-to-subject
distance
.
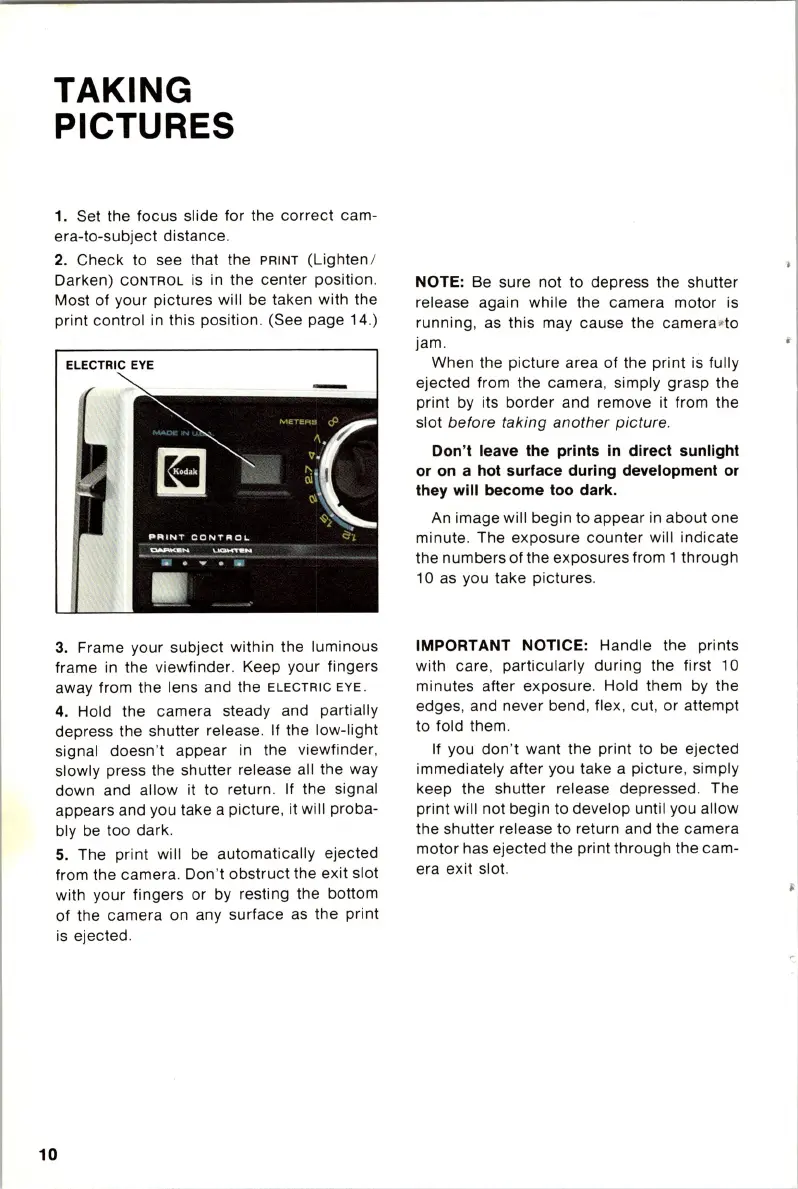
2.
Check
to see that the PRINT
(Lighten
/
Darken)
CONTROL
is in the center
position
.
Most
of
your
pictures
will be taken with the
print
control
in this position. (See page 14.)
3.
Frame your
subject
within
the
luminous
frame in the
viewfinder
. Keep
your
fingers
away from the lens and the ELECTRIC EYE .
4.
Hold the
camera
steady and partially
depress the shutter release. If the
low-light
signal doesn't appear in the
viewfinder
,
slowly press the shutter release all the way
down
and
allow
it to return. If the signal
appears and you take a
picture
, it will
proba
-
bly be
too
dark
.
5.
The print will be
automatically
ejected
from the
camera
. Don't
obstruct
the
exit
slot
with
your
fingers
or
by resting the bottom
of
the
camera
on any surface as the print
is ejected.
10
NOTE: Be sure not to depress the shutter
release again
while
the
camera
motor
is
running
, as this may cause the
camera
~
to
jam.
When the
picture
area
of
the print is fully
ejected from the
camera
, simply
grasp
the
print
by its
border
and remove it from the
slot
before
taking
another
picture
.
Don't leave the prints
in
direct sunlight
or
on
a
hot
surface during development
or
they will become
too
dark.
An image will begin
to
appear in
about
one
minute
. The exposure
counter
will
indicate
the
numbers
of
the exposures from 1
through
10 as you take
pictures
.
IMPORTANT NOTICE: Handle the prints
with
care
,
particularly
during
the first 10
minutes
after exposure. Hold them by the
edges
, and never bend, flex,
cut
,
or
attempt
to fold them.
If you don't
want
the
print
to be ejected
immediately
after
you take a
picture
, simply
keep the shutter release depressed.
The
print
will not begin to
develop
until you
allow
the shutter release to return and the camera
motor
has ejected the print
through
the cam-
era exit slot.
TAKING
PICTURES
1. Set the
focus
slide
for
the
correct
cam-
era-to-subject
distance
.
2.
Check
to see that the PRINT
(Lighten
/
Darken)
CONTROL
is in the center
position
.
Most
of
your
pictures
will be taken with the
print
control
in this position. (See page 14.)
3.
Frame your
subject
within
the
luminous
frame in the
viewfinder
. Keep
your
fingers
away from the lens and the ELECTRIC EYE .
4.
Hold the
camera
steady and partially
depress the shutter release. If the
low-light
signal doesn't appear in the
viewfinder
,
slowly press the shutter release all the way
down
and
allow
it to return. If the signal
appears and you take a
picture
, it will
proba
-
bly be
too
dark
.
5.
The print will be
automatically
ejected
from the
camera
. Don't
obstruct
the
exit
slot
with
your
fingers
or
by resting the bottom
of
the
camera
on any surface as the print
is ejected.
10
NOTE: Be sure not to depress the shutter
release again
while
the
camera
motor
is
running
, as this may cause the
camera
~
to
jam.
When the
picture
area
of
the print is fully
ejected from the
camera
, simply
grasp
the
print
by its
border
and remove it from the
slot
before
taking
another
picture
.
Don't leave the prints
in
direct sunlight
or
on
a
hot
surface during development
or
they will become
too
dark.
An image will begin
to
appear in
about
one
minute
. The exposure
counter
will
indicate
the
numbers
of
the exposures from 1
through
10 as you take
pictures
.
IMPORTANT NOTICE: Handle the prints
with
care
,
particularly
during
the first 10
minutes
after exposure. Hold them by the
edges
, and never bend, flex,
cut
,
or
attempt
to fold them.
If you don't
want
the
print
to be ejected
immediately
after
you take a
picture
, simply
keep the shutter release depressed.
The
print
will not begin to
develop
until you
allow
the shutter release to return and the camera
motor
has ejected the print
through
the cam-
era exit slot.