TP-6376 3/08 49Section 5 General Maintenance
5.11.1 Wheel Installation Procedure
It is important to maintain correct wheel lug nut mounting
torque and use a torque wrench whenever possible to
establish correct wheel torque. Correct wheel torque
prevents loose wheels, broken studs, and wheel/axle
separation. Use the following procedure for wheel
installation:
1. Start all wheel lug nuts by hand to prevent cross
threading.
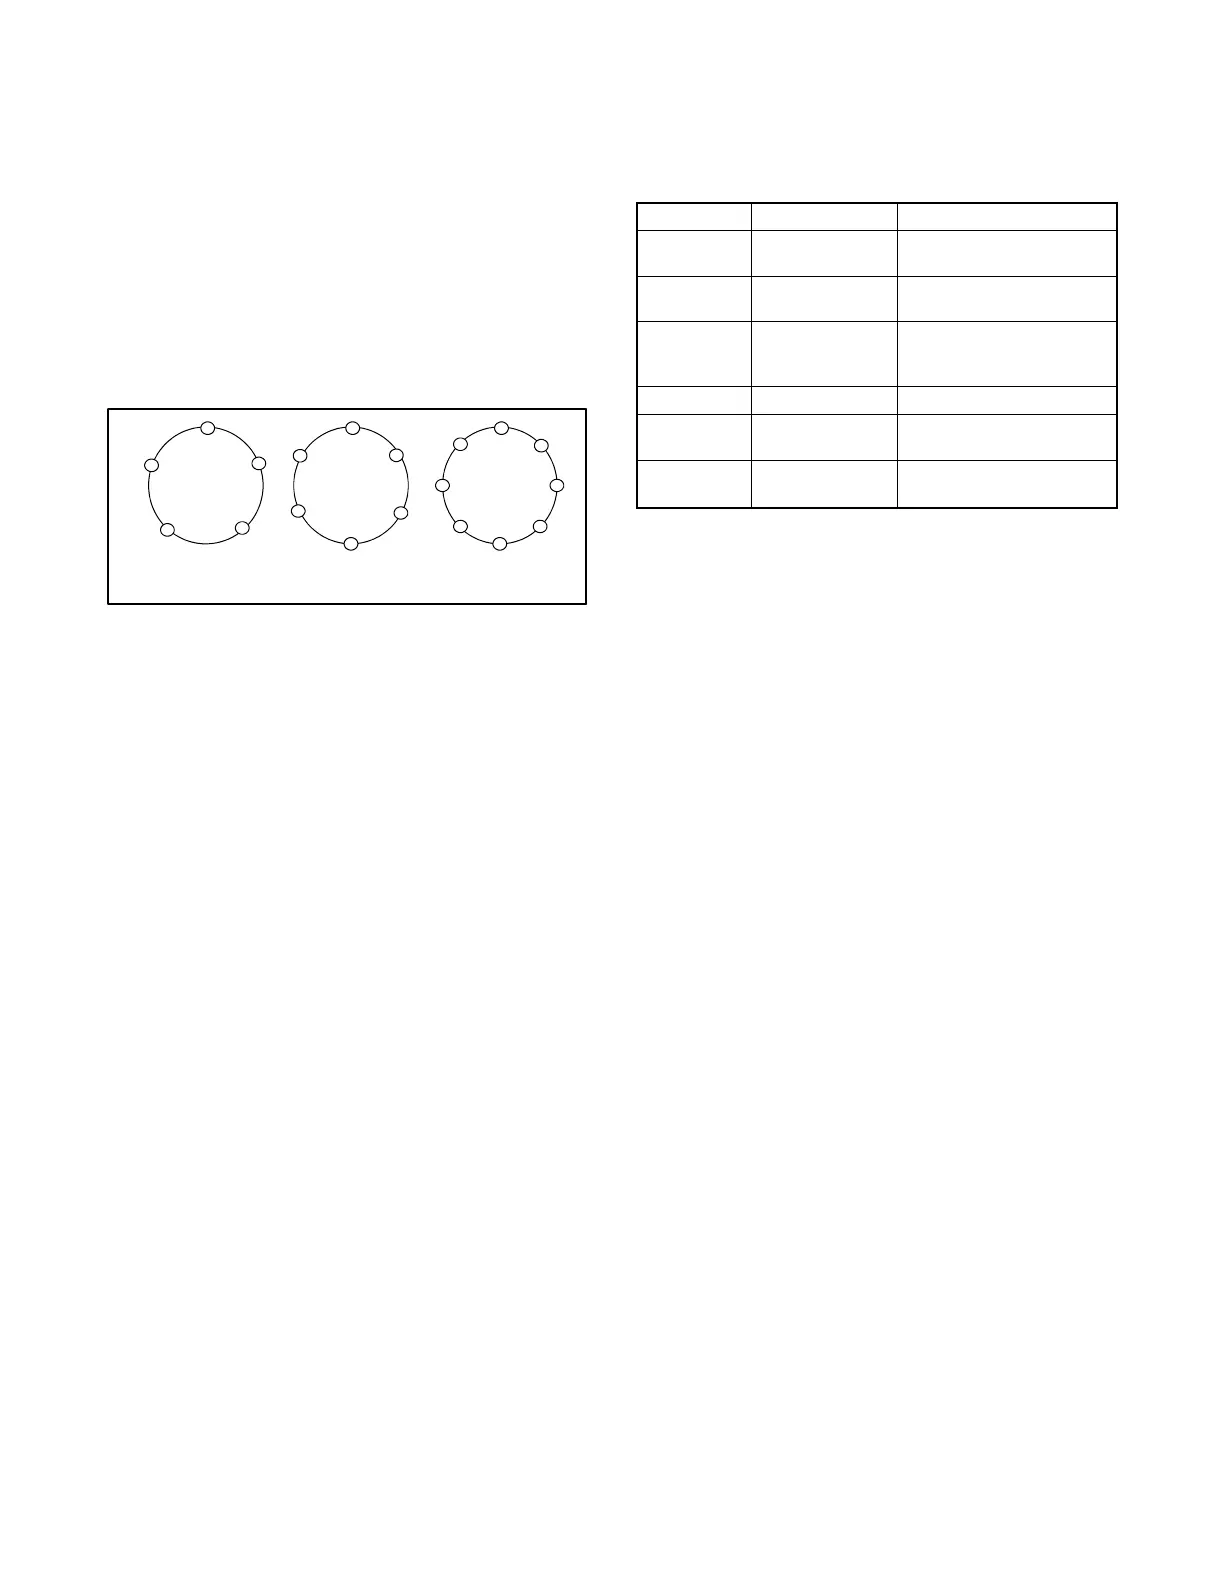
2. Tighten the nuts in the sequence shown in
Figure 5-4.
TP-6376-5
1
2
3
4
5
6
7
8
8-Bolt
1
2
3
4
5
6
6-Bolt
1
2
3
4
5
5-Bolt
Figure 5-4 Lug Nut Torque Sequence
3. Perform the wheel lug nut tightening sequence in
stages. Use the tightening sequence and torque
value recommendations shown in Figure 1-5, Tire
and Wheel Specifications.
4. Torque wheel lug nuts before the first road use and
after each wheel removal. Check and retorque
after the first 40 km (25 miles) and again at 120 km
(75 miles). Check at the specified service interval.
5.11.2 Tires
Before mounting tires onto wheels, make certain that
the wheel size and contour match. The tire must have a
load rating sufficient to match the trailer load.
The capacity rating molded into the sidewall may not be
appropriate for a trailer application. Use the capacity
molded rating into the sidewall for LT and ST truck tires.
Use the capacity molded rating into the sidewall divided
by 1.1 when selecting tires designated for passenger
cars.
Use the tire mounting procedures as outlined by the
Rubber Manufacturer’s Association or the tire
manufacturer.
Tire inflation is the most important factor in tire life. Use
the recommended inflation pressure for the load but
never exceed the tire or wheel maximum pressure
rating. Check inflation pressure before operation while
the tire is cold. Do not bleed air from tires when they are
hot. Check inflation pressure weekly during use to
ensure maximum tire life and tread wear.
Check tire wear frequently because once a wear pattern
becomes firmly established in a tire, uneven wearing is
difficult to stop even after correcting the cause. Use the
chart in Figure 5-5 to help determine causes and
solutions to tire wear problems.
Wear Pattern Cause Action
Center wear Overinflation Adjust pressure to particular
load per tire specifications.
Edge wear Underinflation Adjust pressure to particular
load per specifications.
Side wear Loss of camber or
overloading
Verify that load does not
exceed axle rating. Align at
alignment shop.
Toe wear Incorrect toe-in Align at alignment shop.
Cupping Out of balance Check bearing adjustment
and balance tires.
Flat spots Wheel lockup and
tire skidding
Avoid sudden stops when
possible and adjust brakes.
Figure 5-5 Tire Wear Diagnostic Chart
5.12 Extended Period Storage
Perform the generator set storage procedure as
outlined in the generator set operation manual.
5.12.1 Storage Procedure
If the trailer will be out of service for an extended period
of time, perform the following steps for trailer storage.
Store the trailer in a weather-protected building if
possible.
1. Inflate tires to the s pecified inflation pressure. If
practical, jack up the trailer and place jack stands
under the trailer frame so that the weight will be off
the tires.
2. Lubricate mechanical moving parts, such as the
hitch, that are exposed to inclement weather.
3. Close all doors and lock all accessible doors and
access panels.
4. Cover or seal all openings, louvers, vents, and
drains.
5.12.2 After Storage Inspection
Procedure
1. Remove all wheels.
2. Inspect the suspension for wear.
3. Inspect oil or grease seals for wear or nicks.
Replace as necessary.
4. Mount wheels and torque lug nuts per the
recommend torque specifications.