25
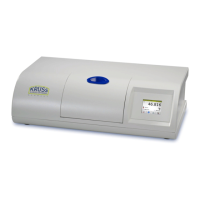
5. Melting point analysis
With the device you will be able to determine the melting point of powdery substances
up to 400 °C.
►Switch on the mains switch on the back of the device.
You will see the current oven temperature on the display and you will hear a signal
tone.
►By pressing the arrow key, select the desired starting temperature (approx. 3 °C
below expected melting point).
►When having reached the selected starting temperature, carefully insert a filled capil-
lary tube (filled with approx. 4 mm) with the opening facing upwards into the drill
hole of the guiding head until you feel the capillary tube touching the end.
After having reached the melting point, the device falls back to the selected tem-
perature and you will also hear a signal tone. The melting point is displayed and can
be printed via the printing key.
►During cooling down to the starting temperature “auto/waiting” will flash up on the
display. After the “waiting” display has disappeared, the same measuring can be
repeated.
► If there is no new measuring within 5 min, the device automatically cools
down (fan) to 30 °C.
► Do not switch off the device before reaching 30 °C, because then the fan cooling
will also be switched off.
► If you wish to carry out a measuring while the cooling is operating, you can directly
select the temperature using the arrow keys. The cooling will switch off automatically.
► If the desired starting temperature is below the current temperature, you have to wait
until the cooling has reduced the temperature.
► Do not attach protective cover before the device has cooled down.
5. Melting point analysis