EasyManua.ls Logo

kruss P3000 User Manual

kruss P3000
70 pages
To Next Page IconTo Next Page
Page #1 background imageLoading...
Page #1 background image
www.kruess.com
innovation since 1796
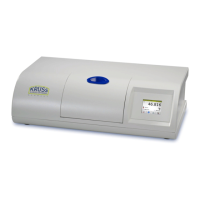
Polarimeter
P3000
User Manual

Table of Contents

Questions and Answers:

kruss P3000 Specifications

General IconGeneral
Contact Angle Resolution0.01°
InterfaceUSB, Ethernet
Contact Angle Range0 to 180°
Temperature Range-10°C to 130°C (optional up to 200°C)
DisplayTouchscreen
Power Supply100 – 240 V, 50/60 Hz

Summary

General Safety Instructions

Electric Shock Hazards

Warnings about electric shock from damaged instruments, liquid ingress, and fuse changes.

Light Source and Pinching Hazards

Warnings regarding LED light source damage to the retina and danger of pinching hands.

Condensate and Overheating Damage

Precautions against condensate formation and overheating damage due to placement or sunlight.

Chemical Damage Warning

Warning about aggressive chemicals damaging the instrument, recommending neutral cleaning agents.

Basic Operation of the Polarimeter

Defining System Settings

Guides the user on how to configure system settings like printer, language, and date/time.

System Settings Configuration

Details the process of setting up system parameters like printer status, language, and date/time via the touchscreen interface.

Defining Instrument Settings

Explains how to configure instrument-specific settings such as scale, polarimeter tube length, and temperature units.

Performing Calibrations

Outlines the procedure for performing instrument calibrations, including measurement range and temperature sensor calibration.

Initial Startup and Installation

Installation Steps

Covers the initial setup steps, including choosing a location, connecting a printer, and connecting the power supply.

Choosing a Suitable Location

Provides guidance on selecting an appropriate, stable, and vibration-free location for the instrument.

Power and Printer Connections

Instructions for connecting the printer and the instrument to the power supply.

Preparing the Instrument After Installation

Describes essential post-installation steps such as switching on the instrument and printer, and calibrating the temperature sensor.

Switching on the Instrument

Details the procedure for switching on the polarimeter and the required waiting time for light source stabilization.

Stabilizing the Light Source

Explains the need for thermal equilibrium of the light source after power-on for optimal precision.

Switching on the Printer

Details the steps to switch on the connected printer via the instrument's system settings.

Connecting and Calibrating the Temperature Sensor

Guides on connecting the temperature sensor and the process of calibrating it for accurate readings.

Checking and Validating the Instrument

Describes how to check the instrument's accuracy after transport and installation, including setting parameters and measuring standards.

Setting the Instrument Parameters

Details how to adjust default instrument settings like scale, polarimeter tube, and temperature units.

Determining the Blank Measurement

Guides the user through the process of performing a blank measurement, essential for accurate sample readings.

Blank Measurement Saving

Instructs on how to save the measured blank value and how it is displayed in the main menu.

Measuring a Standard for Validation

Explains how to measure a standard to verify instrument accuracy and when recalibration is needed.

Routine Operation Procedures

Executing a Measurement

Provides a step-by-step guide on how to perform a measurement, starting with blank determination.

Blank Measurement Procedures

Details the process of performing a blank measurement using the instrument's interface.

Instrument Settings Configuration

Calibrating the Measurement Range

Details the process of calibrating the instrument's measurement range using blank and quartz standard measurements.

Resetting and Performing Calibration

Describes resetting calibration to factory settings and performing calibration steps including blank and quartz standard measurements.

Calibrating the Temperature Sensor

Details the procedure for calibrating the temperature sensor for accurate temperature readings.

Troubleshooting Guide

Troubleshooting Faulty Measurement Results

Lists common causes and remedies for faulty measurement results, such as dirty parts or calibration issues.

Troubleshooting Inferior Precision

Addresses causes of inferior precision, like improper cleaning or sample temperature issues, and their solutions.

Troubleshooting Instrument Power Issues

Covers potential causes and solutions for the instrument failing to power on, such as a blown fuse.

Related product manuals