DMA882S Digital Stepper Drive User Manual
Page | 3
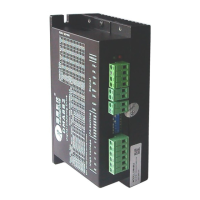
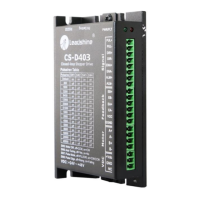
3. Connection Pin Assignments and LED Indication
The DMA882S has two connector blocks P1&P2 (see above picture). P1 is for control signals connections, and P2 is
for power and motor connections. The following tables are brief descriptions of the two connectors. More detailed
descriptions of the pins and related issues are presented in section 4, 5, 9.
3.1 Connector P1 Configurations
Pulse signal: Pulse active at rising edge; 4-5V when PUL-HIGH, 0-0.5V when PUL-LOW.
Minimal pulse width of 2.5μs. Add a resistor for current-limiting at +12V or +24V input logic
voltage (1K for +12V, 2k for +24V). The same as DIR and ENA signals.
DIR signal: This signal has low/high voltage levels to represent two directions of motor rotation.
4-5V when DIR-HIGH, 0-0.5V when DIR-LOW. Minimal direction setup time of 5μs. Swapping
the connection of two wires of a coil (e.g. A+ and A-) to the drive will reverse motor direction.
Enable signal: This signal is used for enabling/disabling the drive. High level +5V (NPN control
signal) for enabling the drive and low level for disabling the drive. PNP and Differential control
signals are on the contrary, namely Low level for enabling. By default it is left
UNCONNECTED (ENABLED).
Fault Signal: An OC output signal which is active when one of the following error protection is
activated: over-voltage, over-current, and position following error. This port can sink or source
20mA current at 24V. The resistance between ALM+ and ALM- is low impedance in normal
operation, and will change to high when the drive goes into error protection.
Notes: (1) shielding control signal wires is suggested; (2) To avoid interference, don’t tie PUL/DIR control
signal and motor wires together
3.2 Connector P2 Configurations
Motor Phase A connections. Connect motor A+ wire to A+ Pin; motor A- wire to A-
Motor Phase B connections. Connect motor B+ wire to B+ Pin; motor B- wire to B-
Power supply input 18~80VAC or 24-110 VDC; No polarity