Home
Lectra
Plotter
Alys 30
Page 64
Lectra Alys 30 - Page 64
72 pages
Manual
Save Page as PDF
To Next Page
To Next Page
To Previous Page
To Previous Page
Loading...
6MKLXWMHISJ4PSXXIVWIIRJVSQXLIFE
G
O
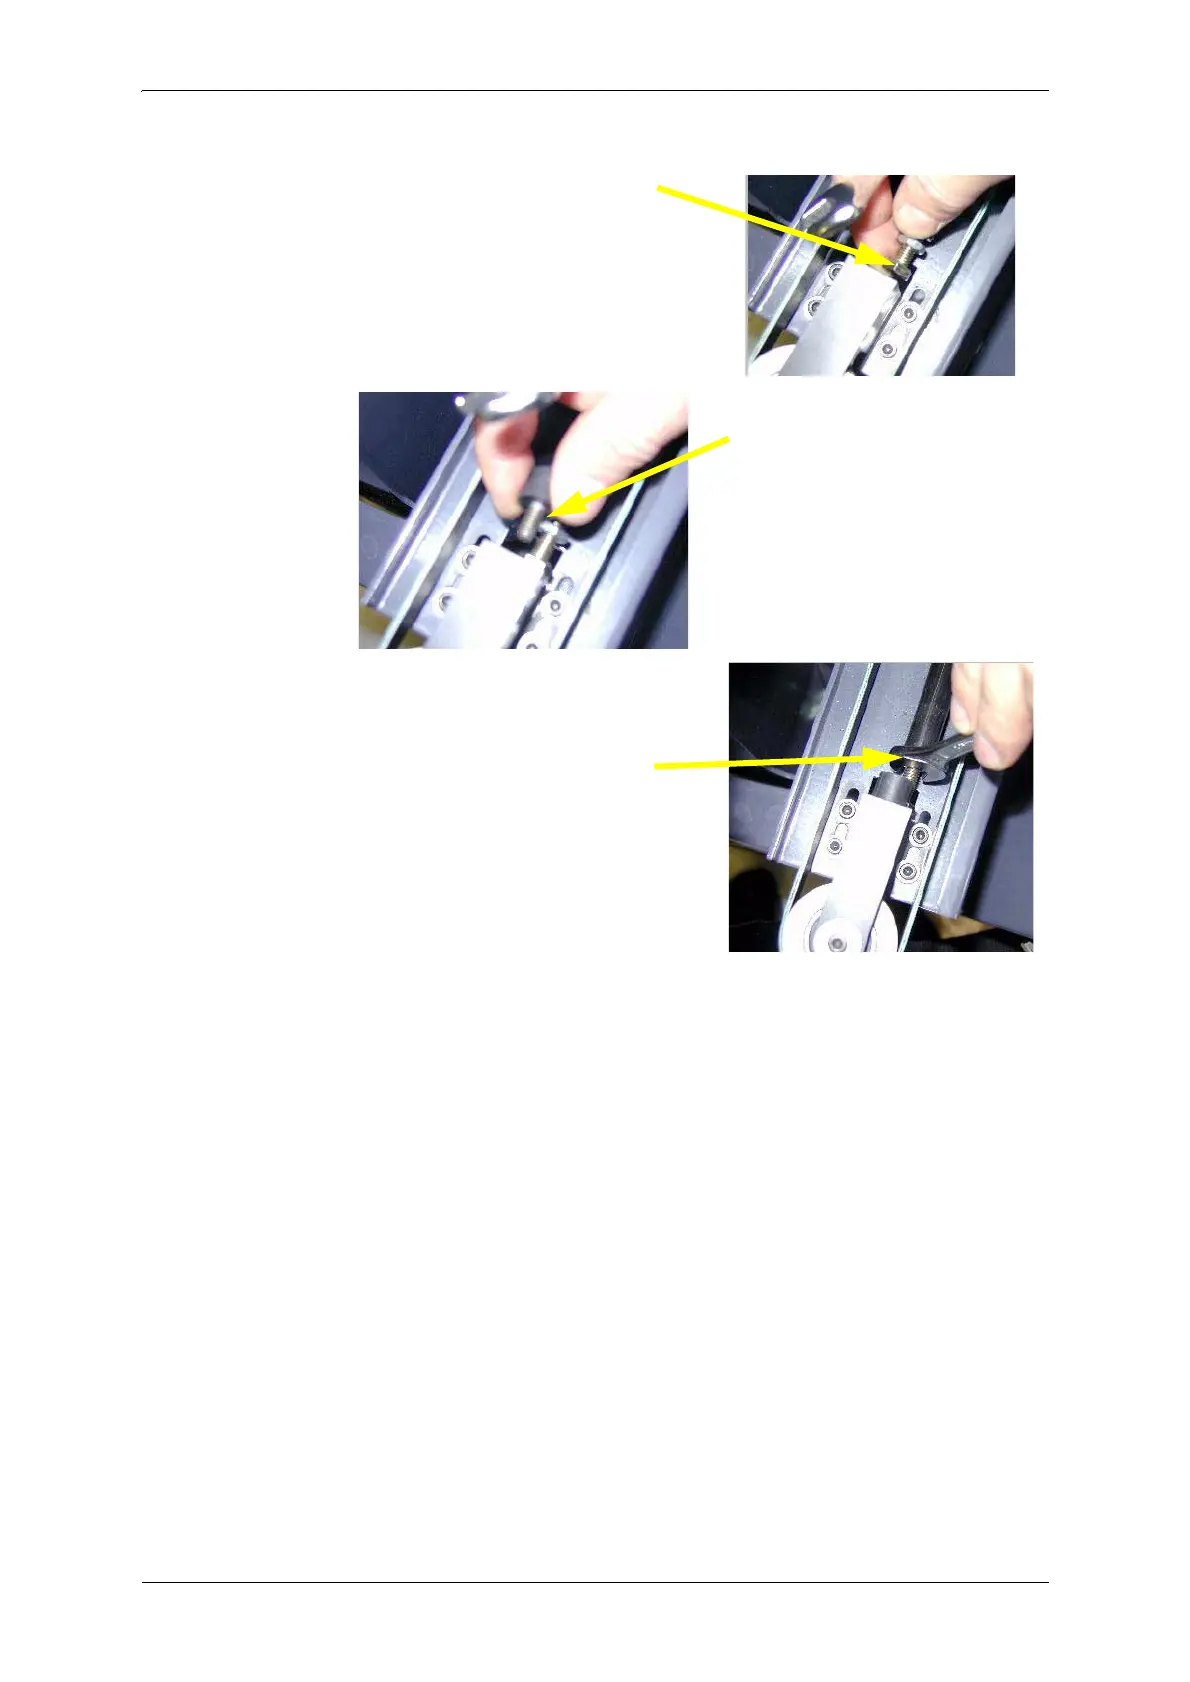
%P]WQEMRXIRERGIQERYEP
%%
7GVI
[MRXL
IV
IXIRXMS
RRYX
7GVI[M
RXLIVYF
FIVPMQMX
WXST
7GVI[MR
XLIFIPXXI
RWMSR
EHNYWXQIR
XWGVI[EGG
SVHMR
KXS
XLIXMKLXIRIVTSWMXMSRTIRQEVO
63
65
Table of Contents
Main Page
Contents
5
Safety instructions
7
1. Electrical safety
7
1.1 Fuses
7
2. Operating voltage of plotter
8
2.1 Mains cord
8
2.1.1 European countries
8
2.1.2 USA and Canada
8
3. Handling and storage of consumable items
9
3.1 Ink cartridges
9
3.1.1 Handling
9
3.1.2 Storage
9
3.1.3 Recycling used ink reservoirs
9
3.2 Paper
9
3.2.1 Storage
9
Introduction
11
1. Presentation of the Alys inkjet plotter
11
2. Control keyboard
12
3. Minimum required configuration
13
3.1 Hardware configuration
13
3.2 Software configuration
13
4. Data Sheet
14
Plotter Tests
15
1. Access to the advanced maintenance software
15
1.1 Updating plotter electronics management program.
16
1.2 Synchronizing plotter clock with the PC clock
18
2. Plotter tests
19
2.1 Configuration
19
2.2 Basic tests
20
2.2.1 Test actuators/sensors
21
2.2.2 Testing motorizations
26
Mechanical maintenance
29
1. Tools necessary for maintenance
29
1.1 General recommendation
29
2. Presentation of sub-assemblies
30
2.1 Front view of plotter
30
2.2 Left side of Plotter, seen from the back
31
2.3 Right side of Plotter, seen from the back
31
3. Dismantling of printing block parts
32
3.1 Removal of head protection cover
32
3.2 Replacing the ink level sensor
33
3.3 Dismantling the buffer reservoir
35
3.4 Mounting the buffer reservoir
36
3.5 Removal of the electronics board
37
3.6 Removal of the head/buffer reservoir unit
38
3.7 Removal of the plotting block
39
3.8 Removal/replacement of anti-static brushes, Y carriage
40
3.8.1 Removal
40
3.8.2 Replacement
40
3.9 Replacement of the plotting block
40
3.10 Replacement of the head/buffer reservoir unit
41
3.11 Replacing the electronics board
42
3.12 Replacement of the head protection cover
44
4. Removal of lateral covers
45
5. Left side of Plotter, seen from the back
46
5.1 Replacement of the fill pump tube.
47
5.2 Replacement of the main electronics board
49
5.3 Replacing the main transformer
50
5.4 Mounting / Removing the Y motor
52
5.4.1 Replacement of Y motor
52
5.4.2 Replacement of carbons
53
5.5 Replacing the paper feed encoder
53
5.5.1 Dismantling
54
5.5.2 Mounting
54
5.5.3 Adjustment
55
5.6 Replacing the paper encoder tension bar
55
6. Right side of Plotter, seen from the back
58
6.1 Changing seals
59
6.2 Removal/mounting of carbon sliding contacts
59
6.3 Removal of Y carriage/Guide sockets/drive belt
60
6.3.1 Removal of the Y carriage drive belt
60
6.3.2 Removal of sockets
61
6.3.3 Removal of the belt
62
6.4 Mounting of the Y carriage
62
6.4.1 Installing the belt on the Y carriage
62
7. Adjustment of belt tension
65
7.1 Head drive belt (green belt, Y motor)
65
7.2 Short belt
67
8. Greasing
67
8.1 Greasing of the block bearing
67
8.2 Greasing the purge station
68
9. Mounting of side covers
69
9.1 Command keyboard connection
69
10. Plotter maintenance
70
10.1 Cleaning ink stains on the plotter
71
11. Handling
71
Related product manuals
Lectra Alys 30L
72 pages
Lectra Alys 60
72 pages
Lectra Alys 120
72 pages