EN
4
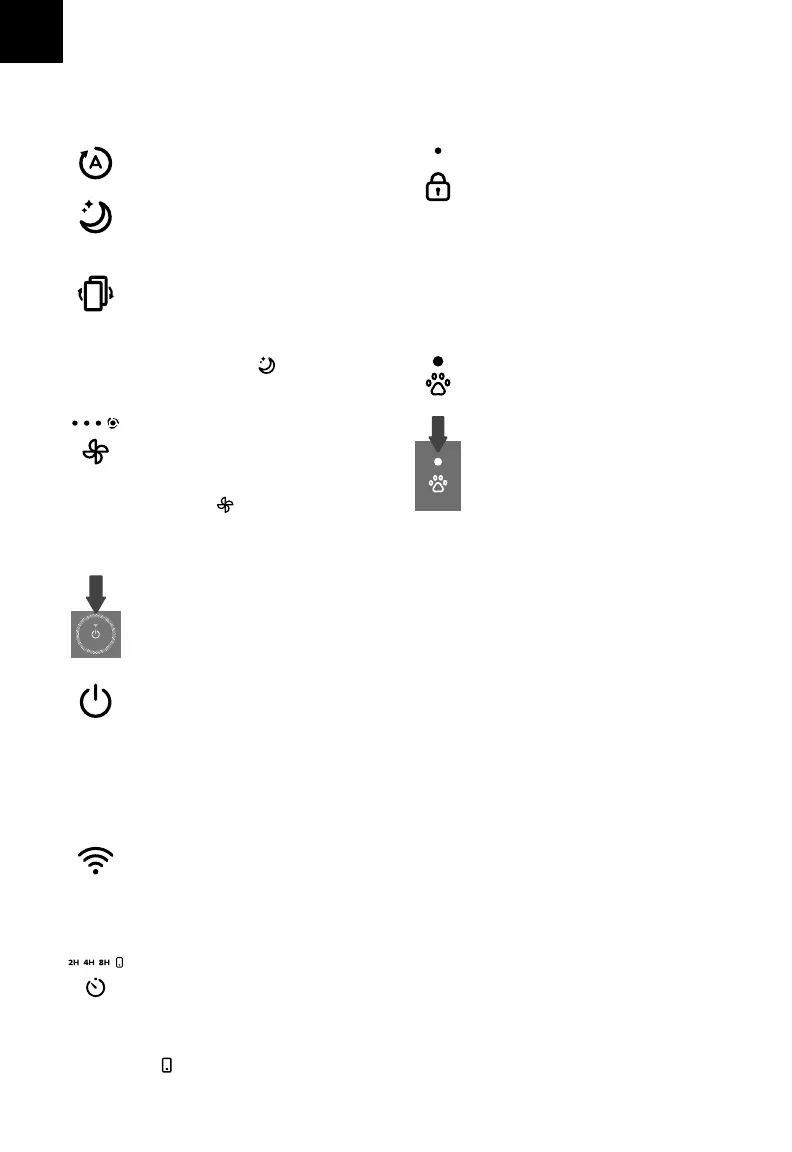
CONTROLS & DISPLAY
Auto Mode Button
• Turns Auto Mode on (see page 5).
On/O Button
• Turns the air purifier on/o.
• Press and hold for 5 seconds to
connect the air purifier to the VeSync
app. See the in-app instructions for
more information (see page 5).
• Press and hold for 15 seconds to
reset the air purifier and disconnect
from Wi-Fi® (see page 5).
Wi-Fi Indicator
• Blinks when connecting to the
VeSync app, lights up when
connected to VeSync, and is o
when disconnected from VeSync.
See the VeSync in-app instructions
for more information (see page 5).
Sleep Mode Button
• Turns Sleep Mode on (see page 5).
• Press and hold for 3 seconds to
reset the Check Filter Indicator.
Check Filter Indicator
• Lights up red when the filter should
be checked (see Check Filter
Indicator, page 8).
• To reset the Check Filter Indicator,
press and hold for 3 seconds.
The Check Filter Indicator will flash
3 times, and turn o.
Fan Speed Button & Indicators
• Cycles through fan speeds: low (1
indicator will light up), medium (2
indicators), high (3 indicators), and
turbo (4 indicators).
• Tapping while the air purifier is
in Auto Mode, Sleep Mode, or Pet
Mode (when the display is lit up)
will exit that mode.
Air Quality Indicator
• These indicator rings use an
automatic infrared dust sensor to
display the air quality: Blue (Very
Good), Green (Good), Orange
(Moderate), Red (Bad).
Timer Button & Indicators
• Cycles through timer options: 2 hours,
4 hours, and 8 hours (see page
6
).
Note: You can also use the VeSync app to control these functions, as well as additional app-only features
(see page “VeSync App Functions” on page 7).
Note: The timer indicators will light up
with the corresponding timer selected.
• lights up when the timer function
is used through the VeSync app.
Display Lock Button & Indicator
• Prevents current settings from
being changed (see page 6). Press
and hold for 3 seconds to lock and
unlock the display.
Pet Mode Button
• Turns Pet Mode on (see page 6).
Light Sensor
• The Light Sensor detects the amount
of light in the room to automatically
adjust the air purifier settings (see
Light Detection, page 6).
• Light Detection can be turned on/o
in the VeSync app (see page 6).
Note: Display Lock can also be
controlled through the VeSync app.
• The Display Lock Indicator will light up
when the display is locked and blink
when any other button is tapped to
indicate the display is locked.
GETTING STARTED
1. Place the air purifier on a flat, stable surface
such as the floor.
2. Pull both sides of the front cover to remove it.
[Figure 2.1]
3. Push the pre-filter’s tabs inward and pull to
remove the pre-filter from the air purifier.
[Figure 2.2]
4. Remove the True HEPA / Activated Carbon
Filter from inside the air purifier.
5. Remove the plastic packaging from the filter
and place the filter and the pre-filter back into
the air purifier. [Figure 2.3]
6. Place the front cover on the air purifier. Make
sure to align the tabs on the cover with the slots
on the bottom of the air purifier. [Figure 2.5]
7. Insert the power adapter plug into the back of
the air purifier. [Figure 2.6]
8. When using the air purifier, allow at least 15
inches / 38 cm of clearance from the front of the
air purifier. Keep away from anything that would
block air flow, such as curtains. [Figure 2.7]
Note: Make sure the True HEPA filter (the side with
the ribbon handle) is facing outward when you
insert the filter. [Figure 2.4]