Networking the printer
Installing a network printer allows users at different workstations to print to a common printer. Methods of setting up
a network printer include:
• sharing a printer that is locally attached to a network computer
• a direct Ethernet connection through a print server
Installing network printers
Shared printing
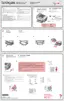
Installing software and sharing the printer on the network (on the host computer)
1 Connect the printer to a network computer using a USB cable.
If the Found New Hardware dialog appears, click Cancel.
2 Insert the printer software CD.
3 Click Install.
4 Click Continue.
5 Select Yes to share your printer.
6 Assign a shared printer name.
7 When prompted, select Test Page to make sure that the computer can print to the printer.
8 Follow the directions on the computer screen until installation is complete.
Installing the shared printer on other network computers (on the client computers)
Using the peer-to-peer method Using the point-and-print method
a Go to a network computer that you want to enable
to print to the shared printer.
b Insert the printer CD.
c Click Install.
d From the “Connect Your Printer” dialog, select the
network option.
e From the “Networking Setup” dialog, select
Peer-to-Peer.
f Enter the shared names of both the printer and the
network computer you assigned in step 6 on
page 66.
g When prompted, select Test Page to make sure
the computer can print to the shared printer.
h Follow the instructions on the computer screen
until installation is complete.
i Repeat this procedure for each network computer
you want to access the shared printer.
a Go to a network computer that you want to enable
to print to the shared printer.
b Browse the Network Neighborhood until you find
the name of the shared printer assigned in step 6
on page 66.
c Right-click the printer icon, and select Open or
Connect.
d This will copy a subset of the printer software from
the host computer. A printer object will be created
in the Printers folder of the client.
e When prompted, select Test Page to make sure
the computer can print to the shared printer.
66