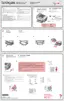
1 Remove the print cartridges.
2 Make sure the sticker and tape have been removed.
1
2
3 Reinsert the print cartridges.
If the printer is connected to the computer through another device:
1 Disconnect the USB cable from any other device, such as a USB hub or switch box.
2 Directly connect the cable to the printer and the computer.
Make sure the printer is set as the default printer and is not on hold or paused.
1 Click:
• In Windows XP Pro: Start Settings Printers and Faxes.
• In Windows XP Home: Start Control Panel Printers and Faxes.
• In Windows 2000: Start Settings Printers.
• In Windows 98/Me: Start Settings Printers.
2 Double-click the name of your printer.
3 Click Printer.
• Make sure no check mark appears next to Pause Printing.
• Make sure a check mark does appear next to Set As Default.
1 Press Power to turn the printer off.
2 Disconnect the power supply cord from the wall outlet.
3 Gently remove the power supply from the printer.
4 Reconnect the power supply to the printer.
5 Plug the power supply cord into the wall outlet.
6 Press Power to turn the printer on.
7 If an error message appears, see “Error messages” on page 94.
78