18
Wiring operator
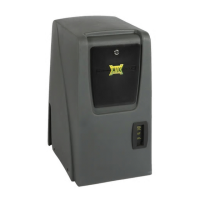
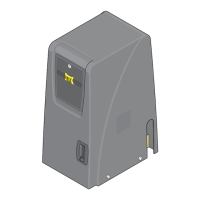
BATTERY
IN
P
OWER
IN
POWER/SOLAR
IN
B
AT
TERY
IN
www
.
ma
x.us.
c
o
m
Mad
e
in
US
A
BA
TTERY
PACK
TO MOT
OR
CONTROLLER
E1
/2
Battery Voltage
Replace
Battery
ON/OFF
Batter
y
TEST
Battery
Battery IN
Erro
r
F
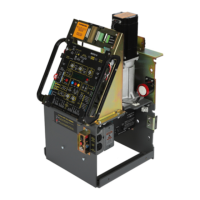
MAX BC-7
Battery Module
E
1/2
Battery
Vo
ltage
Replac
e
Batter
y
ON/O
FF
Battery
TEST
Battery
Battery IN
Error
F
MAX BC-
7
Battery Module
MAX BC-7
Battery Module
POWER/SOLA
R
IN
IMPORTANT
connect to
“BA
TT
ERY IN”
before use
Ph
o
toCe
l
l
E
dge
UL
E
ntrap
1
2
L
i
mi
t
S
W
O
N
-L
I
NE
MA
TR
IX
JO
G
JO
G
L
EF
T
RI
G
HT
Jog LT
Jog RT
GND
Edge 1
Edge 2
Photo
Cell
ERD
Mo
t
o
r
Ov
er
L
oad
PO
WER
MC-200
Moto
r
Co
nt
r
ol
l
er
16
15
1
4
13
12
3
4
5
M
A
X
LED
ON
S
en
s
it
iv
ity
E
dge
ER
D
MO
T
OR
P
ower In
ALAR
M
B
A
T
TE
R
Y
PAC K
LI
M
I
T
S
WI
TC
H
M
O
T
OR
INPUTS
P
W
R 12V
-
GND
-
-
-
P
WR 2
4
V
-
G
N
D
-
R
S
-4
8
5
(-
)
-
R
S
-
4
8
5
(+
) -
M
A
TR
I
X
1
Edg
e
1
M
o
n
itore
d
Rev
e
rsin
g
E
d
ge
M
o
n
itore
d
P
h
o
to
C
ell
OR
GN
D
Jog
RT
Jog
LT
E
n
t
rapme
nt
P
rot
e
c
t
i
on
In
p
u
t
s:
M
U
ST
jump
er
u
nuse
d
inpu
ts
E
n
t
rapme
n
t P
ro
t
ec
tio
n
Se
n
so
r
Guidel
ines
1
-
-
-
C
AUTION:
See in
st
a
l
la
tion in
s
tr
uctions
.
A
TT
E
N
T
IO
N
:
Voir la
no
t
i
ce
d’in
s
tallation.
Ed
ge
2
Ph
oto
Cel
l
M
C-2
00
PW
R
12V M
UST
be
us
ed
ON
LY
p
ower
entr
a
pme
nt pr
ot
ectio
n
sens
ors wi
th M
C
-20
0 PWR
12V
2
3
•
A
se
ns
o
r
M
U
ST
b
e w
ir
ed t
o
E
D
GE
1
o
r
ope
rat
or
WIL
L
NO
T
fu
nc
tio
n
.
•
Wi
re
N
OR
M
A
L
LY
CL
OSED
(
N.C.)
M
ON
ITOR
E
D
se
n
s
or
s
ONLY, to e
ac
h
o
per
ato
r
’
s
M
C
-
200
w
he
n du
al
ope
r
at
ors
a
re
us
e
d.
•
Revers
in
g
Edge
and
/
o
r Photo Cell c
an
be w
ir
e
d t
o
ANY
of
the 3
I
npu
ts
.
•
M
C-2
00
P
W
R
12V M
UST be us
e
d t
o
power
M
ON
ITOR
ED
se
n
so
r
s.
•
U
N
U
SED
i
npu
ts
M
UST
r
em
ai
n
JU
M
PERED o
r
fau
lt
will
o
cc
ur
.
G
N
D
1
2
3
In
p
u
t
s
&
MUST
be “L
EA
R
NED”
to MONI
T
OR
sensors
.
To
LEARN in
p
u
t
s
&
:
1.
MON
IT
OR
ED S
e
n
so
r
s
M
US
T
be
wir
e
d
to inp
uts
BE
F
OR
E the
y
ca
n
b
e
lear
n
e
d.
A
n
y
u
nus
ed in
p
u
ts
MU
S
T
b
e
ju
mpere
d.
2
.
Reve
rs
in
g
Edge a
n
d
/o
r
P
hoto Cell ca
n
be wi
r
ed to
e
it
her
in
p
u
t
2
or
3.
3
.
P
r
e
ss
an
d
HO
L
D t
he OPEN &
S
TOP
b
utton
s
at
th
e sa
me
t
im
e on
Ma
t
r
ix
1
u
ntil bee
p
is
h
e
ar
d, learn
mo
d
e
beg
in
s
.
Le
a
r
n mode la
st
s
fo
r
5
m
in
. in
d
ic
a
te
d
b
y
b
e
e
pin
g
.
4.
LE
Ds
W
IL
L b
e O
N
fo
r e
a
c
h
d
e
te
ct
e
d
se
n
sor on
MC-
2
0
0.
L
E
Ds
WILL
be
ON
fo
r
B
OT
H
M
C-
200
s
when
d
u
a
l
operators a
re
use
d.
5.
P
r
e
ss S
TO
P
bu
tt
on
ag
a
i
n
with
in
5 min
.
to
le
ar
n
s
e
n
s
ors and
e
n
d
le
a
rn
mo
d
e
,
bee
p
in
g
s
to
ps.
In
p
u
ts
a
r
e
n
ow
M
ON
IT
OR
ED
.
2
3
2
3
OPEN
STOP
C
L
O
S
E
M
O
T
O
R MO
TI
ON
M
C
-200 Slid
e
3
4
5
6
7
1
1
2
3
4
5
6
7
2
BATTERY Plug: MUST be plugged into BATTERY IN port Before use.
POWER/SOLAR IN Port: MAX Toroid 15 Amp Box connection.
Battery Voltage LEDs: Show amount of battery power available.
LEDs are always ON when using AC power. Test battery button must be
pressed to show battery power when using battery power ONLY.
ON/OFF Battery Button:
IMPORTANT: Battery power automatically turns ON when
MAX Toroid 15 Amp Box AC POWER Switch is turned ON.
To turn OFF ALL POWER to operator:
1. Turn OFF AC POWER Switch on MAX Toroid 15 Amp Box.
Battery power remains ON.
2. WAIT for 15 seconds.
3. Press and HOLD (approx. 5 seconds) the RED ON/OFF BATTERY
button until MAX BC-7 LEDs turn ON, then release button.
LEDs will turn OFF.
Replace Battery LED: Replace battery when lit.
TEST Battery Button: Press to show amount of battery power available when
using battery power ONLY (Battery voltage LEDs will light respectively).
Battery IN Error LED: Lights when there is a battery connection problem.
Make sure battery plug #1 is plugged into BATTERY IN port or there are no
damaged or loose wires.
Gate Operator System Overview continued
MAX BC-7 Battery Module
MAX MC-200 Motor Controller
Continued on next 2 pages.
A
B
C
D
E
F
G
H
I
J
K
L
M
N
O
P
MOTOR OVERLOAD LED: Excessive current being drawn by motor when lit.
ERD LED: ERD sensor has been activated when lit.
ERD Sensitivity Knob: 16 selectable sensitivity settings of ERD sensor.
ERD Sensitivity LED: MAX sensitivity reached when lit.
Jog LEFT/RIGHT Buttons:
Push and HOLD buttons accordingly to move the gate (release the button to
stop gate). WARNING: Avoid moving gate while using Jog buttons.
INPUTS:
Jog LT/RT inputs: Can connect to an External Open/Close Key switch.
Connect a single key switch to control dual gate operators, See page 37.
GND input: Low Voltage Common connection.
Edge 1-MONITORED CLOSING direction ONLY input: Connects to a
NORMALLY CLOSED (N.C.) Sensing Edge or Photocell.
Closing direction activation: gate will reverse to full open position and
reset close timer.
Opening direction activation: gate will NOT be monitored during
opening cycle.
Edge 2-LEARNED MONITORED OPENING/CLOSING direction input:
Connects to a NORMALLY CLOSED (N.C.) Sensing Edge or Photocell.
Input MUST be “LEARNED” before it can MONITOR a connected sensor
(see page 20).
Closing direction activation: gate will REVERSE to full open position but
will NOT reset close timer. Another command is required for gate to
resume operation.
Opening direction activation: gate will REVERSE 2 inches and STOP.
Another command is required for gate to resume operation.
Photo Cell-LEARNED MONITORED OPENING/CLOSING direction input:
Connects to a NORMALLY CLOSED (N.C.) Sensing Edge or Photocell.
Input MUST be “LEARNED” before it can MONITOR a connected sensor
(see page 20).
Closing direction activation: gate will STOP. Another command is
required for gate to resume operation.
Opening direction activation: gate will STOP. Another command is
required for gate to resume operation.
Matrix On Line LED: Gate operator is successfully communicating with
Matrix 1 when lit.
Limit SW On Line LED: Limit Switch Sensors are successfully
communicating with MC-200 Motor Controller when lit.
Edge 1 LED: Reversing Edge 1 input has been activated when lit.
Edge 2 LED: Reversing Edge 2 input has been activated when lit.
UL Entrap LED: Edge1/Edge2/Photocell input has been activated when lit.
Photocell LED: Photocell input has been activated when lit.
Power LED: Low voltage power is connected when lit.
RS-485 Input: Factory wired for Primary operator.
Wire to Matrix 1 “SEC GATE” for Secondary operator ONLY.
24V Power Input: 24V Power for Matrix 1 ONLY.
12V Entrapment Protection Sensor Power Out: 12V Power that ALL
Entrapment protection sensors MUST use PWR 12V power.
DUAL GATE OPERATORS NOTE: Connect EACH photocell/sensing
edge to the corresponding gate operator’s MC-200. See page 10.
A
B
C
D
E
N
P
O
F
G
H
I
J
K
M
L
Entrapment Protection Sensor Inputs