EasyManua.ls Logo

Memotec mychron 3 User Manual

Memotec mychron 3
56 pages
To Next Page IconTo Next Page
To Previous Page IconTo Previous Page
Page #2 background image
Dear MyChron 3 Owner
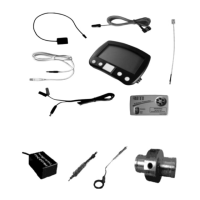
The MyChron 3 represents the new generation of Aim data acquisition
systems that provides the karter with a sophisticated and easy to use display
normally reserved for premium sports cars.
Its configurable graphic RPM display, the magnetic sensor for kart tracks
with magnetic strips installed, the capacity to record up to 250 laps, the possibility
to measure water ( exhaust gas or cylinder head ) temperature, the high number
of splits per lap ( up to 5 ) and the auto power off after 10 minutes of inactivity
make MyChron 3 a great tool for monitoring the kart engine as well as kart and
driver performances.
Our Customer Service is available every day from 9 to 5 and at most all
the major races throughout the country to provide you with personal service.
Please call our toll free number or visit our website if you have any questions,
need help, or want to give us feedback.
Thank you for your MyChron 3 purchase.
1
Question and Answer IconNeed help?

Do you have a question about the Memotec mychron 3 and is the answer not in the manual?

Memotec mychron 3 Specifications

General IconGeneral
BrandMemotec
Modelmychron 3
CategoryMeasuring Instruments
LanguageEnglish

Summary

MyChron 3 and its parts

The Display

Explains the various elements and icons shown on the MyChron 3 display unit.

The Keyboard

Details the functions of the four pushbuttons used for system operation and configuration.

The RPM Cable

Describes the RPM sensor clip and its connection to the spark plug wire for RPM pickup.

The Thermocouple

Lists and describes the four available types of temperature sensors (thermocouples).

The LAP receiver

Explains the operation of infrared and magnetic lap receivers for lap timing.

The Optical beacon

Covers the placement and power options for the optical beacon transmitter.

How to install MyChron 3

Installing and changing the display batteries

Provides instructions for replacing the AAA batteries that power the MyChron 3 unit.

Installing MyChron 3 on the steering wheel

Guides on how to mount the MyChron 3 display unit securely onto a steering wheel.

Installing the RPM clip

Details the correct method for attaching the RPM sensor clip to the spark plug wire.

Installing the water thermocouple

Explains how to correctly install the H2O thermocouple, including fitting options.

Installing the EGT thermocouple

Describes the proper positioning and installation of the Exhaust Gas Thermocouple (EGT).

Installing the underspark thermocouple

Guides on the correct installation of the Cylinder Head Temperature (CHT) sensor.

Connecting cables to MyChron 3

Details how to connect the various sensors and cables to the main display unit.

How to use MyChron 3

Configuration functions

Outlines the process for accessing and modifying system parameters via the configuration menu.

Utility functions

Explains how to manage acquired data, view lap times, and replay test sessions.

Replaying detailed data for the lap

Details methods for reviewing lap data, including automatic and manual replay options.

MyChron 3 and the computer

Software installation

Provides step-by-step instructions for installing the Race Studio 2 software.

Installing the USB drivers

Guides on installing the necessary USB drivers for PC connectivity.

Configuration via software

Channels settings

Explains how to configure individual data channels, particularly RPM settings.

Configuration via “Visualization” pushbutton

Details how to configure display parameters and settings using the Visualization interface.

Transmitting the configuration to MyChron 3

Describes the process of sending the configured settings from the PC to the MyChron 3 unit.

Quick reference guide

Configure MyChron 3

Summarizes basic operations for turning on and activating configuration mode.

Setting the number of splits

Provides steps for setting the number of lap splits to be recorded.

Setting the obscuring time

Explains how to adjust the time parameter for obscuring lap beacons.

Setting the maximum RPM value

Details how to set the maximum RPM scale for the graphical display.