10 Installing the Meru Air Point 100
Installing the Access Point
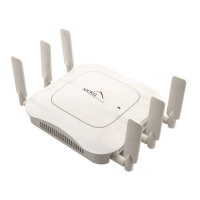
Figure 5: Attaching an Antenna to the AP100
Mounting the Access Point
You can mount the access point in the following ways:
z Horizontally, as described in the “Horizontal Mounting” section.
z Vertically, as described in the “Vertical Mounting” section.
z Below a ceiling, as described in the “Mounting Below a Ceiling” section.
z Above a ceiling tile, as described in the “Mounting Above a Suspended Ceiling” section.
Horizontal Mounting
To horizontally mount an AP100:
1. Place the AP flat on the horizontal surface.
2. For each antenna, loosen the knurled ring at the base of the antenna (see Figure 5), point the
antenna straight up, then retighten the ring.
3. Connect the PoE 100BaseT Ethernet cable, as shown in Figure 6.
Figure 6: Attaching the Ethernet Cable to the AP100
Antenna
Turn clockwise
to tighten
Access Point 100
0135
Caution!
When changing the orientation of the antennas, be sure to slightly loosen the knurled ring
before moving the antenna. Retighten the ring afterward. Otherwise, you might damage the internal
cabling in the AP.
Ethernet cable
0128
 Loading...