13
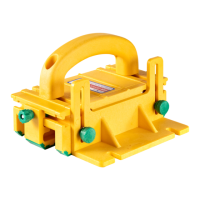
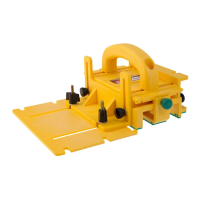
The Handle (1) can be secured at an
angle in relation to the Side Legs (see
Figure 17 on Page 15). Angling the
handle allows for individual ergonomic
comfort.
The non-slip pads are molded from a
thermal plastic that compresses slightly
when downward pressure is applied.
When setting the height of the Balance
Support (6), it is best to set the non-slip
pads over the workpiece, put normal
downward pressure from the Handle
(1), lower the Balance Support (6) until
it fully contacts the table saw top, then
secure the Balance Support (6) in that
position before releasing pressure from
the Handle (1). Double-check the setup
by applying downward pressure on the
tool with one hand and slightly pulling
the workpiece under the tool. If not
enough contact pressure in either the
front or rear, adjust the Balance Support
(6) accordingly.
If the width of the cut is between 1/4”
to 5/8” on the Inside Cut, use the 1/4”
Side Leg (5) on the right against the
rip fence. If the width of the cut is less
than 1/4”, it should be obtained from
Outside Cut as shown in Figure 15 on
Page 14. One advantage of using the
GRR-RIPPER for cutting thin strips over
the conventional push block method is
that the width of your prepared stock
on the Inside Cut area is substantially
reduced. Yield is greatly increased by
saving material, thus reducing costs.
Most importantly, the saw blade is
always within the tunnel, which provides
protection for your ngers.
For a wider Inside Cut that is beyond
the limits of the GRR-RIPPER system,
wooden spacers of an appropriate
width can be added to the Side Leg
against the fence (see Figure 3). Drill
a couple of counter bored holes (5”
center-to-center) for 10-32 pan head
screws and secure it to the brass inserts
on the Side Legs. Alternately, you can
use #8 pan head wood screws from the
inside wall of the 1/2” Side Leg (4).
ADJUSTING THE GRR-RIPPER
HOW TO USE