This document is strictly private and confidential, reproduction without Micropack approval is prohibited. © Micropack Engineering Ltd, 2018
3.4 Installation Checklist
Experience has shown that poor installation and commissioning practice may result in an
unreliable fire detection system that fails to meet the site performance targets. Before
installing the detector, it is important to consider where it is to be located and how it is to
be mounted. In order to maintain compliance with the EMC regulations it is essential the
electrical
installation be engineered correctly.
3.4.1 Mechanical
Notes
When locating the detector consideration should be given to maintenance access to the
detector. The detector mounting should be secure and vibration free.
It is advisable to check the detection locations, prior to fabrication of the mounting
supports, as
changes are frequently made during construction at site which can affect
detector coverage.
The installation should allow space for subsequent detector removal, for maintenance or
repair,
to be easily achieved.
1
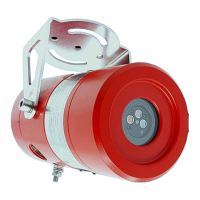
The detector should be fixed to a stable supporting structure using the mounting bracket
provided. The supporting structure must allow for horizontal adjustment of the detector
orientation. The support structure should be in place prior to detector installation.
Information
on mounting is available from Micropack (Engineering) Limited.
2
The threaded flame path of the enclosure cover and body must be protected from damage
during installation. Any such damage can destroy the validity of the enclosure.
3
The detector electronics shall be protected from mechanical damage and external sources
of EMI such as X-rays, RFI and electrostatic discharge. The detector should not face directly
towards
the sun.
4
Fit the mounting bracket to the support structure using 8mm bolts (not provided). The
detector (bracket) should be oriented to provide the desired coverage.
5
The detector enclosure body should be fitted to the mounting bracket. The bolts locate
into the bracket. Twist the enclosure to locate the bolts; these are then tightened using a
6mm Allen key.
6
Ensure the detector is orientated such that the earthing stud is directly beneath the lens.
7
Glanding should be carried out by trained personnel. The gland should be fitted in line
with installation standards for potentially explosive atmospheres that is 5 full threads
minimum with
the IP seal washer fitted at the bottom of the thread. This sealing
arrangement will result in a number of threads of the cable gland being visible. The gland
should be torqued between 15 to 20 N m (11 to 15 lb·ft).