EasyManua.ls Logo

Mocka Jack Buffet - User Manual

Mocka Jack Buffet
11 pages
Print Icon
To Next Page IconTo Next Page
Loading...
Jack Buffet
Assembly Instructions
Thank you for your purchase.
Please follow the instructions below for correct assembly.
mocka.co.nz | mocka.com.au | PO BOX 6171, Maroochydore, QLD, 4558
1
WARNING: Any furniture that is not anchored to a wall has the potential to tip over in certain
circumstances, i.e. if a child attempts to climb up on the furniture or in the event of an earthquake.
Accordingly, we recommend that all furniture is anchored to a wall. We supply a free safety wall anchor
with all furniture sold and we recommend these are used to prevent your product tipping. The fixing device
provided should fit most wall types, but please note that different wall materials may require different fixing
devices from those supplied.
Phillips & Flathead screwdrivers required.
For quicker assembly, we recommend the
use of a power drill on a low-speed setting.
bolt
x8
wedge
x8
screw
x8
screw
x8
A B C D E F
G
H
J
K
L
MI
Hardware Supplied
dowel
x19
screw
x40
slide
rail x3
slide
rail x3
slide
rail x3
slide
rail x3
locking
nut x8
cam bolt
x8
handle
x
5
N
allen key
x1
O
P
small bolt
x15
small locking
nutx15
Wall Strap
x2
washer
Z
Y
wall
anchor
x1
X
safety
strap x1
WV
screw
x1
wall
screw
x1
Q
R S
hinge x4
screw x24
shelf
plugs x8
long
screw x10
T U
screw
x18
Question and Answer IconNeed help?

Do you have a question about the Mocka Jack Buffet and is the answer not in the manual?

Summary

Jack Buffet Assembly Overview

Hardware and Parts Identification

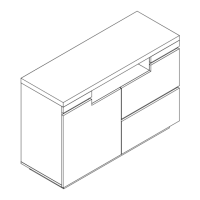
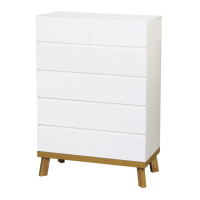
Identifies all included hardware components (A-Z) and panels required for assembly.

Essential Safety and Tool Requirements

Details essential safety warnings, especially wall anchoring, and required tools for assembly.

Initial Cabinet Structure Assembly

Attaching Bolts to Base Panel

Secures 8x bolts (C) into panel [1] using a screwdriver.

Mounting Slide Rails to Side Panels

Attaches slide rails (F, G) to panels [5] and [6] using screws (E).

Constructing the Main Cabinet Frame

Joining Vertical and Base Panels

Attaches panels [3], [4], [5], [6] to panel [1] using dowels (A) and locking nuts (D).

Adding Internal and Bottom Components

Joining Rear Panels with Connector

Connects panels [8] using connector [20].

Inserting Back Panels and Attaching Base

Slides panels [7], [8] into grooves and attaches bottom panel [2] with dowels (A) and screws (B).

Attaching Legs and Internal Supports

Securing Internal Panels with Cam Bolts

Attaches panels [9] to panels [10] using cam bolts (J) and Allen key (N).

Installing Leg Panels

Attaches leg panels to the bottom panel [2] using 10x screws (T).

Installing Shelves and Door Hardware

Placing Shelf Supports and Shelves

Inserts shelf plugs (S) and then places shelf panels [11].

Attaching Hinges and Handles to Doors

Secures hinges (Q) and handles (M) to door panels [12] and [13] with screws (R, E).

Mounting the Doors

Attaching Doors to Cabinet Unit

Secures door panels [12] and [13] to the main unit via hinges (Q) and screws (R).

Door Alignment Adjustment

Guidance on adjusting door hinges for proper alignment and flush fit.

Drawer Construction - Part 1

Inserting Bolts into Drawer Base

Inserts 5x small bolts (O) into panel [14] for drawer assembly.

Assembling Drawer Sides and Base

Attaches panels [15], [16], [17] to panel [14] using dowel (A) and locking nuts (P).

Drawer Construction - Part 2

Forming Drawer Base with Back Panel

Slides panel [18] into grooves to form the drawer base.

Securing Drawer Frame Panels

Attaches drawer frame panels [15], [16], [19] using screws (U).

Completing Drawer Assembly

Attaching Drawer Slide Rails

Attaches slide rails (I, H) to drawer panels [16] and [15] with screws (E).

Attaching Drawer Handle

Attaches handle (M) to the drawer panel [14] using screws (E).

Final Assembly and Safety Installation

Securing Back Panels with Wedges

Attaches 8x wedges (K) to the corners of back panels [7] and [8] using screws (L).

Attaching Safety Strap

Secures safety strap (V) to the top of the unit using washer (Z) and screw (W).

Wall Anchoring and Final Check

Securing Unit to Wall

Fastens the safety strap (V) to the wall using washer (Z), wall plug (X), and screw (Y).

Final Unit Stability Check

Ensures unit is balanced and steady before use.

Mocka Jack Buffet Specifications

General IconGeneral
BrandMocka
ModelJack Buffet
CategoryIndoor Furnishing
LanguageEnglish

Related product manuals