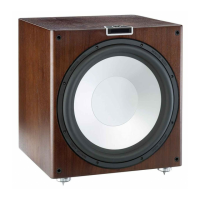
Unpacking
$BSFNVTUCFUBLFOBUBMMUJNFTXIFOIBOEMJOHUIF(PME8EVFUPUIFFYUSFNFXFJHIUPGUIFQSPEVDU8FSFDPNNFOEBUXP
person lift wherever appropriate.
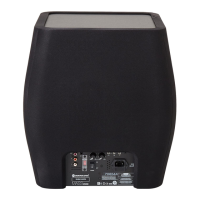
The feet/spike assemblies, 12v trigger cable and mains power cord/s are contained within the packaging and should be removed.
1MFBTFTFMFDUUIFQPXFSDPSE BQQSPQSJBUFUPZPVS$PVOUSZMPDBUJPO .BJOTWPMUBHFTFMFDUJPO GPS 7BDPS7BD
operation is factory preset. Do not adjust.
5PSFNPWFUIF(PME8GSPNJUTDBSUPOQMBDFTPNFQSPUFDUJWFNBUFSJBMPOUIFˍPPSBOEIBWJOHSFNPWFEBOZJUFNTPGQBDLJOH
GSPNUIFUPQPGUIFQBDLDBSFGVMMZMJGUUIFJOOFSTMFFWFGSPNUIFDBSUPO"MTPTFFJDPOTPOUIFDBSUPO3FNPWFˌYJOHUBQFGSPNUIF
CBHBOEFYQPTFUIFCBTFPGUIFDBCJOFUUPBMMPXˌUUJOHPGUIFTQJLFEGFFUJOUPUIFUISFBEFEJOTFSUTBTEFTDSJCFECFMPX
Spiked Foot Fixing For Carpeted Floors
5IFTQJLFEGPPUBTTFNCMZJODPSQPSBUFTBTQJLFGPSVTFPODBSQFUFEˍPPSTBOEBMTPBTPGUQPMZNFSQBEGPSVTFPOXPPEFOPSUJMFE
ˍPPST
Please ensure there are no hidden wires under the carpet, or trailing mains leads that could be damaged by the spikes.
5IFGPPUDPNFTGVMMZBTTFNCMFEGPSVTFPODBSQFUFEˍPPST"MMUIBUJTSFRVJSFEJTˌYJOHJOUPUIFDBCJOFU5IJTJTBDIJFWFECZTJNQMZ
screwing the feet fully into the 4, threaded inserts in the underside of the cabinet. If your carpet has a very thick pile, remove the
TPGUQPMZNFSQBEGSPNUIFGPPUUPFOTVSFUIFTQJLFHPFTSJHIUUISPVHIUIFDBSQFUPOUPUIFˍPPS8JUIHSFBUDBSFUVSOZPVSDBCJOFU
the right way up. Place the cabinet in your desired location, and check that it is level on all sides. If it is slightly uneven, unscrew
UIFGPPUBUUIFMPXFTUQPJOUBOEDIFDLBHBJO$POUJOVFUIJTQSPDFTTVOUJMUIFDBCJOFUJTGVMMZMFWFM6TFUIFMPDLJOHOVUPOUIFGPPU
UPˌYJUJOQMBDFBOEUPTUPQBOZVOXBOUFEWJCSBUJPOT
Spiked Foot Fixing For Wooden/Hard Floors
'PSVTFPOTPMJEˍPPSTPSXIFSFTQJLFTBSFJOBQQSPQSJBUFJUJTQPTTJCMFUPVTFUIFGPPUXJUIPVUUIFTQJLFJOTFSU5PVTFUIFGPPUJO
this manner carefully grip the knurled portion of the spike and rotate anti clockwise to unscrew the spike fully.
:PVNBZˌOEJUFBTJFSUPˌSTUSFNPWFUIFQPMZNFSQBEUPHBJONPSFQVSDIBTFPOUIFTQJLF
The pad should be replaced before carrying out the levelling operation previously described.
Positioning
The Gold W15 should now be sited in the most suitable position, preferably not directly in the corner of a room as this may
DBVTFFYDFTTJWFCBTTCPPN0ODFBEFTJSBCMFQPTJUJPOJTBDIJFWFEJUJTJNQPSUBOUUPDIFDLJGUIFDBCMFTBSFMPOHFOPVHIUPSFBDI
comfortably without being under tension. Leave the Gold W15 unplugged until you are happy with it’s location.
Never connect or disconnect any of the input connections with the Gold W15 switched on.
0QUJNBMDPOUSPMTFUUJOHTXJMMEFQFOEFOUJSFMZPOZPVSTZTUFNDPOˌHVSBUJPOSPPNBOEQFSTPOBMUBTUFT
3monitoraudio.com
ENGLISH