Initial Settings Using 2 Channel (L & R)
Stereo Inputs
4UFSFP - 3 JOQVU NBZ CF SFRVJSFE JG VTJOH B DIBOOFM
TUFSFPBNQMJˌFSPSBOBNQMJˌFSXJUIOP-'&PVUQVU$POOFDU
YJOUFSDPOOFDUDBCMFTMFGUBOESJHIUGSPNBOBNQMJˌFSUP
DPOOFDUJPOTNBSLFE-JOF*OQVUT-3
8JUIZPVSQSFBNQMJˌFSTFUUPBMPXMFWFMTFUUIFTVCXPPGFS
up using the suggested guide below before playing any music/
test tones.
q 3VOUIF-&0SPPNFRVBMJTFSTFFCFMPX
q 4FUUIFWPMVNFUPE#1BHF
q LFE should be set in accordance to you main speakers
1BHF
q 1IBTFUP1BHF
q &2UP0''1BHF
q -&0UP0/ 1BHF-FPUVSOT PO BVUPNBUJDBMMZBGUFS
calibration
Running LEO
#FGPSFFOBCMJOHUIF-&0SPPNDPSSFDUJPOJUOFFETUPCFTFUVQ
To do this follow these simple steps.
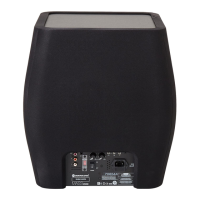
1. Connect the jack lead of the microphone to the jack
socket next to the encode as in the illustration below.
2. Place the microphone at your listening position at
approximate ear height.
NOTE: Ensure there are no obstructions between the
Gold W15 and the microphone other than those normally
in the room.
3. )PMEEPXOUIFo$BMpCVUUPOPOUIFSFNPUFGPSTFDPOET
8IFOJUTUBSUTUIFEJTQMBZXJMMTIPXo$"-pBOEBUFTU
tone will be heard.
4. 8IFOUIF-&0DBMJCSBUJPOIBTˌOJTIFEUIFEJTQMBZXJMM
SFWFSUCBDL UPUIFIPNFTDSFFOTJOHMFSFEEPUJOUIF
NJEEMFPGUIFEJTQMBZ5IF-&0GVODUJPOXJMMBMTPIBWF
been turned on.
.FOV4ZTUFN
Low Pass Filter
5IF -PX 1BTT 'JMUFS -1' TFUT UIF DSPTTPWFS QPJOU BOE UIF
slope angle with the main speakers. It is only enabled in
stereo mode. When using the LFE input, the crossover setting
PQUJPOJTOPUBWBJMBCMFBTJUJTDPOUSPMMFECZUIF"7BNQMJˌFS
receiver.
The table opposite gives suggested crossover points
dependant on the main speakers. The slope angle depends
PO IPX TIBSQMZ ZPV XBOU UIF IJHI GSFRVFODJFT UP SPMM Pˋ
5IJTDBOCFBEKVTUFEJOE#PDUBWFTUFQT*UJT
recommended that when partnering the Gold W15 with sealed
MPVETQFBLFST B TMPQF PG E#PDUBWF JT VTFE BOE XIFO
QBSUOFSJOH XJUI QPSUFE MPVETQFBLFST E#PDUBWF JT VTFE
However, experimentation is still advised.
Setting the LPF Using the Remote
With the Gold W15 powered up and out of standby mode, follow
the next steps to set the LPF:
1. Press the RIGHT arrow. The display will change to /3)
2. Press ENTER. The display will change to show the
current setting, eg.
3. 1SFTTUIF61%08/BSSPXTUPBEKVTUUIFTFUUJOH
4. 1SFTT&/5&3UPTFMFDUBOETBWF5IFEJTQMBZXJMMˍBTI
UXJDFUPDPOˌSNTFMFDUJPOBOEUIFOEJTQMBZUIFTMPQF
angle, eg
5. 1SFTTUIF61%08/BSSPXTUPBEKVTUUIFTFUUJOH
6. 1SFTT&/5&3UPTFMFDUBOETBWF5IFEJTQMBZXJMMˍBTI
UXJDFUPDPOˌSNTFMFDUJPOBOEUIFOEJTQMBZ/3)
Setting the LPF Using the Control Panel
Encoder
With the Gold W15 powered up and out of standby mode, follow
the next steps to set the LPF:
1. Press the encoder down. The display will change to
/3)
2. Press the encoder again to enter the LPF menu. The
display will change to show the current setting, eg.
3. Rotate the encoder left or right to change the setting
4. Press the encoder to select and save. The display will
ˍBTIUXJDFUP DPOˌSNTFMFDUJPOBOE UIFOEJTQMBZUIF
slope angle, eg
5. Rotate the encoder left or right to change the setting
6. Press the encoder to select and save. The display will
ˍBTIUXJDFUPDPOˌSNTFMFDUJPOBOEUIFOEJTQMBZ/3)
Connect microphone
here
(PME80XOFST.BOVBM8