. INSTALLATION . INSTALLATION
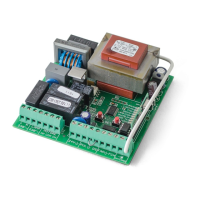
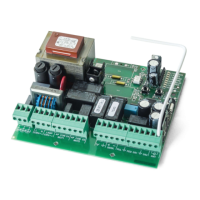
CONTROL BOARD INSTALLATION
• CONDITIONS AND PRE VERIFICATIONS
• ESSENTIAL INSTALLATION STEPS
• Make sure that the motor is properly installed at the gate.
• Check if the ambient temperature values are acceptable for the functioning of this
control board.
• Perform the entire installation with the power off.
• Consult the manufacturer's instructions from all the components to install.
• Always make a ground connection directly to the motor's metal structure.
• Place the control board in the appropriate fixing location and tighten the screws to
secure it.
• Make the connections of all the accessories and components you want to use, according
to the wiring diagram (p. 2).
• Connect the control board to a 110V or 230V power supply according to the value
shown on the transformer (terminals 1 and 2 - CN1).
• Check that the limit switches are working properly. (P. 6A)
• Also check other devices like selectors or photocells. (P. 6B)
• Start by programming a transmitter (p. 7A).
• Now do an course's automatic programming (p.8B).
• If necessary, you can now adjust the strength / speed of the automatism in the VR1
potentiometer (p.4A). Whenever any change is made in this potentiometer, you must
redo the course's automatic programming.
• Put silicone or another type of sealing in the cable entries of the control board box in
order to prevent the entrance of insects or other elements that may damage the control
board.
INSTALLATION ESSENTIAL GUIDE
At this time, the control board is programmed with all the essential
functions for a proper functioning of the automation. If you want to enable
other control board functions, please check how to do so, on the following
pages.