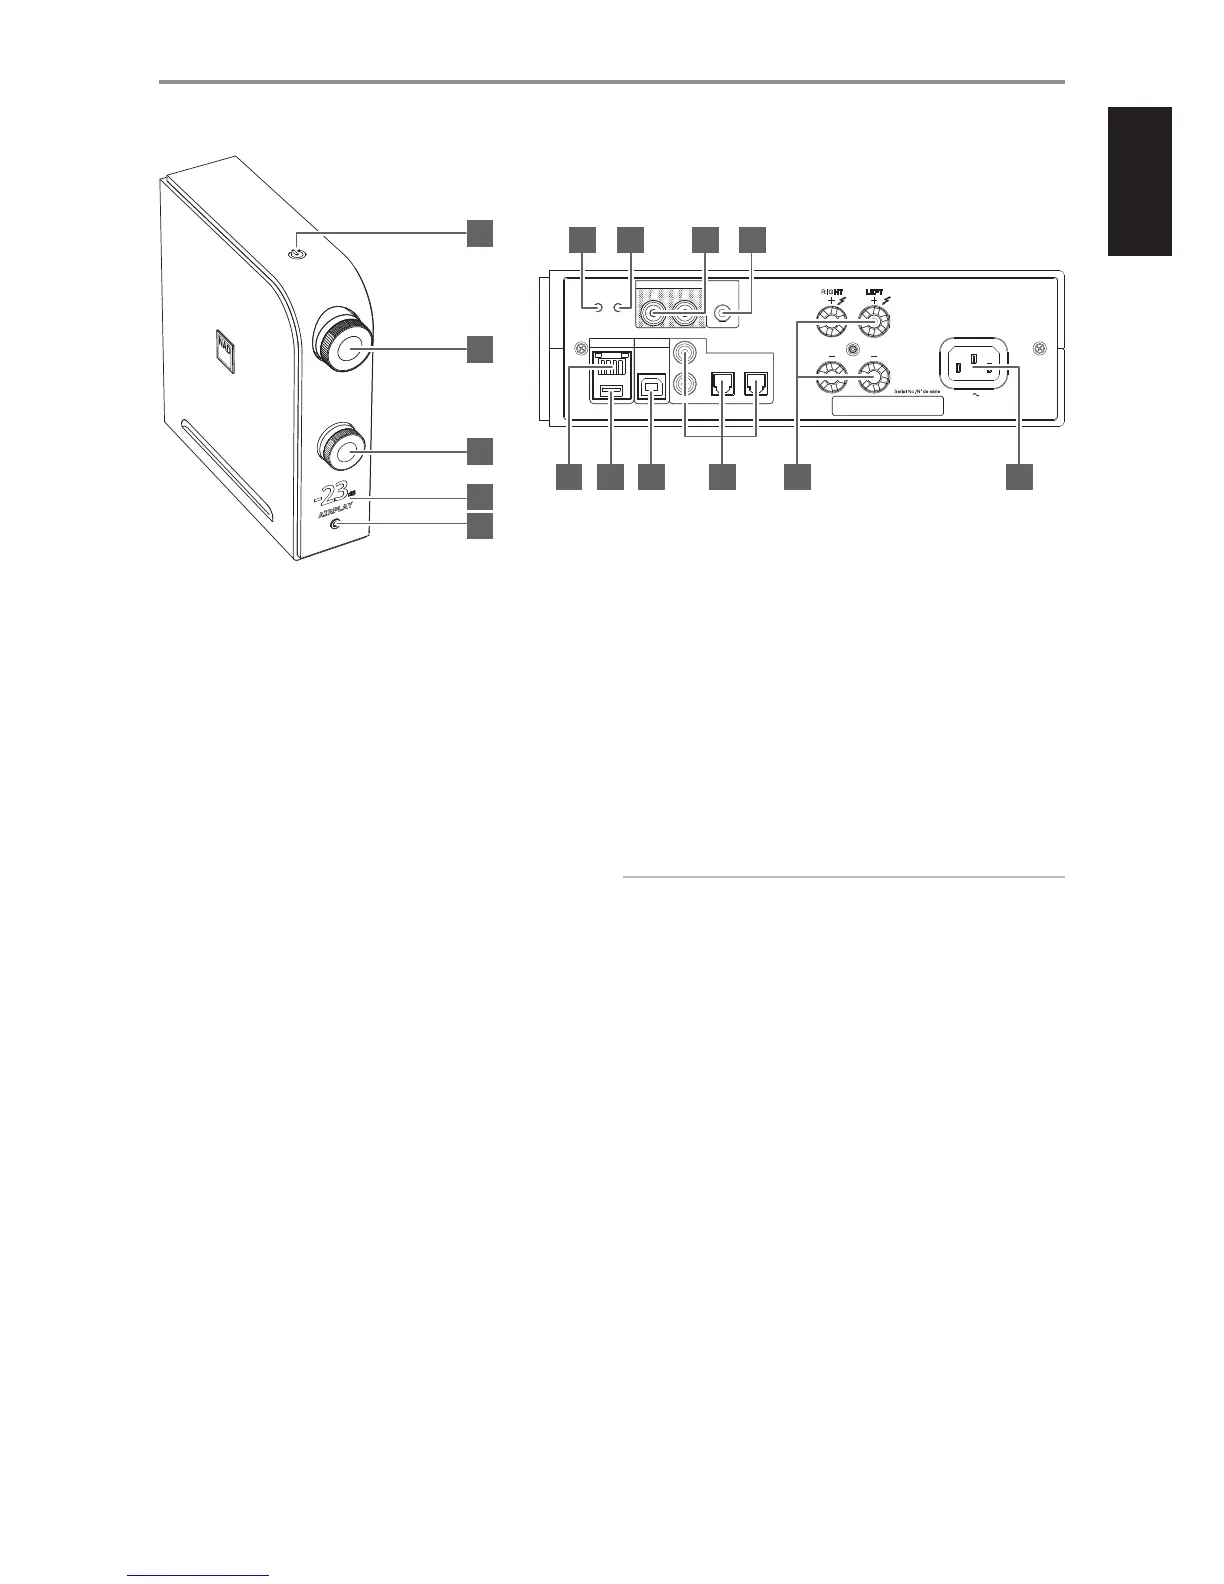
IDENTIFICATION OF CONTROLS
1 o (STANDBY)
• With the corresponding end of the mains power cord connected
to the AC mains input of the D 7050 and the plug connected to a
mains power source, press o (Standby) to switch ON the D 7050
from standby mode. The Standby indicator will turn from amber to
bright/white color.
• Press and hold o (Standby) to return the unit back to standby mode.
STANDBY MODES
There are two standby modes for D 7050.
Eco Standby
• D 7050 switches to standby mode at lowest power consumption.
• From standby mode, the D 7050 can only be switched to operating
mode by pressing top panel’s o (Standby) or remote control’s [ON]
button.
Network Standby
• D 7050 switches to standby mode at reduced system performance
level.
• Network connection is maintained at network standby mode.
• From standby mode, the D 7050 can be switched to operating
mode using the network connected App, pressing top panel’s
o (Standby) or remote control’s [ON] button.
IMPORTANT NOTES ABOUT STANDBY MODE
The following conditions describe Standby Mode response with respect
to AUTO SHUTOFF as congured in the D 7050 app. Refer to section
below about “NAD D 7050 APP” for further information.
Condition 1
AUTO SHUTOFF in the D 7050 app is set to “ON”.
• D 7050 will automatically go to standby mode if current source
remains inactive for 30 minutes. This is the default setting.
Condition 2
AUTO SHUTOFF in the D 7050 app is set to “OFF”.
• D 7050 will not go to standby mode at any time unless directly
initiated by pressing o (Standby) switch (actual unit or app) or OFF
from the remote control.
2 VOLUME
• Adjust audio level by turning clockwise or counterclockwise.
3 INPUT
• Rotate to select desired input source.
4 DISPLAY
• Illuminate the selected or active source (COAXIAL1, COAXIAL2,
OPTICAL1, OPTICAL2, COMPUTER, AIRPLAY, DOCK, BT) and current
audio level.
• Display follows the orientation of the unit - vertical or horizontal
view as shown on the front cover.
IMPORTANT NOTE
Display shall temporarily turn o if there is no user interface interaction
within 5 minutes. Restore display by sending a remote control command
or rotating any of the controls.
5 PHONES
• A 3.5 mm stereo jack socket is supplied for headphone listening.
• Specially designed low noise headphone circuitry can accommodate a
wide range of phones, even 600 Ohm studio models.
• Adjust headphone audio level by rotating the VOLUME control
clockwise or counterclockwise.
• Ensure that the volume control is turned to minimum (fully
counterclockwise) before connecting or disconnecting
headphones. Listening at high levels can damage your hearing.
• Inserting a headphone jack into this socket automatically switches
o the loudspeakers.
6 RESET
• Restore factory default settings.
7 WPS/JB
• Use to setup wireless network connection.
AUDIO OUT
+12V
TRIGGER
IN
OPTICAL
COMPUTER
DIGITAL AUDIO INPUT
LAN
100-240V 50/60Hz
SPEAKERS
RI GHT
LE FT
WPS/JBRESET
21
1
2
L
R
COAXIAL
6 7 8 9
10 11 12 13 14 15
2
1
3
4
5
5