E11
cd
in
tuner
in
hdd in/
out
av
in/out
signal
ground
aux 2 in
(alternative)
aux 1
in/out
aux 2
in
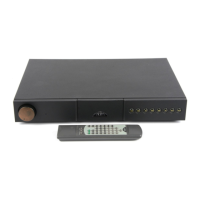
NAC 282, NAC 202 & NAC 152 XS
10.7.1 Power Supply Upgrade Options
Preamplifier Stage 1 Upgrade Stage 2 Upgrade Stage 3 Upgrade
NAC 282 Use: Hi-Cap Use: 2 x Hi-Cap Use: SuperCap
Connect to: Upgrade 1 socket Connect to: Upgrade 1 & 2 sockets Connect to: Upgrade 1 & 2 sockets
Connect: Power amp to Hi-Cap Connect: Power amp to Hi-Cap 1 Connect: Power amp to SuperCap
NAC 202 Use: NAPSC Use: Hi-Cap Use: SuperCap
Connect to: NAPSC socket Connect to: Upgrade 2 socket Connect to: Upgrade 2 socket
Connect: Power amp to preamp Connect: Power amp to Hi-Cap Connect: Power amp to SuperCap
NAC 152 XS Use: FlatCap XS (both outputs) Use: FlatCap XS and Hi-Cap Use: 2 x Hi-Cap
(see Note) Connect to: Upgrade 1 & 2 sockets Connect to: Upgrade 1 & 2 sockets Connect to: Upgrade 1 & 2 sockets
Connect: Power amp to Flatcap XS Connect: Power amp to Hi-Cap Connect: Power amp to Hi-Cap 2
to power
amplier
with
internal
power
supply
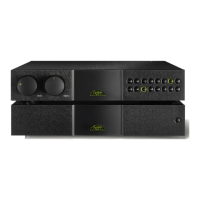
11.1 NAC 282 Rear Panel Sockets
cd/RCA Phono
ch1(L)
ch2(R)
aux 2/RCA
Phono
ch1(L)
ch2(R)
RS232
interface
RC5 in
Note: The NAC 282 Aux 2 input is provided with two sockets.
The lower socket, fitted on delivery with a blanking cover, is
intended for use with a StageLine or SuperLine Phono stage
and incorporates an appropriate DC power supply. The two
sockets must not be used simultaneously.
Note: The RS232 interface is an optional upgrade. It can be
specified at time of order or fitted retrospectively. Contact
your local representative or Naim Audio directly for further
information.
to NAPSC
power supply/output option sockets
with link and blanking plugs tted
ch1
-ve
nc
nc
ch2
cd, tuner and aux
2 inputs
ch1
-ve
ch1
(out)
ch2
(out)
ch2
hdd, av and aux 1
inputs
+ve
-ve
+ve
ch1
ch2
aux 2
(alt.) input
11 NAC 282, NAC 202 and NAC 152 XS
Rear Panel Connections
Note: A NAC 152 XS may also be powered by a single FlatCap even if one FlatCap output is already
in use to power a CD5 XS CD player. The FlatCap should be connected to the preamplifier Upgrade 1
socket with the power amplifier left connected directly to the preamplifier.
Note: Section 12 comprises diagrams illustrating some of these power supply options.