Do you have a question about the Nice LP21 and is the answer not in the manual?
Operating manual must be available and understood before device use.
All work on the device must be carried out by qualified electricians.
Device must only be used for the purpose intended by the manufacturer.
Manufacturer not responsible for incorrect settings or inappropriate use.
Only manufacturer can perform repairs; unauthorized repairs void warranty.
Voltage supply must meet safety extra-low voltage (SELV) requirements.
Users must comply with valid electrical regulations like EN 60335.
Installation must adhere to national and local electrical regulations.
Device not for safety component use; hazard potential requires extra equipment.
Used with induction loops and controllers for traffic/barrier systems.
Traffic engineering, doors, barriers, parking, tunnels, traffic lights.
Intended for installation in a controller cabinet or similar housing.
Operate only with prescribed supply voltages; check technical data before installation.
Install in a location protected from heat, water, moisture, and dust.
Alterations or unauthorized parts can cause injury, damage, and void warranty.
Do not open housing; poses danger to persons and device functions, voids warranty.
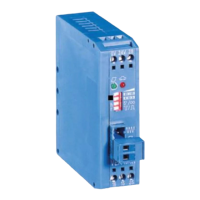
Provides physical dimensions of the device housing.
Lists components (LEDs, switches, ports) and their descriptions.
Details housing, mounting, power, protection, environment, and loop properties.
Details specifications for device inputs and outputs.
Details on loop inductance, relay contacts, and terminal blocks.
Details available versions (LP21, LP22) and their features.
Recommendation for systems with high switching frequency.
Lists key features like loop channels, relay outputs, USB, and galvanic isolation.
Describes options like frequency levels, output signals, response threshold, hold time.
Details advanced functions specific to dual-channel variants.
Identifies metallic objects via LC oscillator for output switching.
Describes presence, pulse, direction signals and loop fault outputs.
Explains automatic or manual alignment after power on or reset.
Details timed scanning of loops in multiplex mode for LP22.
Identifies loop errors like closure or break and their effects.
Details how to connect the power supply via the blue terminal block.
Describes connections for induction loops via the orange terminal blocks.
Explains relay connections (NC/NO) and signal inversion for outputs.
Shows signal output states for power, detector ready, and loop covered.
Diagram and description of relay connections using yellow and red terminal blocks.
Refers to earlier sections for device illustrations and technical data.
Instructions for mounting the detector onto a TS35 DIN rail.
Steps to connect the device's power supply.
Steps to connect the device's relay outputs.
Guidelines for installing induction loops, including cable and turns.
Steps to connect the induction loops to the device's terminal blocks.
Ensures system is inactive, personnel are qualified, and assembly is correct.
States that no specific tools are required for system commissioning.
Procedure for commissioning the detector, including DIP settings and power on.
Detector settings can be adjusted via DIP switch during operation.
Document refers to default settings; customer variants may differ.
Explains meaning of Red and Blue LEDs for detector and loop status.
Defines symbols used for LED status indicators.
Illustrates LED flash code for displaying loop frequency.
Specifies LED locations for loop channel 1 and 2.
Describes functions of DIP switches like Sensitivity, Frequency, Hold Time.
Details DIP switch assignment for LP21 single-channel variants.
Provides specific parameter settings via DIP switch for LP21.
Details DIP switch assignment for LP22 dual-channel variants.
Provides specific parameter settings via DIP switch for LP22.
Describes reset/readjustment and factory settings using the reset button.
Clarifies holding the reset button for 5 seconds for factory settings.
Explains that the DIP column shows settings options for the DIP switch.
Document refers to default settings; customer variants may differ.
Explains how to select the switch-on threshold for signal activation.
General guidance on setting sensitivity in large steps.
Advise setting sensitivity low (high threshold) to minimise interference.
Details sensitivity settings based on DIP switch positions.
Explains frequency setting to prevent loop couplings.
Guidance on frequency spacing for adjacent loops to prevent interference.
LED flash sequence indicates loop frequency after changes.
Explains how multiplexing prevents loop interference in dual-channel versions.
Frequency range may be restricted with non-recommended loop inductivity.
Details loop frequency settings (low/high) via DIP switch.
Allows setting separate hold times for each channel, or infinite hold.
Explains how hold time limits can be used for automatic vehicle removal.
Shows hold time settings (infinite, 5 min) via DIP switch.
Allows setting various output modes (signal types) for the outputs.
Direction logic must be OFF to set output mode on DIP switch.
Table for setting output mode (constant/impulse signal) via DIP switch.
Allows selection of inverted or non-inverted signal output.
Factory settings for signal behaviour are in short instructions/housing.
Table showing how DIP switches control signal inversion for outputs.
Defines the switching time for outputs in impulse signal mode.
States the default impulse duration is 200 ms.
Table defining impulse time (past/freed up) via DIP switch.
Explains complex algorithms for direction-dependent vehicle recording.
Diagram illustrating direction detection with loops, logic module, and outputs.
Defines symbols used in the direction detection principle diagram.
First loop covered determines direction and counting.
Information on counter overflow and lack of power failure protection.
Table for enabling/disabling direction detection via DIP switch.
Allows setting various evaluation logics in the logic module.
Direction logic can only be set when direction detection is activated.
Table for setting direction logic (constant signal/wrong-way driver) via DIP switch.
Details various direction logics (D1, DB, F1, F2, etc.) and their functions.
Defines symbols used in the direction logic tables.
Illustrates single vehicle detection logic.
Illustrates queue detection logic.
Illustrates wrong-way driver 1 detection logic.
Illustrates wrong-way driver 2 detection logic.
Illustrates manoeuvring 1 detection logic.
Illustrates manoeuvring 2 detection logic.
Illustrates wrong-way driver in queue detection logic.
Illustrates cross traffic direction logic.
Explains that most logics deliver false counts for cross traffic.
Logic for short entrances/exits, disabling cross traffic interference.
Highlights loop positioning dependency on congestion for parking bay logic.
Diagram illustrating parking bay direction logic.
Defines symbols used in the parking bay logic diagram.
Details logic for travel direction 1 to 2 in parking bay.
Details logic for travel direction 2 to 1 in parking bay.
Product requires no maintenance; contact vendor for issues.
Procedure for safely removing and disassembling the detector.
Ensures system is non-functional and work is done by qualified specialists.
Lists necessary tools, e.g., insulated slotted screwdriver.
Step-by-step instructions for safely removing and disassembling the detector.
Dispose of product according to valid legal specifications at end of service life.
| Power Source | Battery |
|---|---|
| Operating Voltage | 3V |
| Detection Principle | Infrared |
| Detection Range | 12 m |
| Battery Type | CR123A |
| Type | Passive Infrared (PIR) Motion Sensor |