Cooking the same food in each zone? Set Zone 1 with thermometer and use
Match Cook to automatically match settings to Zone 2.
STEP 1
Set up Zone 2 with Thermometer
STEP 2
Program Zone 2
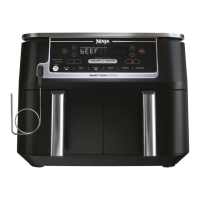
• Remove the thermometer storage
compartment located behind the control
panel.
• Remove Zone 2 basket (before plugging in
the thermometer).
• Insert the thermometer in the protein
according to the guide on page 5.
• Place protein in basket and insert into unit.
• Plug thermometer into jack (located just
above Zone 2).
• Select Zone 2 and the desired cook
function (e.g., Air Fry).
• Use the PROBE button to select Small
Preset or Large Preset, depending on the
size of the protein. Reference the preset
cooking chart below for guidance.
• If using the Manual button, use the
recommended internal cook temperatures
included on page 6.
• Press the Protein button and use the
arrow buttons to select your protein. Press
the Doneness button and use the arrow
buttons to set the internal doneness.
• Select MATCH COOK, then press the
START/PAUSE button to begin cooking.
Match Cook with the
Ninja
®
Smart Thermometer
Smart Finish with the
Ninja
®
Smart Thermometer
Using the thermometer to make complete meals? Want to cook mains and
sides using 2 dierent functions, temperatures, or cook times? Program each
zone and pair the Ninja® Smart Thermometer with Smart Finish Technology to
eliminate the guesswork and have both zones finish at the same time.
STEP 3
Program Zone 1
STEP 4
Start Cooking
STEP 1
Set up Zone 2 with Thermometer
STEP 2
Program Zone 2
• Remove the thermometer storage
compartment located behind the control
panel.
• Remove zone 2 basket (before plugging in
the thermometer).
• Insert thermometer in protein using
the guide on page 5 to ensure the
thermometer is placed correctly.
• Place protein in basket and insert into unit.
• Select Zone 1.
• Select function (e.g., Air Fry).
• Set cook temperature and time.
• Select SMART FINISH.
• Press the START/PAUSE button to
begin cooking.
• Plug thermometer into the jack
(located just above Zone 2.).
• Select Zone 2 and the desired cook
function (e.g., Air Fry).
• Use the PROBE button to select either
the Small or Large preset, depending
on the size of the protein. Reference the
preset cooking chart on the following
page for guidance.
• Use the arrows on the left of the display to
select your desired protein and arrows on
the right to set the internal doneness.
NOTE: You can’t use the manual probe setting when
selecting Smart Finish.
NOTE: During the initial setup, the zone with
the shorter cook time will display HOLD. When
cooking begins, the display will always show the
probe and target temperature in Zone 2
and progress bars in Zone 1 during cook cycle.
ninjakitchen.com 1312
PROTEIN PRESET WEIGHT (per basket) EXAMPLES
Pork
Small
4 each (4-6 ounces each) Italian Sausages,
2 each (10-12 ounces each) Bone-In Pork Chops
Large
1 each (2 pounds) Pork Tenderloin
1 each (4-5 pounds) Pork Loin/Roast
Chicken
Small
3-4 each, depending on size (8-12 ounces each) Boneless Chicken Breast
3-4 each, depending on size (6-10 ounces) Bone-In Chicken Thighs
Large 1 each (5 pounds) Whole Chicken
Beef
Small 2-4 each, depending on size (6-12 ounces each) Steak
Large 1 each (3-4 pounds) Top Round
Fish
Small 3-4 each, depending on size (4 ounces each) Salmon Fillets
Large 1 each (12-16 ounces each) Side of Salmon
Preset Cooking Chart
STEP 5
Cooking Complete
• When cooking is complete, unit will beep. Transfer protein to a plate and allow to rest for 5
minutes before serving. This is an important step, as proteins continue to cook and retain juices
after being removed from the source of heat.
STEP 3
Cooking Complete
• When cooking is complete, unit will beep. Transfer protein to a plate and allow to rest for 5
minutes before serving. This is an important step, as proteins continue to cook and retain juices
after being removed from the source of heat.
FPOFPO
FPOFPO