Wiring Installation
ACPS-2406 PN 51304:B 09/02/2003 15
.
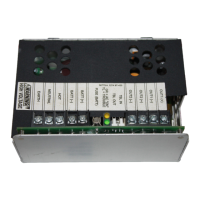
WARNING: Install the snap-on cover for TB1
after wiring. Refer to Figure 2.7 for cover
installation
TB2, TB3 - The lead-acid battery charger will charge 7 to 25 AH batteries. Connect two batteries
to these terminals as illustrated in Figure 2.4. Leave the battery interconnect cables disconnected
until after system power-up.
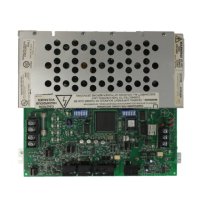
TB4, TB5, TB6 - Outputs 1 through 4 and UZC-256 connections. With all power sources off,
connect wiring. Refer to Section Four of this manual for applications suggestions. Outputs 1
through 4 share 6.0 A of output power when configured as NACs, or 5.0 A of 24VDC detector
power or general purpose power.
TB8 - SLC Wiring. Connect to panel Signaling Line Circuit.
J1 - Auxiliary power connection, 0.50A, +24VDC, unsupervised output for connection within the
same cabinet. When this output is used for an installation, the maximum load current available at
Output #4 (TB6-3 and TB6-4) will be reduced to 2.0 A maximum.
To determine battery requirements, refer to Section 5 of this manual.
CAUTION !
HIGH VOLTAGE
Figure 2.7 Installing the TB1 Snap-on Cove
C
A
U
T
I
O
N
!
H
I
G
H
V
O
L
T
A
G
E
TB1
Press fit the snap-on cover over TB1
after AC power has been connected.
Snap-on cover
accover.CDR
accovinst.CDR
!