10
6. Installation
6-1 Connecting the Handpiece Cord
Align the mark on the Handpiece Cord with mark on the
Control Unit; push the Base of Handpiece Cord Plug into the jack
until the locking joint ‘clicks’ into place (Fig. 1).
To disconnect the plug; pull back the Lock Joint, pull further to
disconnect the cord.
Lock Joint
Fig.1
6-2 Connecting the Foot Control
Matching the shapes of the Foot Control Plug and the Foot
Control Cord Jack of the control unit, insert the plug into the jack
and then tighten the Lock Ring (Fig. 2).
Lock Ring
Fig.2
6-3 Connecting the AC Power Cord
Before connecting the AC Power Cord, make sure the Main
Power Switch is OFF (on the side).
Matching the shapes of the AC Power Cord and the AC Power
Cord Connection Jack on the back of the control unit, insert the
cord tightly into the AC Power Cord Connection Jack (Fig. 3).
Then plug the AC Power Cord into the outlet.
Fig.3
Fig.4 Fig.5
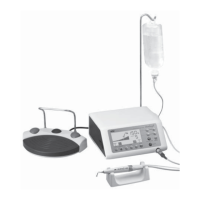
6-4 Mounting the Saline Solution Hanger Post
Insert the Saline Solution Hanger Post into the holder, making sure to fit the guiding pin of the hanger into the slit of
the holder (Fig. 4 and 5). The bottle should be hung facing the side of the Control Unit.
AC Power Cord Connection Jack
Main Power Switch
 Loading...