NU-SET Smart-Box Series Lockbox User Guide
7
▀ Installing Batteries
➊
Unpack the lockbox package and its components.
➋
The lockbox is shipped unlocked. Simply slide down the gold lever to open the vault.
➌
Unlock and remove the battery compartment cover by sliding the black lever to the right.
➍
Install 4x AA-battery included. The bottom (-) side of the battery should sit on the spring.
➎
Once the batteries are installed, all 3 color LED will flash.
➏
Replace and lock the battery compartment cover by sliding the black lever to the left.
▀ Locking & Unlocking Shackle (7010 Model Only)
➊
To unlock the shackle, simply roll the dials to the last preset
combination and lift the shackle. (Factory preset ‘0000’)
➋
To lock, simply push the shackle down into locked position
and scramble the dials on top of the vault.
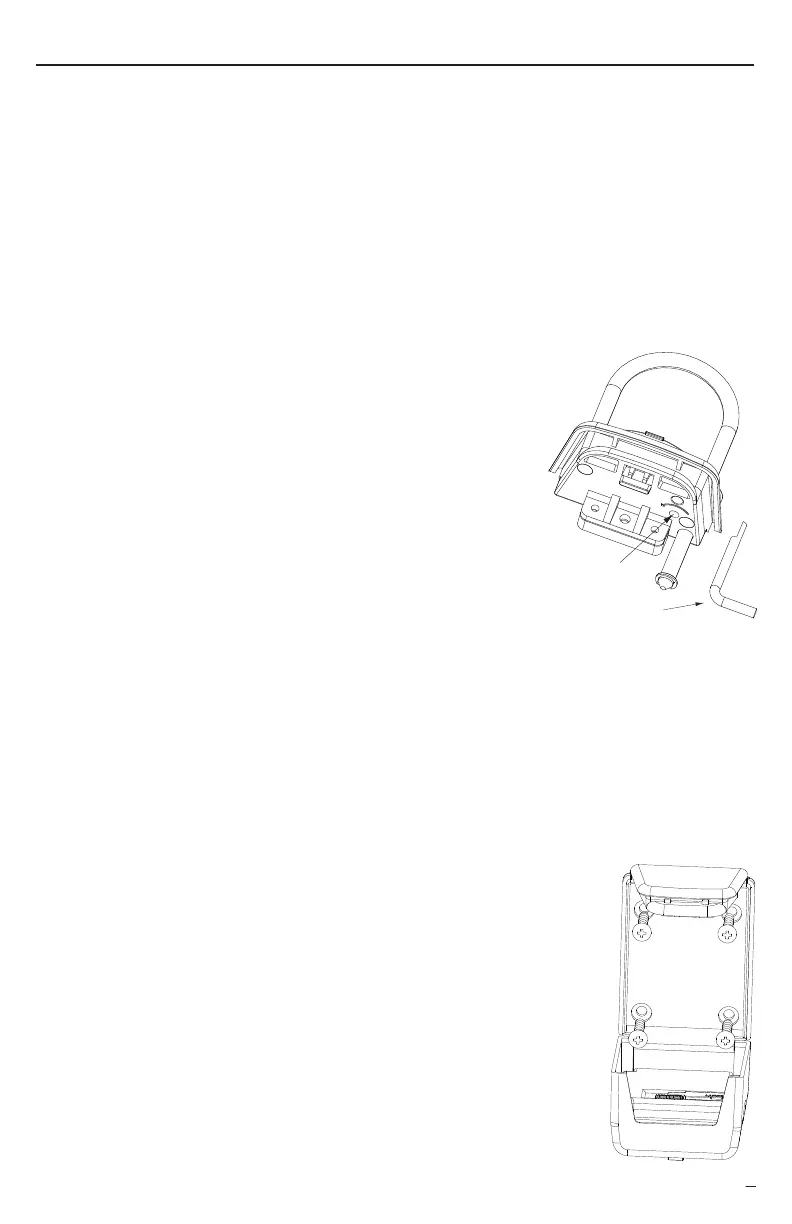
▀ Changing Shackle Combination (7010 Model Only)
➊
Lift and swing the top vinyl cover away from the shackle.
➋
Roll the dials to the last combination set.
➌
Insert the included "Reset Tool" into the hidden hole located inside the vault under the
shackle lock.
➍
Insert the reset tool so that the tail points to a "3 o'clock" position. Turn the tool
counterclockwise until the tail points to a 10 o'clock position. (i.e. make a 75˚ turn
counterclockwise.)
➎
Roll the dials one at a time to set a new 4-number shackle combination.
➏
Turn the reset tool back to the starting position and remove it from the lock.
✍
The factory preset shackle combination is '0000'. Record the new shackle combination
to prevent lost of the new combination.
▀ Mounting Wall-Mount Lockbox (7060 Model Only)
➊
Remove the Smart-Box from packaging.
➋
Position the Smart-Box on desired surface area.
➌
Use the level to verify that Smart-Box is in a vertical position and
mark the screw holes on surface.
➍
Remove the Smart-Box and drill holes. Use a hammer to install
anchors if necessary.
➎
Position the Smart-Box over drilled holes and tighten all screws.
➏
Secure vault by sliding up the gold lever to the lock position.
Setting Up the Smart-Box™
Refer to the software session on how to setup the owner passwords and to define the user
access codes.
Reset Tool
Reset Hole