7
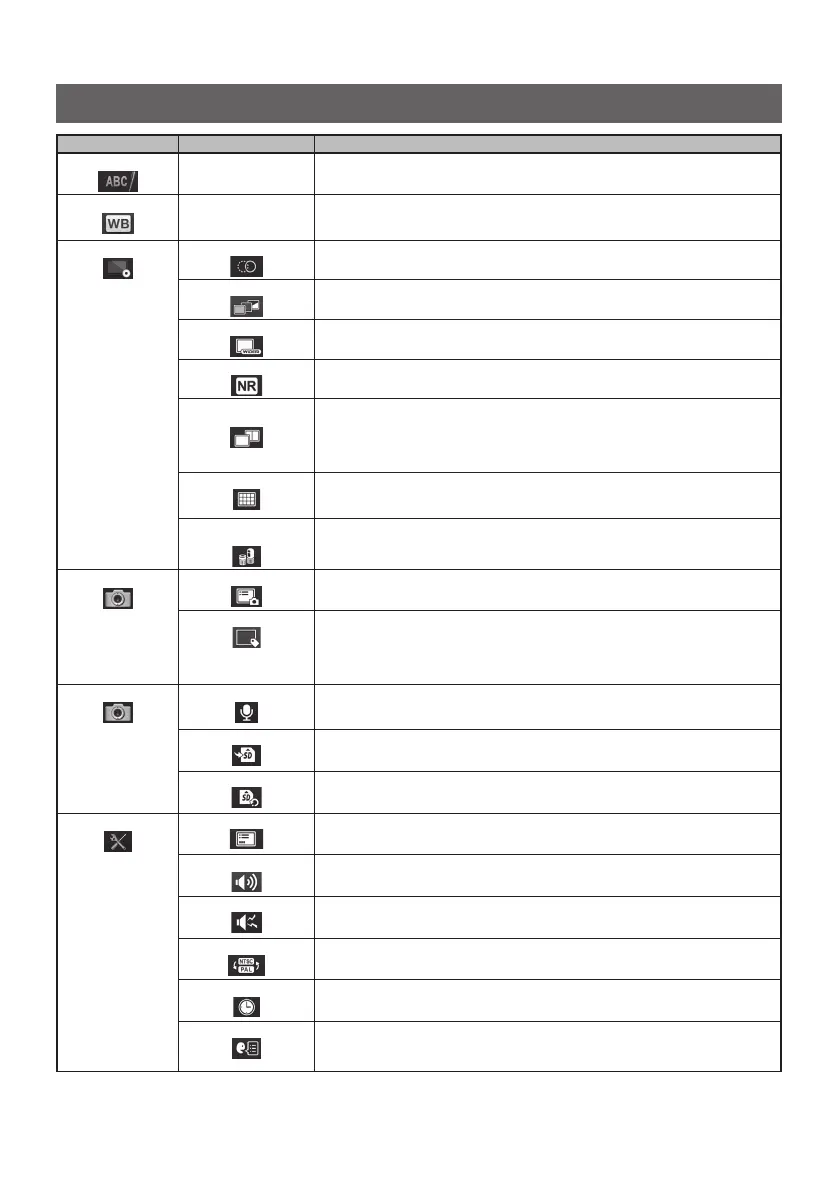
Main menu Sub menu Available settings
<TITLE>
–
Inputs a title.
Puts a title on the live screen and recorded images. Up to 30 characters can be inputted.
<WHITE BALANCE>
–
Adjusts the white balance (Live screen only).
When replacing parts like the optical adapter, adjust the white balance by capturing an
image of a white object such as a piece of paper, from a distance of 50 to 60 mm.
<IMAGE MODE>
<SHARPNESS>
Adjusts the sharpness of the image.
The sharpness level increases from left to right (4 levels).
<SATURATION>
Adjusts the color of the image.
<WIDER>
Enables the WIDER function.
The level increases in the order of <OFF>, <WIDER1> and <WIDER2>.
<NOISE REDUCTION>
Reduces the noise from the image.
The effect level increases in the order of <OFF>, <LOW>, <MEDIUM> and <HIGH>.
<STEREO ADAPTER
IMAGE DISPLAY MODE>
Selects the screen in <MONOCULAR IMAGE> or <BINOCULAR IMAGE>.
Sets the live image whether to display in monocular view or binocular view when the stereo
optical adapter is attached.
• <MONOCULAR IMAGE> : Displays the image in monocular view (one screen)
• <BINOCULAR IMAGE> : Displays the image in binocular view (two screens)
<GRID>
Displays the grid on the screen.
The grid display can be selected from <OFF> or three grid types.
The grid is displayed on the live screen.
<STEREO ADAPTER
SELECT>
Displays the stereo optical adapter list.
Selecting to decide the optical adapter will set the stereo optical adapter that is connected
to the system.
<RECORD MODE>
<PRINT SCREEN>
Records the texts and the graphic data over the still images or movies.
<FILE NAME MARK>
Specifies whether to add the markings to the file names of the still image or the movie.
• <OFF> : The mark is not attached.
• <ON> : The mark is attached.
You can select the marking to be added when recording the image. The markings can
be selected from "None, _A, _B, _C and _D".
<RECORD MODE>
<STILL AUDIO>
Switches whether to record the sound when recording the image.
The sound recoding can be selected from <ON> or <OFF>. If <ON> is selected, the sound
recording confirmation dialog appears when recording the still image.
<MEDIA>
Selects the drive for recording and playing back.
The SDHC card or the USB flash drive can be selected.
<MEDIA FORMAT>
Formats the media (SDHC card or USB flash drive) currently selected.
<SYSTEM SETUP>
<DISPLAY>
Selects whether to show or hide the information on the screen.
<AUDIO VOLUME>
Specifies the sound volume.
The sound volume can be selected from <OFF>, <LOW>, <MEDIUM> and <HIGH> (4levels).
<BEEP>
Sets the output of the operation sound (beep sound).
<VIDEO IN>
Specifies the image input mode for next startup.
The input mode can be selected from <OFF>, <NTSC> or <PAL>.
<DATE TIME>
Specifies date and time.
<LANGUAGE>
Specifies the display language.
English and other languages are supported. The default is [ENGLISH].
Using the live screen/freeze screens