Do you have a question about the Onbon OVP-L1X and is the answer not in the manual?
Important safety instructions regarding voltage, power, environment, and handling of electronic products.
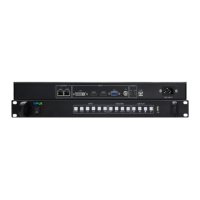
Description of the OVP-L1X video controller for LED screens, its applications, and integrated features.
Key features include pixel-pixel I/O, Gigabit ports, seamless switching, multiple input interfaces, and USB support.
Details the front panel interface, including power, input, function, USB PLAY, and USB ports.
Configuring LED screen parameters, including width and height, via PC software for optimal display.
Software automatically distributes output parameters based on receiver connection for network ports.
Manually set output parameters for each Ethernet port based on LED screen and receiver card connections.
Details supported input signal sources: HDMI1, HDMI2, DVI, VGA, CV, and USB, with their capabilities.
Configure backup input signal sources for redundancy, selecting from available inputs.
Set receiver card connection parameters like column and row count for proper display mapping.
Adjust receiving card width and height to match the connected LED screen, then load settings.
Set the display status for images, with 'open' being the default for active display.
Adjust image width, height, horizontal start, and vertical start for each displayed image.
Adjust image quality parameters including brightness, sharpness, contrast, saturation, and dynamic contrast.
Modify color temperature using preset styles (warm, cold, natural, custom) or by adjusting RGB values.
Control audio effects, enable/disable audio, and adjust volume, bass, and treble.
Save current settings (layout, source, crop, effect) into one of eight user-defined modes.
Load previously saved parameters from a user mode to restore settings.
Delete all saved parameters associated with a specific user mode.
Switch the active image mode to a selected user-defined mode.
Edit EDID for HDMI/DVI sources or adjust VGA parameters for optimal signal compatibility.
Configure width, height, and frequency for HDMI and DVI input signals.
Adjust VGA parameters and perform calibration for VGA ADC and CV ADC.
Use automatic adjustment for VGA display or manually set horizontal/vertical start for fine-tuning.
Perform ADC calibration and VGA-DDC writing for accurate signal processing.
Adjust VGA ADC or DV ADC to correct screen darkness or signal issues.
Set the output status to 'open' for display or 'close' to hide the output.
Reset the device to factory default settings to resolve issues or start fresh.
Troubleshoot no light or flashing signal buttons by checking power supply and input signal connections.
Resolve no picture output with signal light on by checking display support and brightness/contrast settings.
Ensure full LED display by matching LED screen width/height parameters with software settings.
Fix VGA input image positioning and black frame issues using PC software adjustments.
| Brand | Onbon |
|---|---|
| Model | OVP-L1X |
| Category | Controller |
| Language | English |